Spettroeliografia
Spectroheliography
Fulvio Mete- Roma
siti web :
http://www.lightfrominfinity.org
Appassionato di astronomia
dall’età di otto anni,Fulvio Mete ha dedicato buona parte della sua vita a
questa sua passione, integrando le conoscenze di astronomia con quelle di
fisica, informatica, meccanica.Da
quasi vent’ anni si occupa di spettroscopia astronomica, ha diretto il Settore
di Ricerca UAI di Spettroscopia, ha svolto e svolge numerose iniziative di
ricerca, quali spettroscopia di nove e supernove, ,spettroeliografia,
magnetografia solare, imaging in IR vicino.Ha, altresì, organizzato numerosi
eventi di livello nazionale in tale settore, quali i Seminari di Spettroscopia
di Asiago e di Arcetri, e molti altri di minore livello.Ha pubblicato articoli
su riviste commerciali di divulgazione astronomica (Coelum, Nuovo Orione,
Astronomia UAI), nonché articoli in inglese e francese su testi stranieri.Ha
partecipato con proprie relazioni a numerosi Convegni e Congressi di
astronomia.Ha costruito e costruisce da autodidatta strumenti per la
osservazione e ripresa spettroscopica del sole e degli oggetti del cielo
profondo, alcuni dei quali hanno carattere di unicità a livello nazionale.
Dopo alcuni anni di sperimentazione e lavoro nella branca della spettroscopia ad alta risoluzione del sole, ho ritenuto opportuno raggruppare le mie esperienze, attualmente sparse in alcuni articoli sui miei siti web, in un testo organico di 209 pagine che faccia il punto su una materia attualmente sconosciuta alla maggior parte degli amatori, anche a coloro che si interessano di osservazioni solari: la spettroeliografia digitale.
Ho intitolato il libro "Spettroeliografia digitale,una finestra sul sole" non a caso, ma con la precisa intenzione di far comprendere come questa branca dell'astronomia ci dia la possibilità di osservare il sole, la stella a noi più vicina, nelle le sue caratteristiche più nascoste ed in modo veramente completo ed esaustivo.
Questo è il mio secondo libro di spettroscopia, forse meno impegnativo del precedente, anche per il numero delle pagine, 209 contro le 377 del primo.Insieme i due testi costituiscono una trattazione di ben 586 pagine,un punto di riferimento per tutti gli astrofili determinati ad interessarsi con successo della spettroscopia astronomica amatoriale.
Questo mio secondo libro come il primo, ma ancora più di questo, costituisce un evento significativo nella storia dell'astronomia amatoriale italiana,in quanto è il primo del genere a trattare in modo divulgativo ed accessibile a tutti una materia di per sè difficile e complessa anche per i professionisti del settore.
Come per il precedente testo, ho predisposto e resa disponibile anche la copertina del libro, per coloro che volessero od avessero la possibilità di stamparlo in proprio.Questo nuovo lavoro, a differenza del primo, è stato anche completamente tradotto in lingua inglese per incrementarne l'accessibilità.
Digital spectroheliography: The Book in english
After
several years of experimentation and work in the branch of high-resolution
spectroscopy of the sun, I thought it appropriate to group my experiences,
currently dispersed in some articles on my websites, in a 207-page organic text
that illustrates in a simple and understable way a subject currently unknown to
most amateurs, even to those who are interested in solar observations: digital
spectroheliography.
I titled the book "Digital spectroheliography, a window on the sun" not by
chance, but with the precise intention to make understand how this branch of
astronomy gives us the opportunity to observe the sun, the star closest to us,
in its more hidden features and in a truly complete and exhaustive way.
The instrumentation, which I designed and built for this type of observations is
still within the reach of anyone who has the will and tenacity to overcome the
small obstacles that stand in the construction of spectroeliographs, to be
eventually rewarded with the satisfaction of owning and using instruments
of an almost professional level at a very low cost.In the book are in fact
reported all the data, theoretical and technical, for the self-construction of
digital spectroeliographs similar to the five I made and that currently use
successfully.This is my second book of spectroscopy, perhaps less demanding than
the previous one, also for the number of pages, 207 against 377 of the first.
Together the two texts are a treatise of 584 pages, a point of reference for all
amateur astronomers determined to take an interest in amateur astronomy
spectroscopy.
The english version of the book is free and can be downloaded at the link below in PDF format.It can also be printed for personal use with the front and back cover of above JPG image.
http://www.lightfrominfinity.org/Libro di spettroeliografia digitale/Libro Spettroeliografia.htm
Those who want to have only a brief overview of this branch of solar physics, can read the content of this page
La spettroelioscopia
La
spettroelioscopia può essere definita come la capacità di osservazione (e
ripresa fotografica, come spettroeliografia) del disco
solare e delle sue caratteristiche nelle varie lunghezze d’onda degli elementi
del suo spettro .
Lo
spettro della luce solare appare ricco di righe di assorbimento anche con un
modesto spettroscopio: alcune di esse sono effettivamente causate dal sole,
mentre altre appartengono all'atmosfera terrestre: (alcune righe deboli
appartengono infatti sia al vapore acqueo (H2O) e cambiano di intensità a
seconda del grado di umidità, che all'Ossigeno diatomico (O2) , queste ultime
concentrate in gran parte nel rosso profondo ai confini dell'IR).Lo spettro
solare vero e proprio costituisce tuttavia un laboratorio unico per gli
appassionati di fisica e, perchè no, anche per gli appassionati di spettroscopia
astronomica.Le righe della serie di Balmer dell'Idrogeno,quelle del del Calcio, del
Magnesio, del Sodio, sono evidenti ed appaiono, a media risoluzione, come nell'immagine
sottostante (strumento TSA):

La storia
Lo spettroelioscopio fu
sviluppato da George Ellery Hale nel 1924,per la ripresa fotografica
del sole in varie lunghezze d'onda.Hale nacque a Chicago, USA, nel 1868,
iniziò il suo percorso educativo già diciassettenne al M.I.T, e poi
all’Osservatorio del College di Harvard. Nel 1890 divenne direttore del
Kenwood Astrophisycal Observatory.Lavorò ai più importanti Osservatori
dell’epoca, quali quelli di Yerkes e di Mount Wilson.
Lo spettroeliografo fu, ad
onor del vero, inventato indipendentemente da Hale e dal francese Henri
Alexandre Deslandres, ma ad Hale va il merito di aver perfezionato l’invenzione
sino a creare un potentissimo mezzo d’indagine della fisica solare.
Il lavoro di Hale sugli
spettroelioscopi datava sin dal 1889, epoca nella quale elaborò le sue prime
idee sull’argomento, poi completate nell’articolo “The spectrohelioscope and its
work” pubblicato sull’Astrophysical
Journal del Dicembre 1929.Non molti lo sanno, ma Hale fu anche in Italia, a
Firenze, dove discusse di astrofisica solare con Abetti e Tacchini, ed a
Catania, dove andò sull’Etna allo scopo di riprendere, col suo spettroelioscopio
la corona solare senza eclisse:lo strumento fu applicato al telescopio
dell’osservatorio di Bellini sulla sommità dell’Etna e la lunghezza d’onda
prescelta fu quella del CaII K nell’UV vicino, per ridurre il glare
dell’atmosfera, tuttavia l’esperimento non ebbe successo.Egli fu uno degli
ideatori della torre solare di 60
piedi dell’osservatorio di Mount Wilson nel 1908, che fu poi un modello per
quelle analoghe in tutto il mondo. Si interessò dell’attività magnetica del sole
ed in particolare di quella delle macchie solari e dell’effetto Zeeman.Scoprì
l’inversione della polarità dei campi magnetici delle macchie al cambio del ciclo.Hale morì nel 1938 dopo una vita di intensa attività scientifica.
The work of Hale on spettrohelioscopes dated since 1889, a period in which
elaborated its initial ideas on the subject, then completed in the article "The
spectrohelioscope and its work" published in the Astrophysical Journal in
December 1929.Not many people know this, but Hale was also in Italy, in Florence,
where he discussed with solar astrophysics Abetti and Tacchini, and in Catania,
where he went on Etna in order to resume, with his spectrohelioscope the solar
corona without eclipses: the instrument was applied to the telescope of '
Bellini observatory on the summit of Etna and the chosen wavelenght was
that of the CaII K near UV, to reduce the glare of the atmosphere, but the
experiment was unsuccessful.He was one of the creators of the
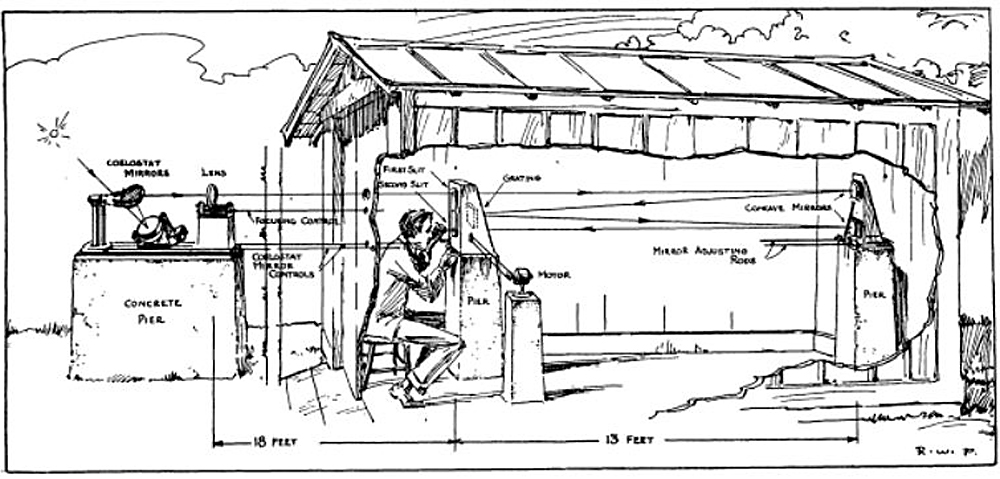
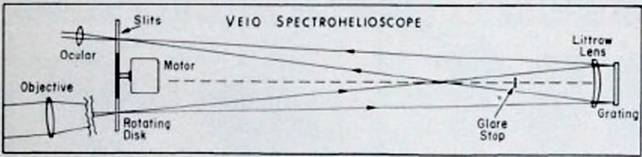
Layout dello
spettroelioscopio di Hale
Ma com’è uno
spettroelioscopio classico amatoriale?
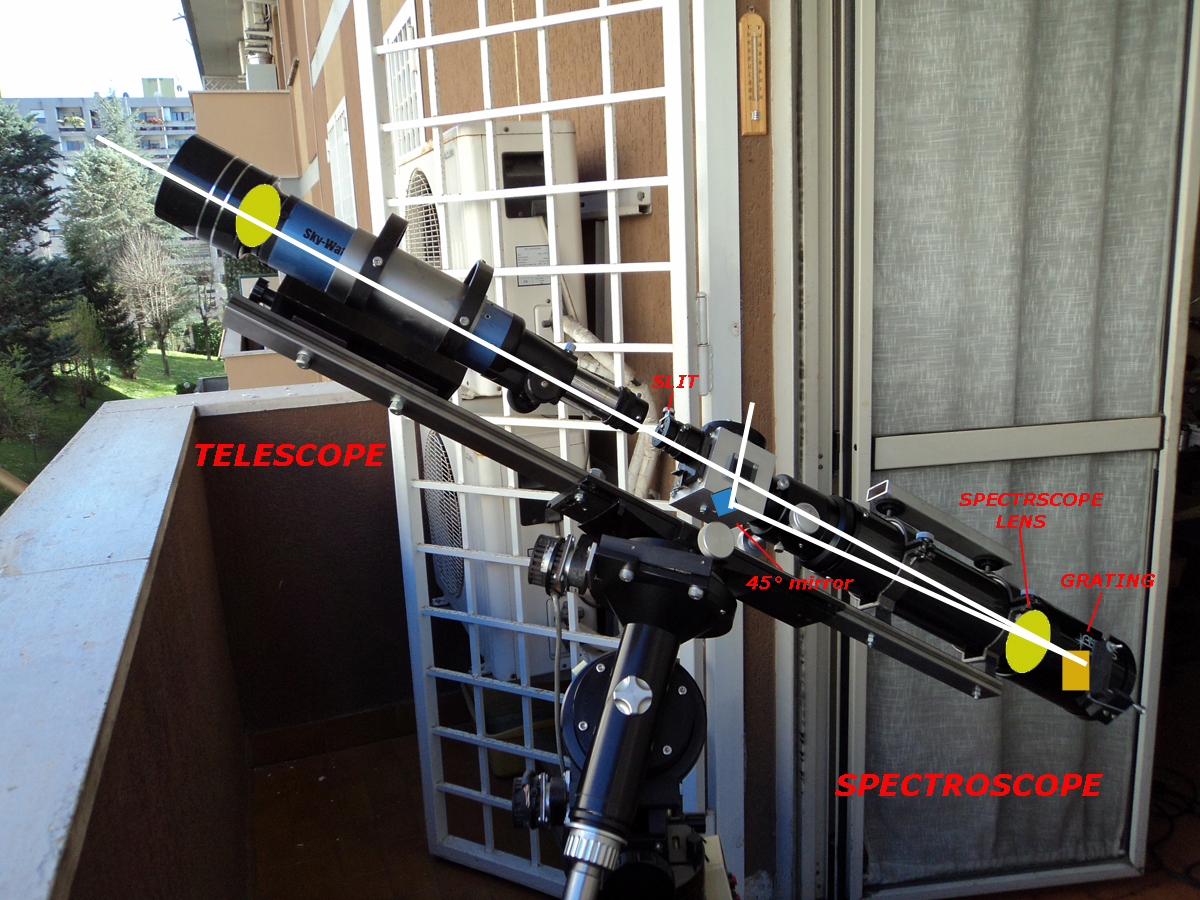
Si tratta in pratica di
uno spettroscopio, alimentato da un telescopio che invia un'immagine del disco
solare di adeguate dimensioni sulla fenditura di ingresso del medesimo, e poi,
tramite un sistema di specchi piani, all'obiettivo dello spettroscopio, dietro
di cui si trova il reticolo: la luce
solare diffratta selezionata nella riga di interesse viene poi reinviata ad una seconda
fenditura , detta di uscita.Immediatamente prima e dopo le due fenditure, sono
posti due sintetizzatori d'immagine, (in genere prismi rotanti detti di
Anderson) comandati da un sistema motorizzato, il primo alimenta la
fenditura di ingresso, ed il secondo forma l'immagine in uscita.La
rotazione dei prismi ad una data velocità (ca 15 rotazioni/sec) consente, per effetto moviola, di
formare un'immagine del disco solare nella lunghezza d'onda corrispondente alla
riga esaminata ,che viene osservata all'oculare o ripresa con una fotocamera o
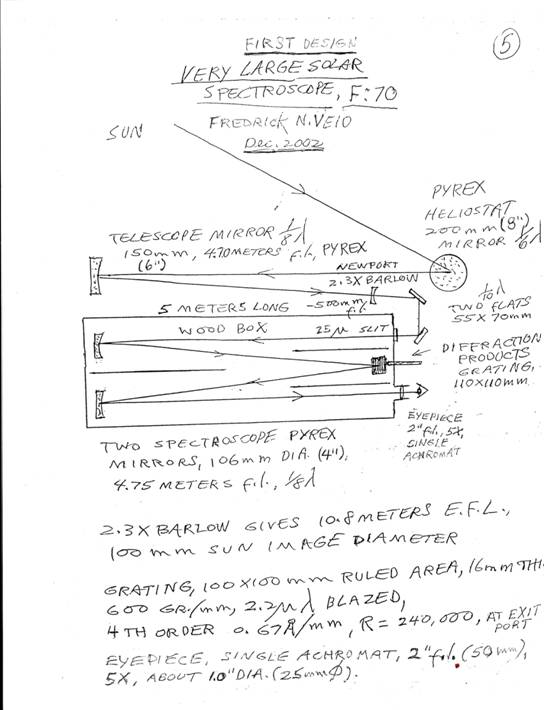
camera CCD.Qui di seguito è riportato uno schema di
spettroelioscopio amatoriale del noto autocostruttore americano Frederick Veio
(da: spectrohelioscope.org).
Si tratta tuttavia di strumenti che, seppur eccellenti, sono molto complessi da autocostruire specie per la loro parte elettronica e meccanica , in primo luogo i sintetizzatori, dei quali esistono vari tipi, e per le loro dimensioni, dato che è necessario utilizzare focali elevate per ottenere un'immagine spettrale sulla fenditura di ingresso di adeguate dimensioni e quindi un'immagine solare finale di adeguata risoluzione.Si contano infatti sulla punta delle dita, in tutto il pianeta, gli amatori che sono stati capaci di realizzare un progetto del genere.
It
is in practice a spectroscope, powered by a telescope which sends an image of
the solar disk of appropriate size on the entrance slit of the same, and then,
via a system of plane mirrors,to the objective of the spectroscope, behind which
is the grating: the solar light diffracted in the selected line of interest is
then sent back to a second slit, said of exit.Immediately before and after the
two slits, are placed two image synthesizers, (typically rotating prisms said
of Anderson) controlled by a motor-driven system, the first feeds the inlet slit,
and the second form the image in exit.The rotation at a given speed of the
prisms (ca 15 rotations / sec) enables, for slow motion effect, to form an image
the solar disk in the wavelength corresponding to the scanned line, which is
observed at the eyepiece or imaged with a camera or CCD.In the image below is a
diagram of amateur spectrohelioscope built by the well-known american
amateur astronomer Frederick Veio (by: spectrohelioscope.org).
It is, however, of instruments which, although excellent, are very complex to be
self made species for their electronic and mechanical part, in the first place
synthesizers, of which there are various types, and for their size, since it is
necessary to use high focal for obtaining spectral image on the entrance slit of
adequate size and therefore an image of appropriate final solar resolution.You
can count on your fingers, all over the planet, amateurs who have been
able to realize such a project.
.
.
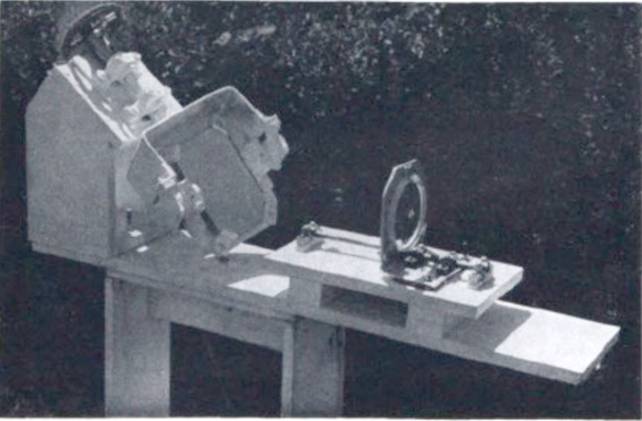
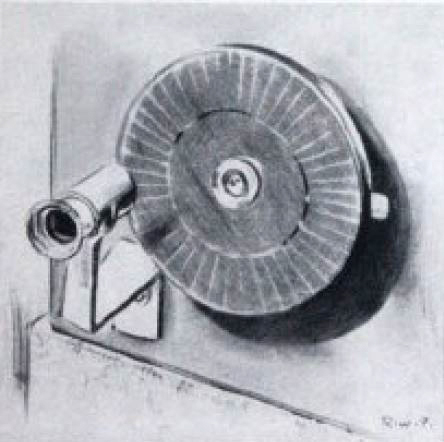
Spettroelioscopio
classico autocostruito da Leonard Higgins in California (USA).Notare le cospicue
dimensioni dello strumento, che è alimentato da un celostata.(Fonte: F: Veio-
Spectrohelioscope .org)
Fredrick Veio: un precursore della spettroelioscopia tradizionale
All’alba del mio interesse per la spettroscopia e
la spettroeliografia fui attratto, e direi affascinato, dal poderoso lavoro
portato avanti da Fredrik Veio nel campo della spettroeliografia amatoriale.Veio
fu infatti il precusore di tale campo di ricerca tra gli amatori, con il suo
famoso articolo sul numero di gennaio 1969 di Sky and Telescope, nel quale
illustrava la costruzione ed il funzionamento di uno spettroelioscopio
tradizionale di grande semplicità e ridotte dimensioni (all’epoca il digitale
era al di là da venire) costruito nel 1964.Lo strumento si basava su due
elementi a rifrazione,una lente fissa da
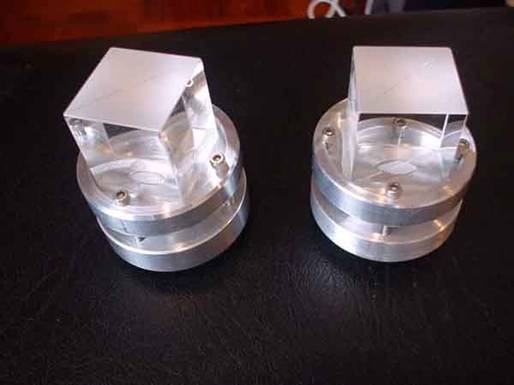
In uno spettroelioscopio tradizionale, come
quello di Hale, per intenderci, l’elemento fondamentale era costituito dalle
fenditure di entrata e di uscita ed ancor di più dai sintetizzatori di immagine
in entrata ed in uscita che, ruotando ad una data velocità in modo sincrono,
inviavano un’immagine solare scansionata alle fenditure e permettevano di
osservare o fotografare una certa parte del disco solare nella lunghezza d’onda
prescelta.I sintetizzatori più diffusi tra gli amatori erano quelli a prismi
rotanti (cd “prismi di Anderson”) che avevano tuttavia il difetto di essere
costosi e difficili da sincronizzare, mentre per il suo primo progetto Veio
scelse il sistema a dischi di vetro rotanti con fenditure radiali ideato da
F.Stanley .Tale primo progetto di spettroelioscopio con elementi a rifrazione è
anche quello mostrato a pag 4 del suo libro “The Spectrohelioscope” del 1999.
At the dawn of my interest in spectroscopy and spectrohelioscopy I
was attracted, and I would say fascinated, by the powerful work carried out by
Fredrik Veio in the field of amateur spectrohelioscopy. Veio was in fact the
precursor of this field of research among amateurs, with his famous article in
the January 1969 issue of Sky and Telescope, in which he illustrated the
construction and operation of a very simple and compact traditional
spectrohelioscope (at that time digital was beyond the reach) built in 1964. The
instrument was based on two refraction elements , a fixed
In a traditional spectroscope, like that of Hale, so to speak, the
fundamental element was constituted by the entry and exit slits and even more by
the incoming and outgoing image synthesizers which, rotating at a given speed
synchronously, they sent a scanned solar image to the slits and allowed to
observe or photograph a certain part of the solar disk in the chosen wavelength.
The most widespread synthesizers among amateurs were those with rotating prisms
(so-called "Anderson's prisms") which had however the defect of being expensive
and difficult to synchronize, while for his first project Veio choosed the
rotating glass disk system with radial slits designed by F. Stanley. This first
project with refraction elements is also the one shown on page 4 of his book
"The Spectrohelioscope" of 1999.
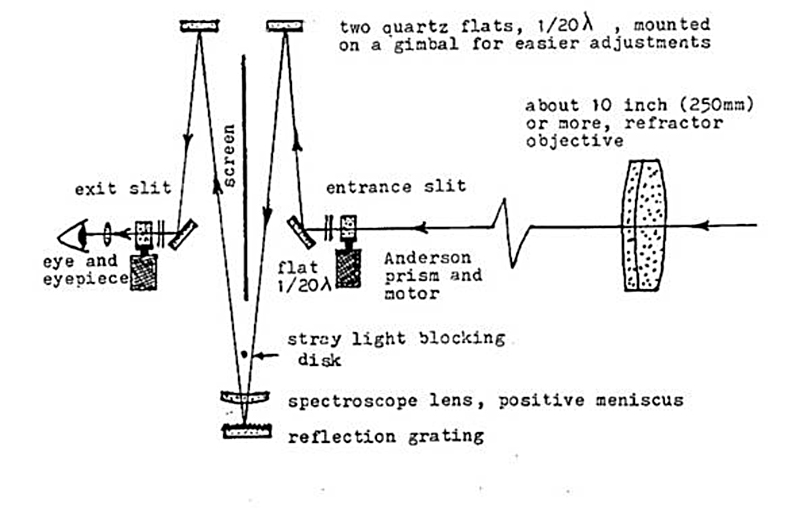
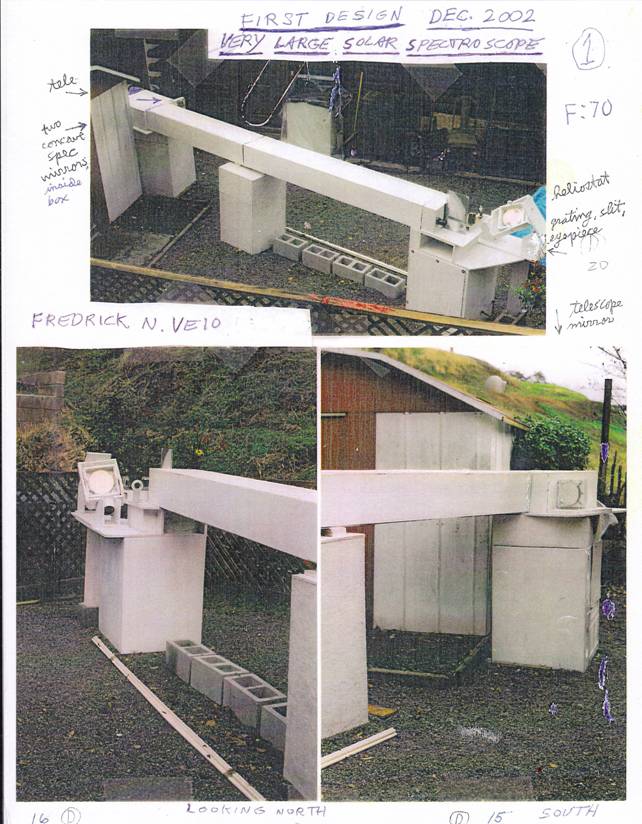
Il progetto di spettroelioscopio di Veio
illustrato nel numero di gennaio 1967 di Sky & Telescope
The Veio spectrohelioscope layout shown in the january , 1967 issue
if Sky & Telescope
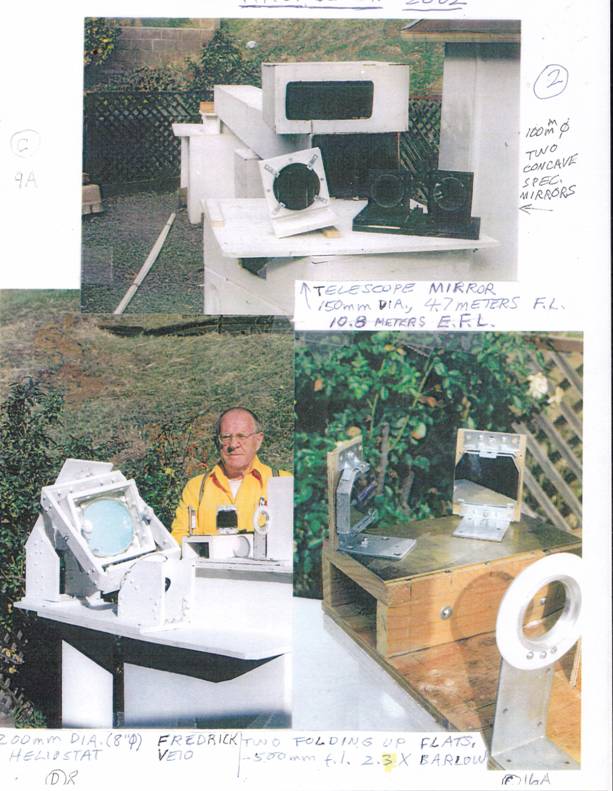
Il celostata che inviava la luce solare all’obiettivo del telescopio.
The heliostat that sent the sunlight to the lens of the telescope
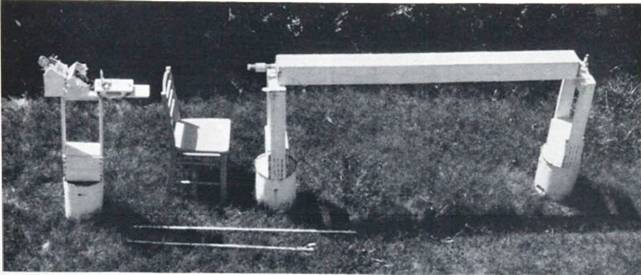
La vista complessiva dello strumento
The whole sight of the instrument
Il sistema di fenditure radiali rotanti su dischi di vetro
The rotating glass disk with radial slit unit
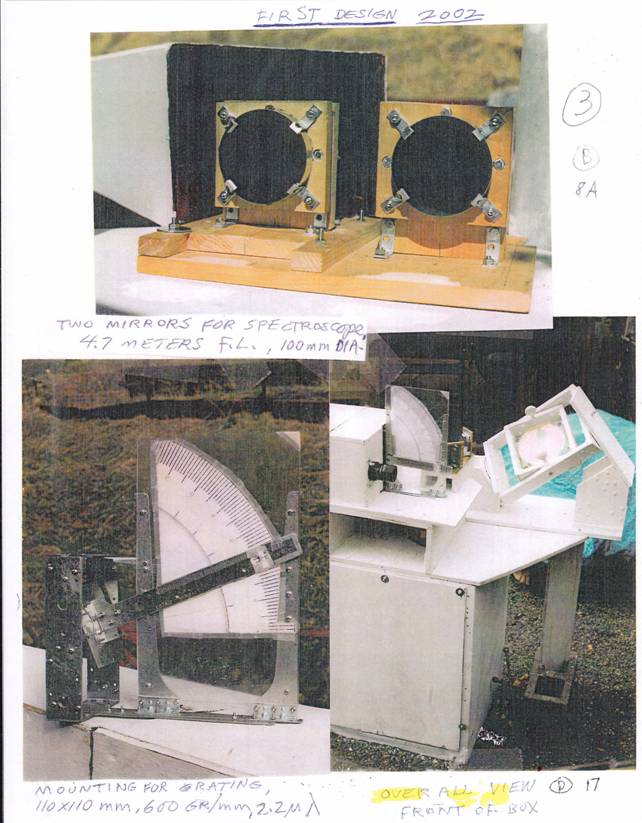
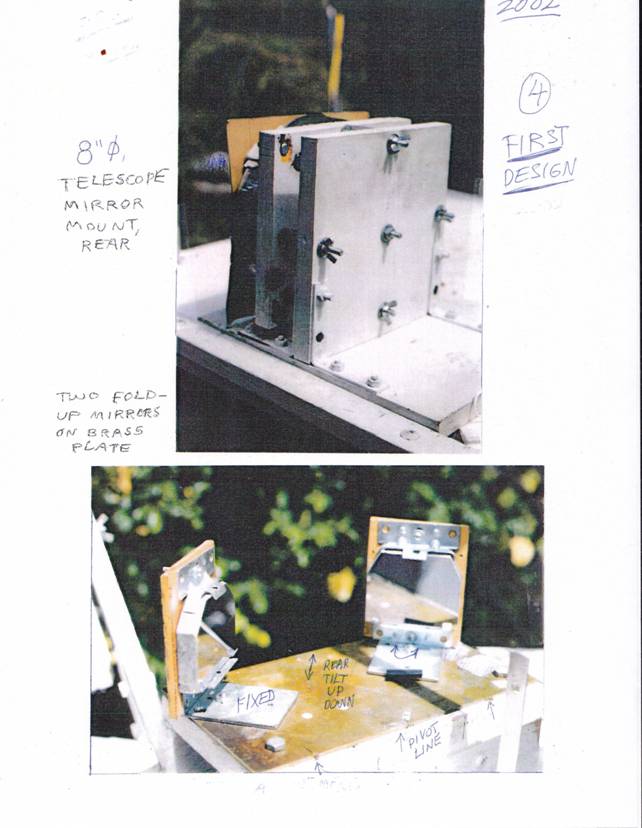
Un altro progetto di Veio fu successivamente, nel
2002, uno spettroscopio solare di grandi dimensioni, tutto specchi, in
configurazione Hale e quindi esente da cromatismo, con un reticolo di
dimensioni generose: ben
Another Veio project was later, in
Ma per
comprendere a fondo l’enorme lavoro di Veio nel campo della spettroelioscopia
amatoriale occorre leggere il suo libro “ The Spectrohelioscope”.
Il testo, di
119 pagine, costituisce un compendio minuzioso ed esaustivo della costruzione,
l’uso, ed i risultati ottenibili con uno spettroelioscopio amatoriale
tradizionale esso, redatto inizialmente nel 1972, è stato poi aggiornato sino
alla data della sua pubblicazione, nel 1999.
But to fully understand Veio's enormous work in the field of amateur
spectrohelioscopy you need to read his book "The Spectrohelioscope". The text,
of 119 pages, constitutes a meticulous and exhaustive compendium of the
construction, the use, and the results obtainable with a traditional amateur
spectroscope, initially drafted in 1972, was then updated until the date of its
publication, in 1999.
Il testo in
PDF è scaricabile, per gentile concessione dell’autore, qui:
The PDF text is downloadable, courtesy of the author, here:
La Rivoluzione della
Spettroeliografia Digitale
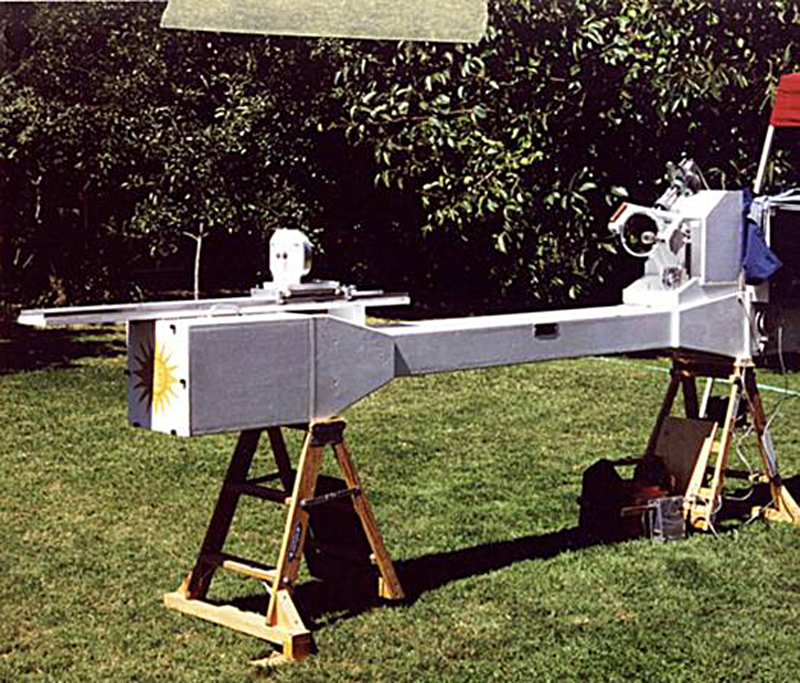
Indubbiamente la resa
finale delle immagini degli spettroeliografi digitali è qualitativamente
inferiore a quella degli spettroeliografi tradizionali, ma i particolari
visibili sono quasi gli stessi, mentre il guadagno in dimensioni e peso e quindi
capacità di utilizzo e portabilità è semplicemente enorme.Basta del resto fare
il confronto tra alcune immagini di spettroelioscopi professionali e
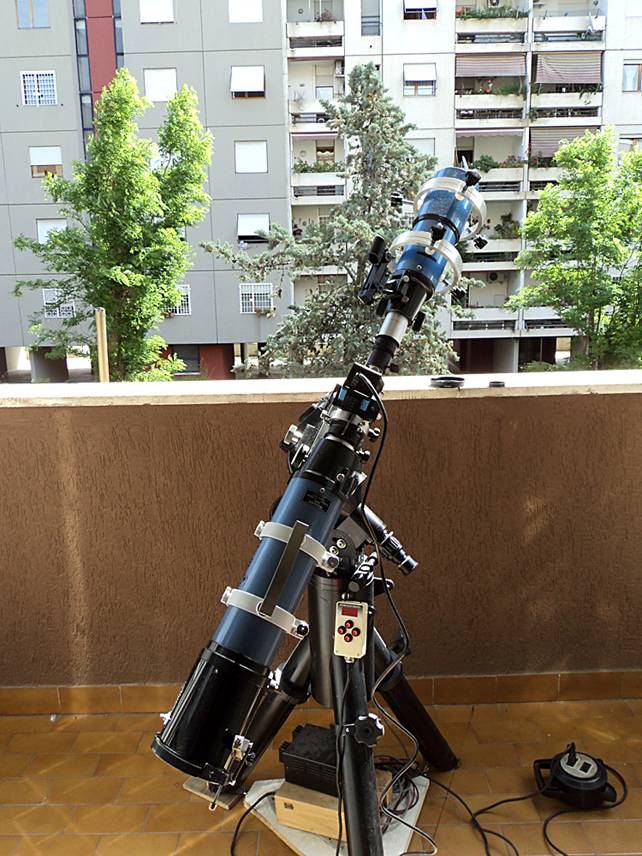
quelle di VHIRSS , qui di
seguito fotografato, di 8.6 Kg di peso e 110 cm di lunghezza, trasportabile
ovunque con la massima facilità.La digitalizzazione delle immagini
spettroelioscopiche ha sostituito l’uso dei sintetizzatori, la cui costruzione e
messa a punto è particolarmente complessa, con semplici programmi informatici.
Lo sviluppo
dell’informatica degli ultimi anni ha permesso di sostituire, negli
spettroelioscopi amatoriali,apposite procedure informatiche al compito svolto
dai sintetizzatori: è nata così la
spettroeliografia digitale e tale campo di
applicazione è alla portata degli amatori.
Undoubtedly, the final image rendering of digital spectroheliographs is
qualitatively inferior to the traditional ones, but the visible details are
almost the same, while the gain in size and weight and therefore the ability to
use and portability is simply enormous.The comparison between some of
professional spectrohelioscopic images and those of VHIRSS, here
photographed below, of 8.6 kg in weight and 110 cm in length, anywhere
transportable with the maximum ease, is quite impressive.The digitization of
spectrohelioscopic images has replaced the use of synthesizers, whose
construction and tuning is particularly complex, with simple computer programs.
In what follows, I will talk about my experiences in digital spectroheliography,
an experiment that I've been following now since seven years, with homemade
instruments extremely efficient, considering their dimensions. My present
purpose was indeed to get spectroheliographic images of the whole sun disc, as
higher magnification would mean a substantial change in the project, with the
telescope lenses and the focal spectroscope of high focal lenght (over 1500 mm),
which, besides preventing the portability of the instrument, would place serious
problems of location for those who does not possess terraces or gardens.
In a period of widespread use of filters for solar observation, Ha, Ca k etc,
might seem unnecessary the construction of such an instrument, whose quality
output, in terms of image rendering, can not compete with that of such
filters.There is however to consider a fundamental aspect: the involved filters
have a maximum spectral resolution of 0.3 A in the type H alpha, or about
1/3 the size of the line and cost thousands of euros, a
hires-spectrohelioscope as VHIRSS, using surplus components and second hand
optics, it does not cost more than € 6-700, and can theoretically provide images
of dozens, if not hundreds of lines, arriving at resolutions to 1/50 of A! This
does mean that allow us to observe more details of the filters, even if less
sharp.The smaller sharpness is essentially due to two factors: the closing of
the slit which causes diffraction phenomena, and the quality of the slit itself
which causes horizontal stripes in images due the so-called "trasversalium"
spectrum.
All spectroscopes Hires-spectroelioscopes I built adopt the
autocollimating or Littrow
One
Spettroscopi
Hires-spettroeliografi digitali autocostruiti
Alcuni Spettroscopi
Hires-Spettroeliografi
digitali autocostruiti da Fulvio Mete: si tratta di configurazioni
autocollimanti o Littrow,che garantiscono la massima compattezza in rapporto
alle prestazioni.Essi vengono continuamente aggiornati nelle ottiche e nei
sistemi meccanici per mantenere le prestazioni stesse a livelli elevati.
Realizzare uno
spettroelioscopio digitale è sicuramente molto meno complesso di uno
spettroelioscopio tradizionale, ma richiede comunque una buona dose di manualità
di capacità meccaniche e, principalmente, di esperienza nel campo.Chi
vuole provare le sue capacità è bene sappia che non contano solo la
preparazione teorica e l’attidudine manuale, ma anche e principalmente una certa
esperienza nella spettroscopia e le sue applicazioni pratiche.
Il layout e gli schemi
sono, in linea di principio piuttosto semplici, ma i problemi di allineamento
delle ottiche e degli spettri aumentano in modo più che proporzionale rispetto
alla focale delle lenti o degli specchi usati nel progetto.
Making a digital spectroheliograph is certainly much less complex than a
traditional spectrohelioscope, but still requires a good deal of manual ability
and mechanical skills,and primarily experience in the field.Who wants to try his
skills is good to know that not only count the theoretical preparation and
manual attidude, but also and mainly some experience in spectroscopy and its
practical applications.
The layout and scheme are in principle relatively simple, but the problems of
alignment of the optics and of the spectra increase in more than proportionally
with respect to the focal length of the lenses or mirrors used in the project.
Disegno in schema di
VHIRSS
Il
nuovo layout di POSS2
New layout of POSS2

Solarscan ,
uno spettroelioscopio
digitale completamente automatizzato e pilotato da un software apposito, frutto
della collaborazione con la ditta Avalon Instruments che segna l'evoluzione del
progetto VHIRSS.
Sintesi delle operazioni da effettuare in spettroelioscopia digitale
Passo ora alle operazioni
necessarie per una buona acquisizione di un'immagine solare con uno
spettroeliografo digitale, cui si è già accennato in precedenza, uno strumento
relativamente semplice del tipo di quelli illustrati in precedenza, nel
presupposto che sia collocato su di una montatura equatoriale motorizzata.
L’ora ed il periodo
dell’anno
Innanzitutto, è appena il
caso di dirlo, ha importanza la scelta delle ore in cui gli effetti negativi del
seeing, che si ripercuotono sulle immagini, sono meno avvertiti.Le ore
mattutine, se non vi sono esigenze di monitoraggio di un dato fenomeno in altre
ore, sono a mio avviso preferibili.
Ha ovviamente grande
importanza la stagione e l’altezza del sole sull’orizzonte; i migliori risultati
si hanno, sulla base della mia esperienza, in tarda primavera ed all’inizio
dell’autunno.
La localizzazione
La localizzazione dello
strumento è anch’essa importante: per chi può sceglierla, molto meglio un
giardino di un balcone od un terrazzino che diffondono il calore del sole nello
spazio soprastante.
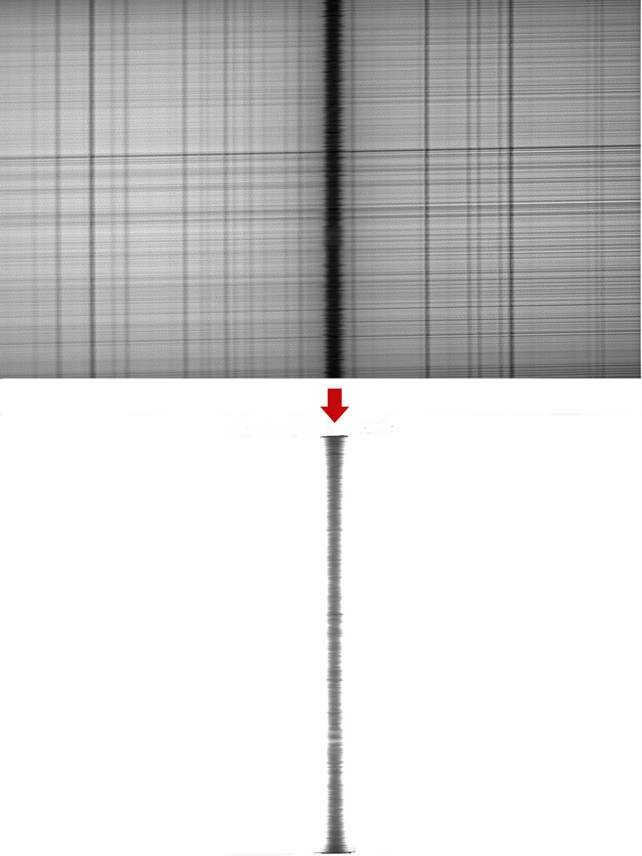
La messa a fuoco
La messa a fuoco è
un'operazione poi abbastanza critica, anche se , una volta effettuata, per una
data riga dello spettro, richiede piccoli aggiustamenti.Fondamentale è mettere a
fuoco il cannocchiale (o lo specchio) che invia l'immagine solare sulla
fenditura dello spettroscopio, operazione da fare per prima, sino a che il bordo
dello spettro (che poi sarà il bordo del disco solare nell'immagine) sia quanto
più inciso possibile, si eseguono quindi piccoli aggiustamenti della messa
a fuoco dello spettroscopio principale sino ad ottenere un'immagine della riga,
Ha, Hb o altre simile a quella dell'immagine precedente, con piccoli
frastagliamenti orizzontali, mentre il bordo dello spettro dovrà restare netto
.Se la risoluzione data dalla chiusura della fenditura è adeguata,a quel punto
si potranno notare particolari dell'atmosfera solare all'interno della
riga stessa.E' bene precisare che l'apertura della fenditura dovrà essere
regolata in modo da non pregiudicare la risoluzione dello strumento, permettendo
nel contempo l'acquisizione di un'immagine quanto più possibile priva da
fenomeni di diffrazione , come le strie orizzontali cui si è accennato (trasversalium),
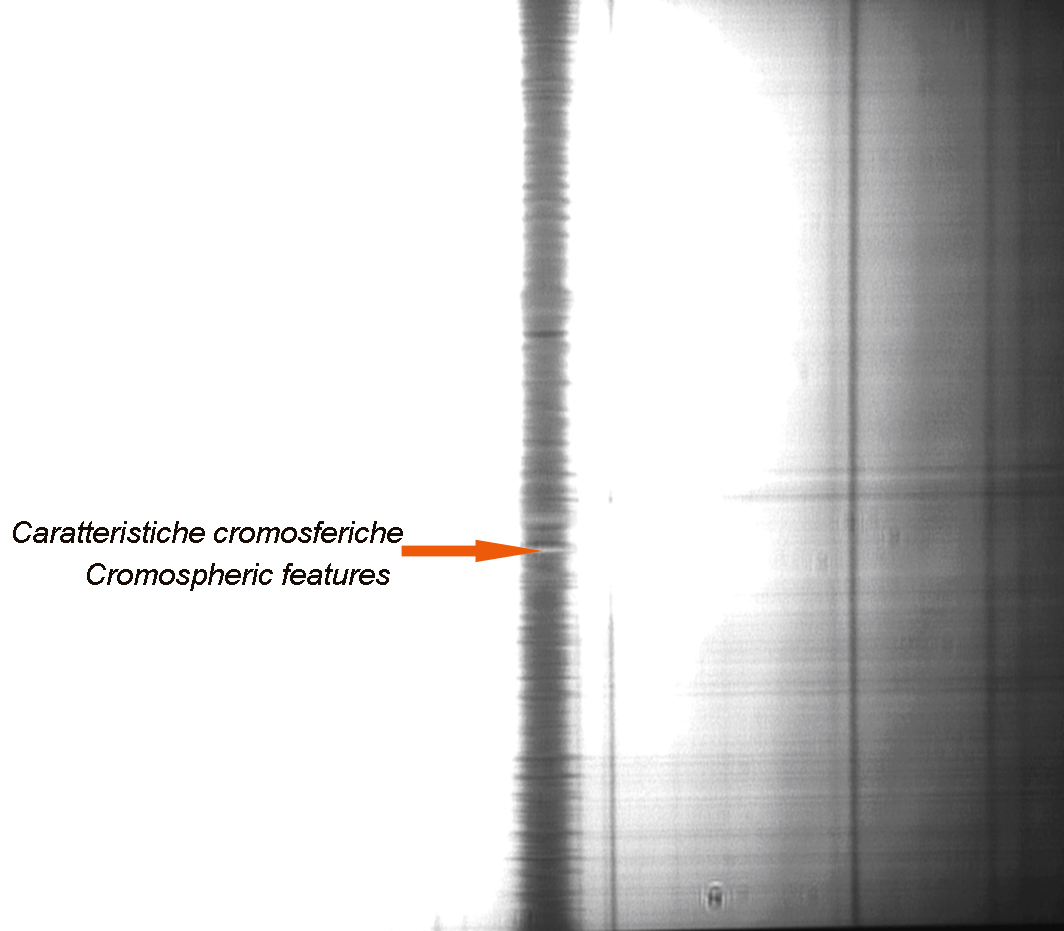
classiche delle fenditure non professionali molto chiuse.L'immagine della riga
sullo schermo del PC dovrà essere inoltre il meno scura possibile, ed il
contorno sovraesposto, come nell’immagine della riga Ha che segue.I
frastagliamenti orizzontali della riga sono in realtà le celle di
supergranulazione cromosferiche e le relative colonne di plasma in moto
ascendente e discendente.
Obviously it has great importance the season and the height of the sun on the
horizon; the best results you have, based on my experience, in late spring and
early autumn.
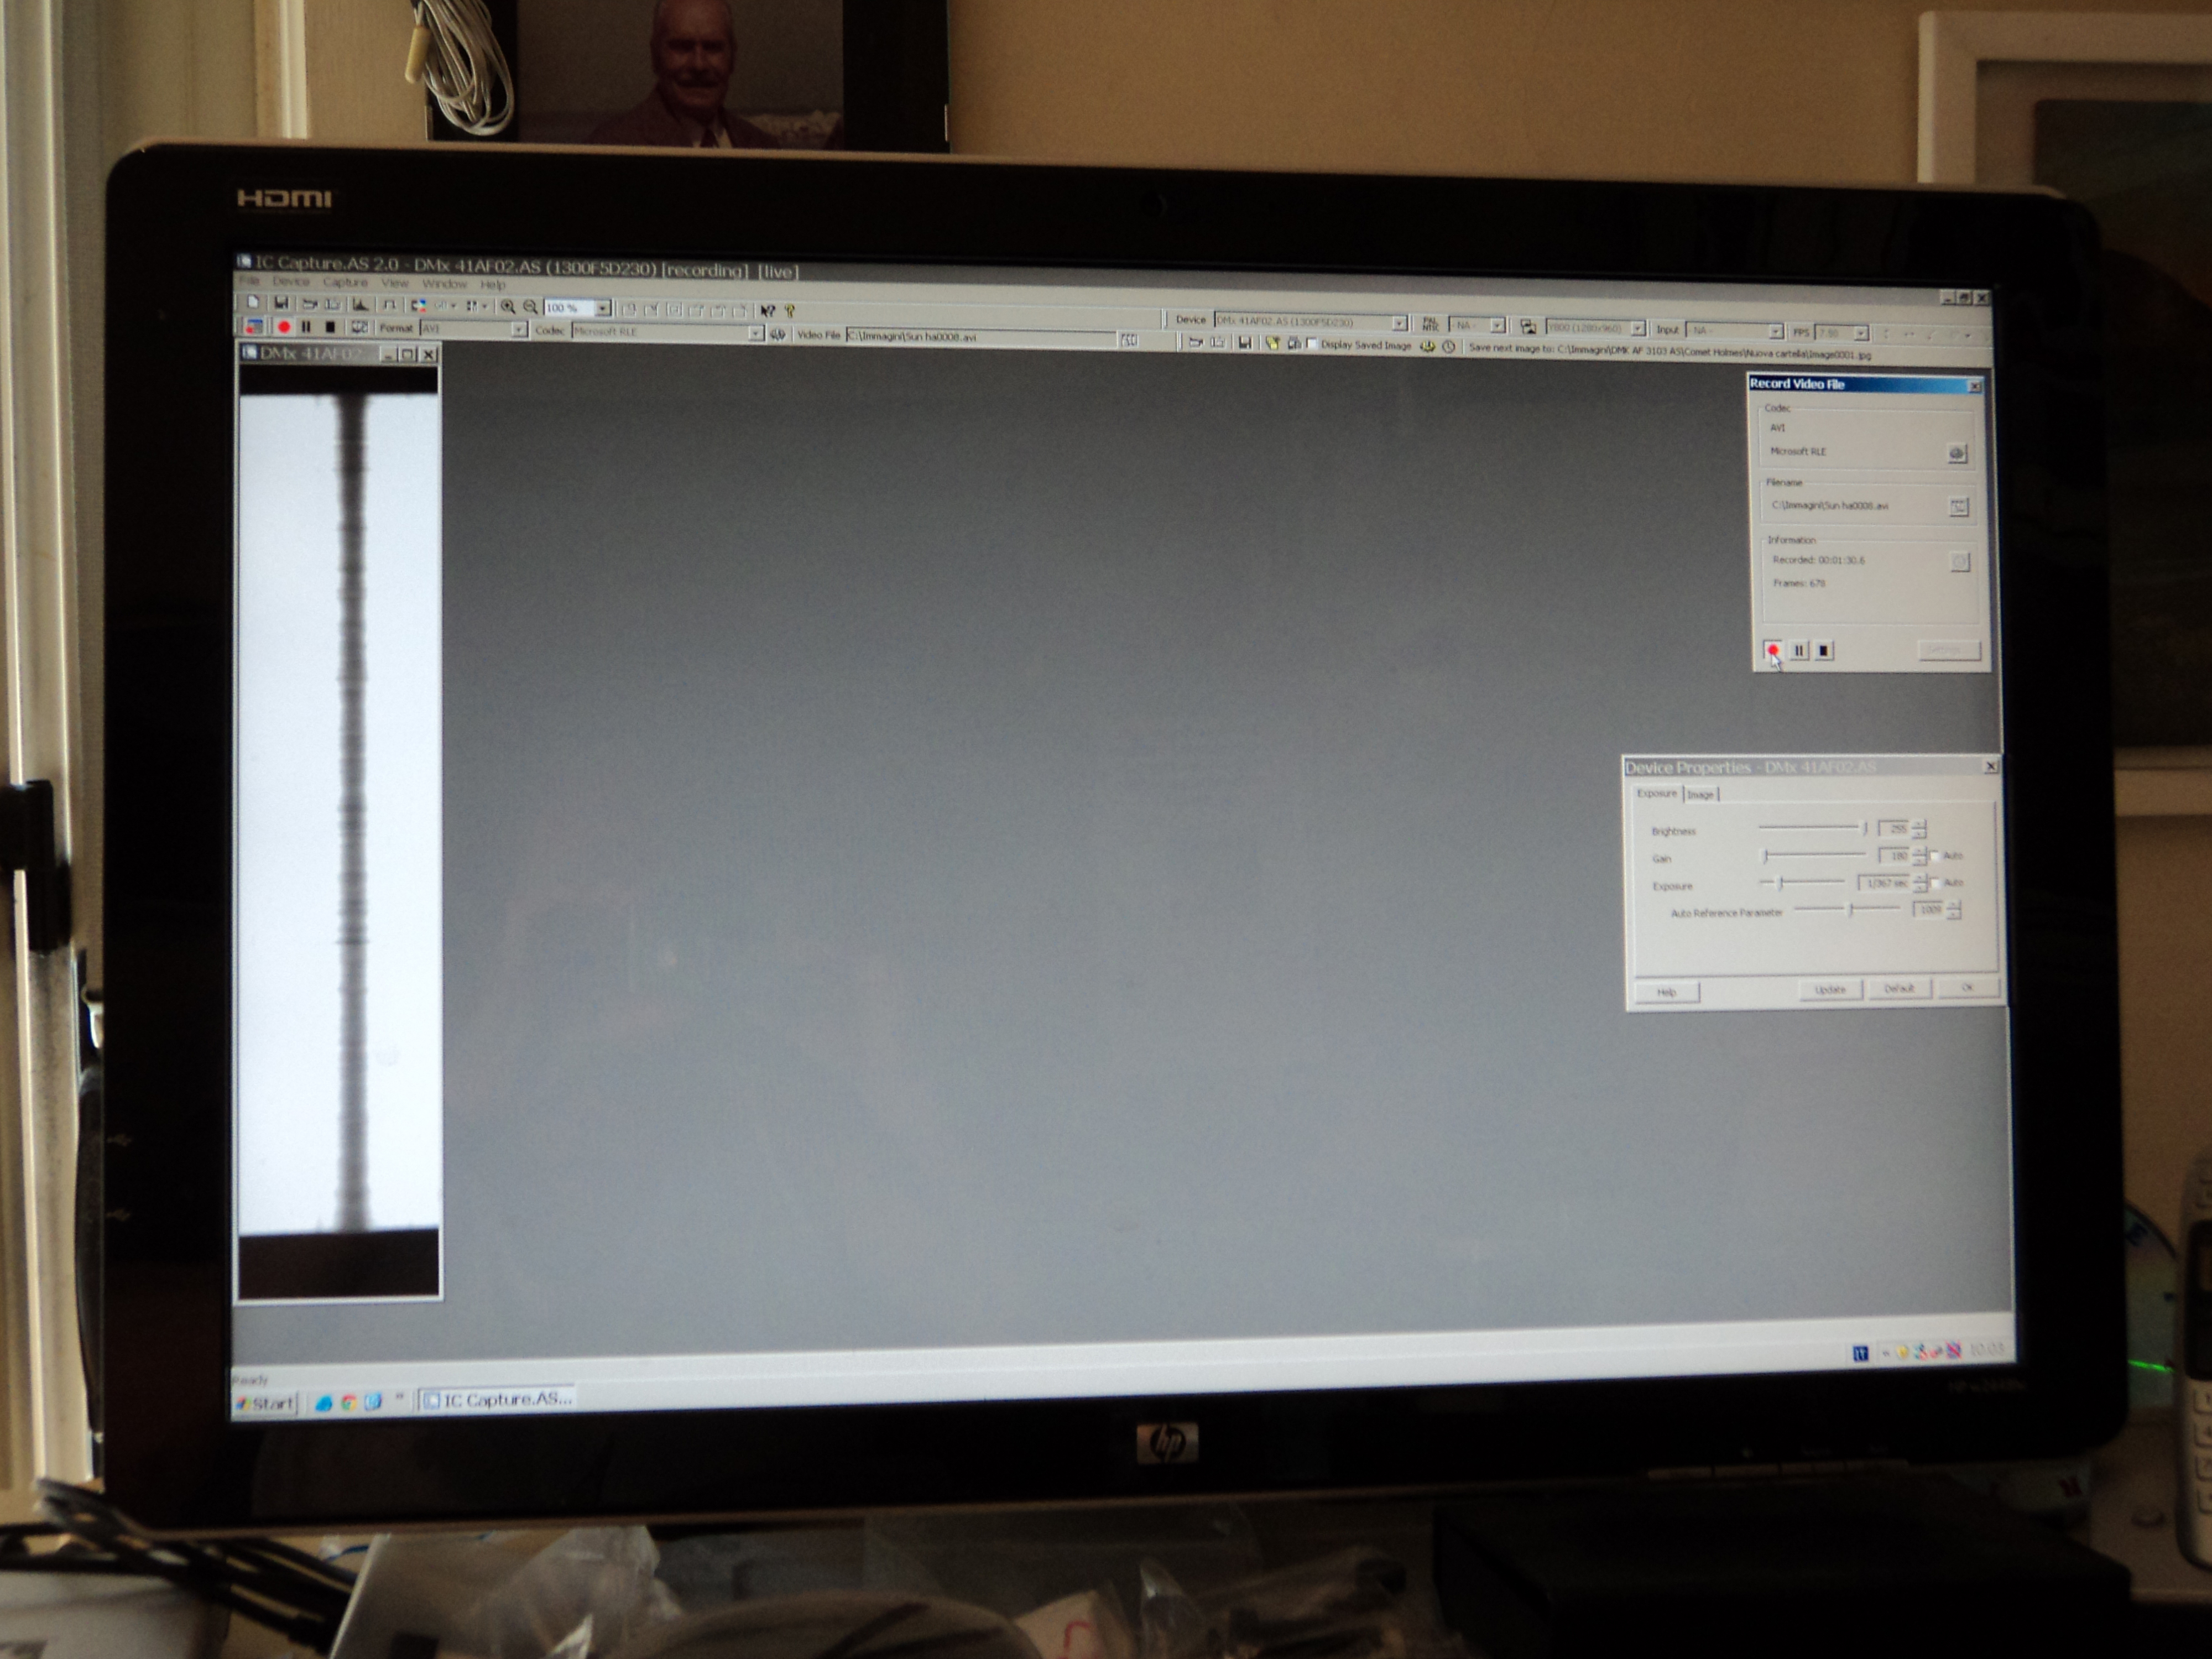
A quel punto poi, usando i
moti veloci della montatura, si porta il disco solare tangente al bordo
superiore della fenditura:l'immagine dello spettro scomparirà dallo
schermo del PC. Si lancia allora l’acquisizione di un filmato, ed immediatamente dopo si ferma il moto orario
della montatura equatoriale, lasciando scorrere il disco solare sulla fenditura,
da est verso ovest.
Scegliendo la colonna
centrale,si ritiene che l'immagine
ottenuta appartenga al centro riga, tuttavia talvolta ciò non si verifica ed il
centro riga risulta spostato verso il blu a causa di piccoli disallineamenti
nelle superfici ottiche, inevitabili quando si parla di strumenti assemblati in casa.Nel presupposto, comunque che sia nel centro riga, se ottengono altre, dei
pixel a destra e a sinistra, in modo di comprendere tutto il core della riga, e
di queste si fa lo poi stacking per avere un'immagine più completa e satura del
disco solare nell'elemento corrispondente alla riga stessa.
La procedura permette quindi la emulazione totale di uno spettroeliografo di tipo
convenzionale, consentendo di associare a ciascun pixel dell’immagine dello
spettro lungo l’asse X e quindi ad una data lunghezza d’onda di dimensioni molto
piccole (con VHIRSS ed una camera DMK con pixel da 4.65 micron,la dispersione è
mediamente pari a circa
E' bene precisare, infine,
che la qualità
complessiva delle immagini ottenute dipende in misura notevole, oltre che dalla
risoluzione della camera, anche dalla qualità dell'ottica che ha il compito di
inviare l'immagine del disco solare sulla fenditura, oltre che , ovviamente,
dall'ottica dello spettroscopio.Le immagini ottenute con VHIRSS sono
derivate dall'uso di un rifrattorino Skywatcher 70/500 del costo di 50-60 €, ciò
più per contenere il peso dello strumento che il costo dello stesso, sostituito
poi da un cannocchiale da 62 mm di surplus dalle eccellenti
prestazioni.Risultati senz'altro migliori, dal punto di vista dell'estetica
delle immagini, si avrebbero con l'uso di un rifrattore APO (per Solarscan è
stato usato un Takahashi FS 60), che tuttavia
farebbe crescere di molto sia il costo che il peso dello strumento.
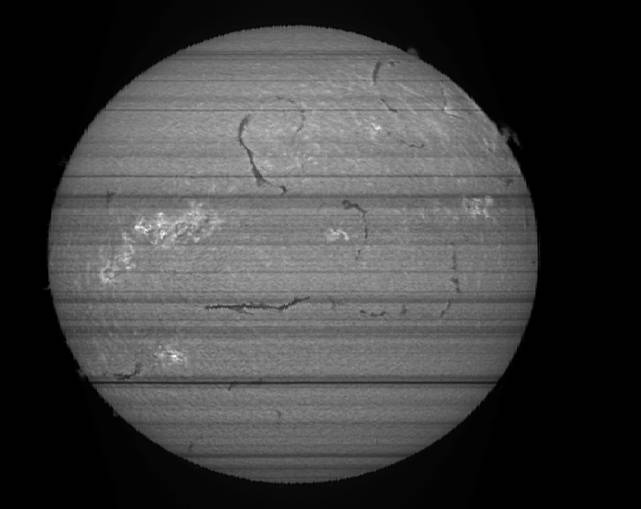
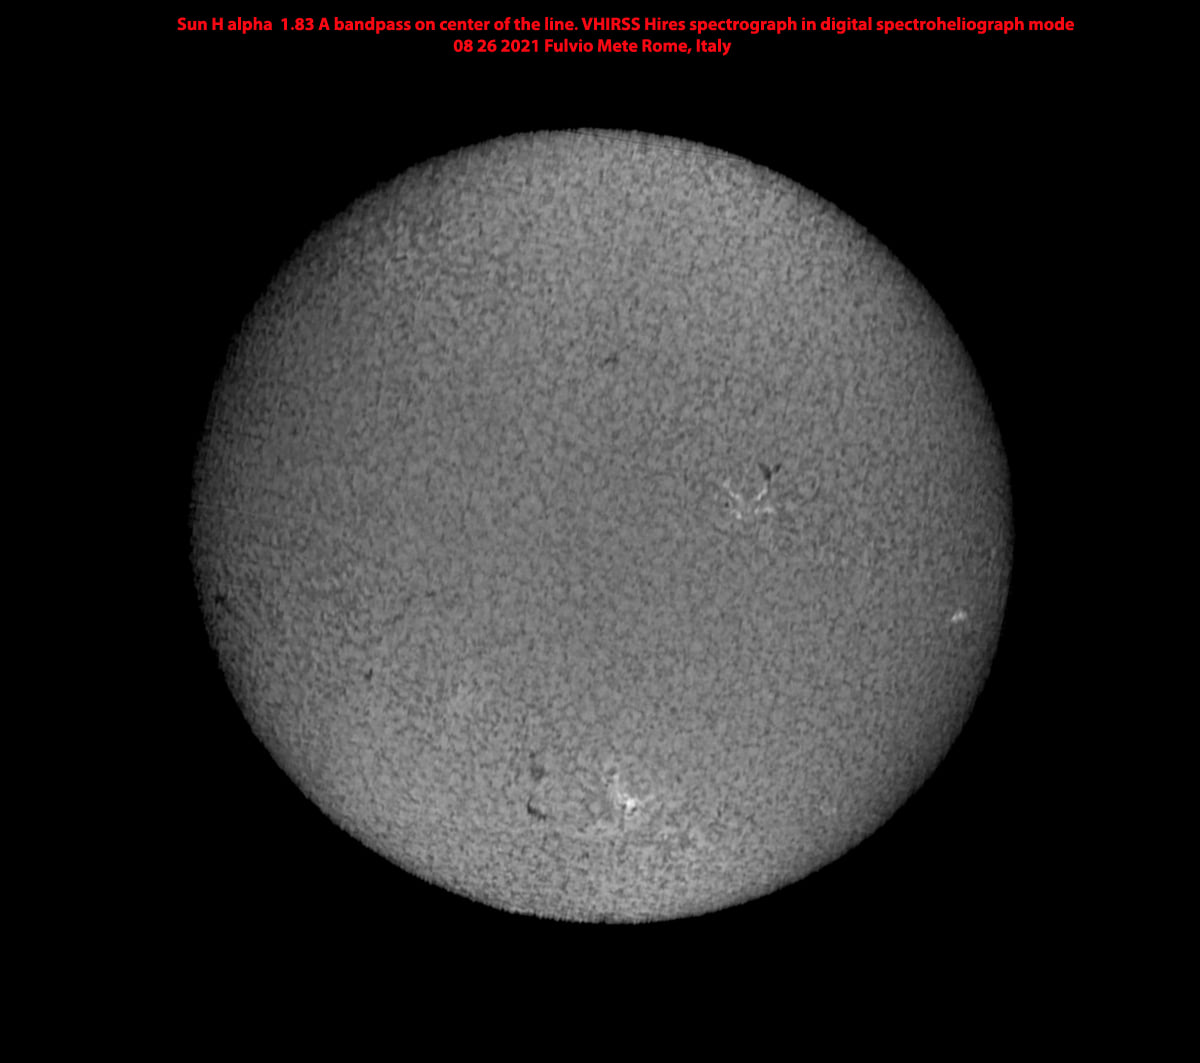
Un discorso a parte, ma di primaria importanza è la chiusura della fenditura, che , come si sa, influenza in modo decisivo la risoluzione dello spettro e quindi la qualità dell’immagine solare ottenuta.Se si chiude al minimo possibile la fenditura si ottengono immagini molto incise e particolari minuti, ma appaiono anche righe trasversali di notevole entità, molto difficili da eliminare via software.L’immagine H alpha che segue è la più evidente dimostrazione di tale situazione.Si tratta quindi di chiudere la fenditura al minimo compatibile con la qualità dello spettro, ovvero con la minimizzazione delle righe orizzontali, dovute alle imperfezioni della fenditura ed alla diffrazione.E’ una soluzione di compromesso, che tuttavia è indispensabile con fenditure commerciali a basso costo.Una soluzione più sofisticata, ma di difficile realizzazione, è quella della costruzione di fenditure capaci di chiudersi a 15-10 micron limitando al minimo il transversalium; ciò tuttavia implica che i bordi delle fenditure stesse siano lavorati almeno ad ½ della lunghezza d’onda della luce, cosa piuttosto difficile a fare in casa, egualmente difficile anche in un’officina non adeguatamente attrezzata.Del resto le fenditure fisse da 3 mm di lunghezza lavorate al laser non sono adatte in quanto di dimensioni inferiori al disco solare che si vuole riprendere e non regolabili.
Choosing the column in the middle, it is believed that the image obtained
belongs to the center line, but sometimes this does not happen and the center
line is shifted towards the blue due to small misalignments in the optical
surfaces, which are inevitable whith home made instruments : in assumption,
however, that it is in the center line, we can also get some other images from
the pixels on the left and on the right, in order to consider the whole of the
line core, that can be stacked in order to have a more complete picture of the
solar disc in the element corresponding to the line itself.
The procedure then allows the total emulation of a spectroheliograph of
conventional type, allowing to associate to each pixel of the spectrum
image along the X axis, and then to a given wavelength of very small dimensions
(with VHIRSS and a DMK camera with pixels of 4.65 microns, the average dispersion is about 0.029 A/pixel in violet, and 0.020 in deep red) the
corresponding solar image.While the number of pixels along the axis Y of the
image format is the native of the room used, the one along the axis x is given
by the choosen acquisition speed in relation to the scan duration. If, for
example, the native image size is 960 x 1280, the images you get will be 960 x (to
x fps) where to is the time in seconds required to perform scan of the solar
disk and fps is the number of frames per second of the video,so , if to = 160
sec and fps = 7.5, the format will be X-axis image 160 X 7.5 = 1200 pixels: then,
we'll get solar images of 960 X 1200 pixel.This latter consideration leads us to
reflect on the importance of the used camera, the field covered by it , its
resolution and its framerate.Such features are critical to the quality of the
obtained solar images with the system described just now . The latest versions
of Iris are now able to read the files of Lumenera and other cameras of improved
performance, including the DMK FireWire, which I then used to replace the webcam
previously used.Now, the best quality and recording efficiency of DMK 41 AS 1280
x 1024, recently joined by a DMK 51 1600 x 1200, allowed me a great improvement
in quality and, with VHIRSS,to get scan the entire solar disk.
It 'should be pointed out, finally, that the overall quality of the images
obtained is highly dependent on, in addition to the resolution of the camera,
also from the optical quality of the telescope which has the task of sending the
image of the solar disk on the slit, as well as, of course, the optics of the
spectroscope.The images obtained by VHIRSS are derived from the use of a
Skywatcher 70/500 refractor of the cost of 50-60 €, what more to contain
the weight of the instrument that the cost of the same, was replaced by a
surplus 62mm refractor with excellent perfomances.Best results, from
the point of view of aesthetics of the images, it would have with the use of an
APO refractor (for Solarscan I use a Takahashi FS 60) , that however would
increase both the cost and the weight of the instrument.
A separate, but of primary importance point is the closing of the slit, which,
as you know, influence decisively the spectral resolution and therefore the
quality of the solar image from the point of vue of the visible features.
Closing to the minimum possible the slit there are obtained very sharp
images and minute details, but also appear transverse lines of considerable
extent, very difficult to clear away by software.The following H alpha image
is the clearest demonstration of this situation.We must therefore close the slit
to the minimum compatible with the quality of the spectrum, and with the
minimization of horizontal lines, due to the imperfections of the slit and the
diffraction.It is a compromise solution, which however is indispensable with low
cost commercial slits .A more sophisticated solution, but difficult to realize,
it is that of the construction of slits capable of closing to 15-10 microns
limiting to the minimum the transversalium; However, this implies that the edges
of the slits themselves are worked to at least ½ of the wavelength of light,
which is rather difficult to do at home, equally difficult even in a good
workshop.
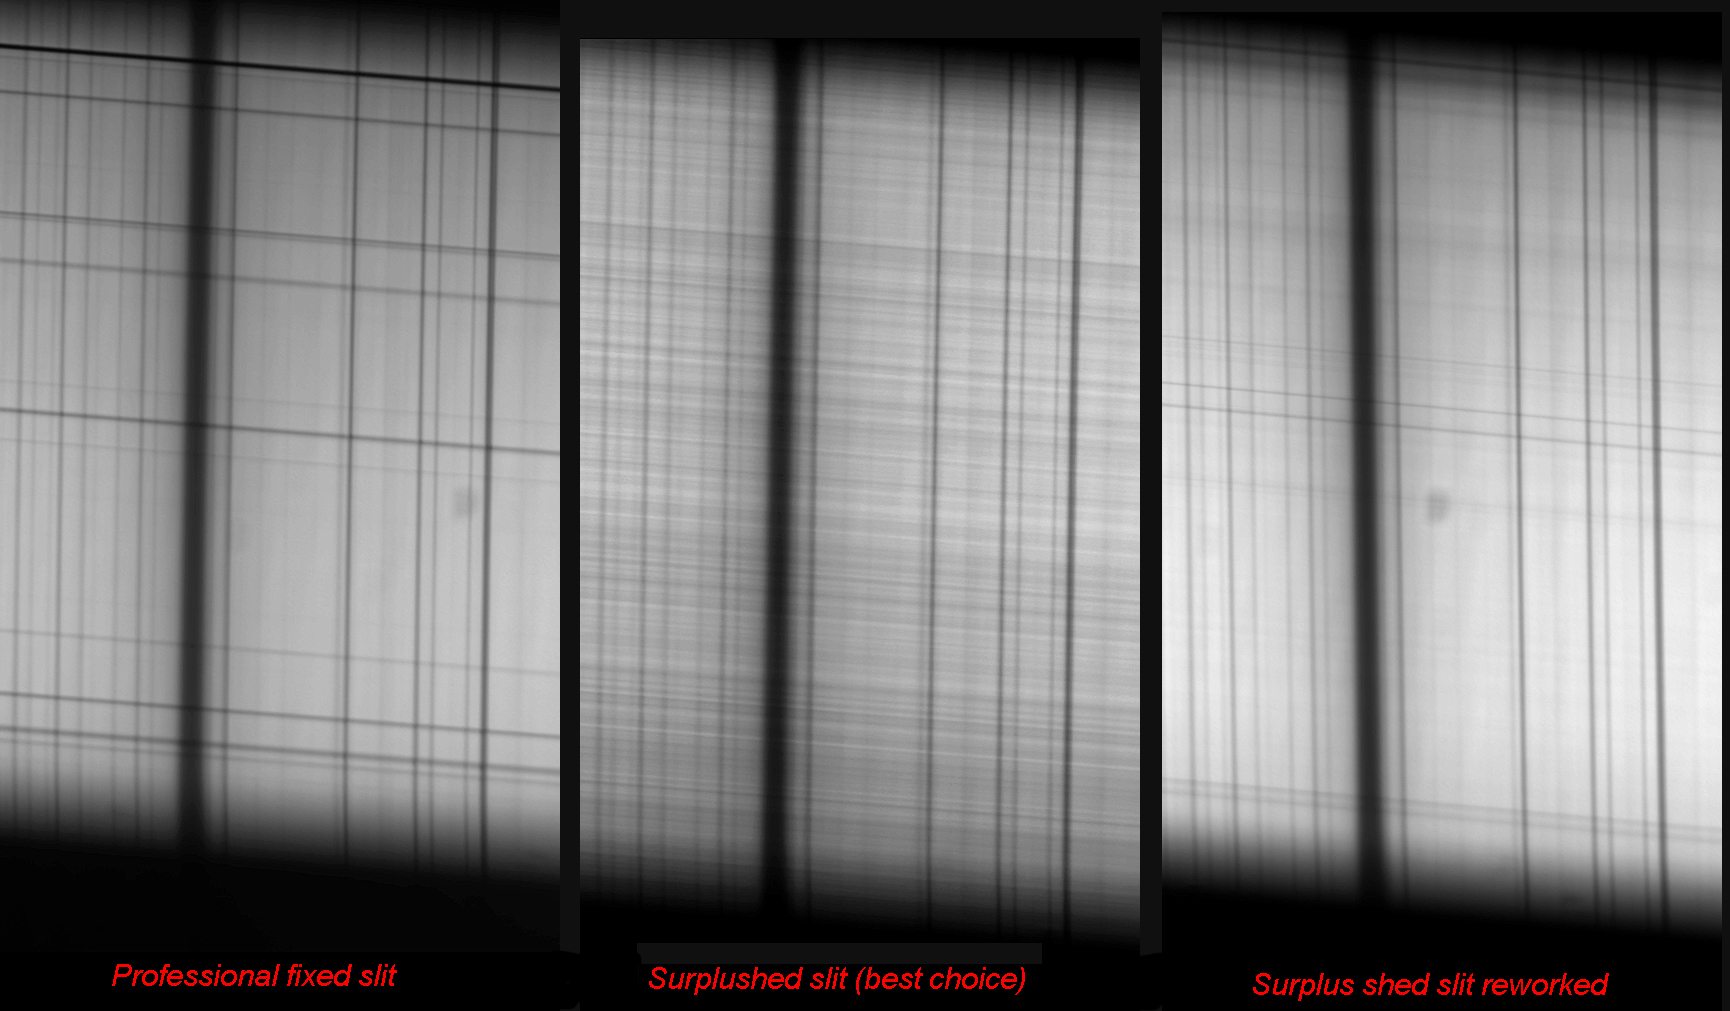
Questa considerazione
riporta il discorso sull’importanza della qualità della fenditura
ed il ruolo che essa riveste nell’output di uno spettroscopio, specie nei casi,
come quello in esame, in cui l’output stesso viene tradotto in immagini.Una
fenditura, tuttavia, capace di chiudersi perfettamente ad 1/50 di mm e con le
lame perfettamente lavorate è molto difficile da realizzare, e quindi costa
cifre sicuramente superiori allo strumento stesso, che può essere anche di
migliaia di euro.Le soluzioni possibili per l’autocostruttore
sono quindi due:
-Acquistare un certo
numero di fenditure commerciali a basso costo (ca 20 € l’una da Surplushed) e
scegliere la migliore
-Smontare una di queste e
lavorarne le lame nel miglior modo possibile, verificando ad un microscopio con
almeno 600X il miglioramento qualitativo.Come strumenti potrebbero usarsi la
carta abrasiva finissima bagnata con acqua; la pasta abrasiva per carrozzieri;
l’ossido di cerio.
Oltre a ciò l'uso come
telescopio di strumenti più costosi e perfomanti ed un' attenta elaborazione può
cambiare radicalmente la qualità delle immagini ottenute, al punto di renderle
qualitativamente somiglianti a quelle ottenibili con filtri a banda stretta, di
gran lunga più costosi specie se relativi lunghezze d'onda più esotiche dell'H
alfa.L'immagine sotto riportata è quella ottenuta da VHIRSS dopo la modifica di
sostituzione del rifrattore Skywatcher 70/500 con un eccellente doppietto semi
apo di provenienza militare da
Ovviamente anche la
videocamera gioca un ruolo di primo piano nell’ottenimento di immagini solari di
qualità dell’intero disco; meglio quindi usare sensori a basso rumore, come i
Sony, di formato dal ½ pollice in su e della massima risoluzione possibile.Il
frame rate alto non è a mio avviso assolutamente indispensabile, data la grande
quantità di luce; un’immagine solare già quasi correttamente proporzionata in X
e Y si ottiene con soli 7,5 frames/sec con una DMK 41 AS.Un alto frame rate
consentirebbe un miglioramento della risoluzione sul solo asse X,ma con
l’esigenza di dover riscalare l’immagine, tuttavia+ dalle prove fatte il
miglioramento in risoluzione non si traduce in un miglioramento consistente
dell’immagine che compensi il peso dei files.
L’ideale, ma sarebbe una
scelta piuttosto costosa, sarebbe di poter disporre di una video camera
raffreddata per ridurre ulteriormente il rumore termico, che diviene elevato,
specie in estate.
Dalla mia esperienza posso quindi ricavare in definitiva, che i parametri
che rivestono un ruolo cruciale nella qualità delle immagini ottenibili
in spettroeliografia digitale,sono, nell’ordine, i seguenti:
1- Qualità della fenditura dello spettroscopio
2- Qualità delle ottiche dello spettroscopio e del telescopio
3- Efficienza e sensibilità della videocamera
- Buy a number of commercial cheap slit (about 20 € each from Surplushed)
and choose the best
- Disassemble and work one of these blades in the best way possible, by checking
at a microscope with at least 600X quality improvements .As tools could be used
the fine abrasive paper wet with water; the abrasive paste for car body style;
the cerium oxide.
In addition the use of more expensive
Obviously the camera plays a major role in obtaining
The ideal, but it would be a choice rather expensive, it would be to be able to
have a cooled
From my experience I can then derive ultimately that the parameters that play a
crucial role in the quality of images obtained in digital spectroheliography,
are, in order, the following:
1- Quality of the slit of the spectroscope
2- Quality of optics of telescope and spectroscope
3- Efficiency and sensitivity of the
I never tire to reiterate the crucial importance of the slit in
spectroheliographs, especially those of small size in which the short focal
length and the ratio F / D of the telescope optics (F5-7) forces to very narrow
slit
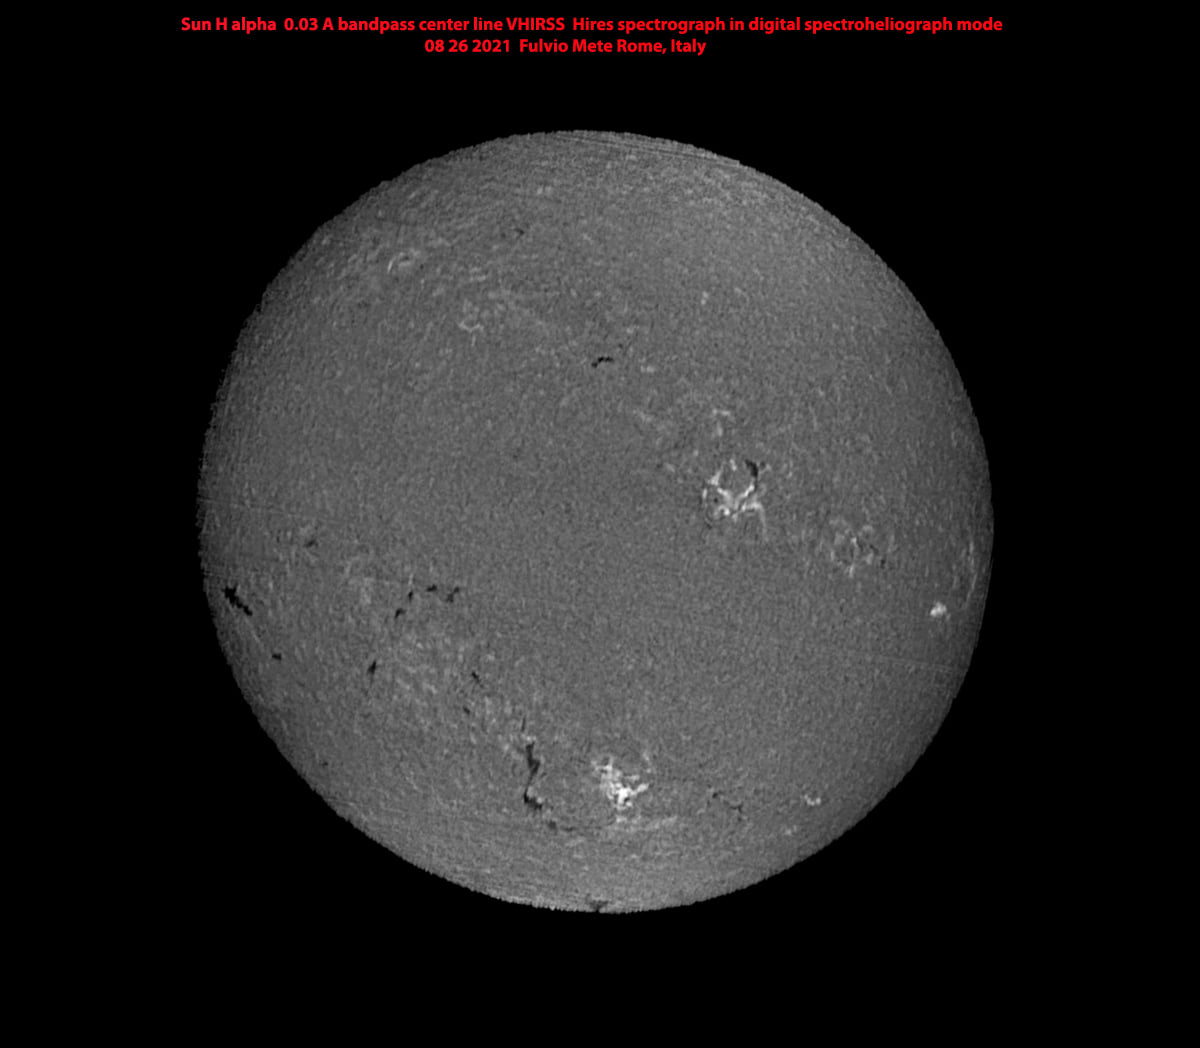
Una volta assicurata la
sussistenza di detti parametri,e seguendo i suggerimenti forniti, potranno senza grossi problemi
ottenersi immagini simili o superiori a quelle che seguono, di qualità estetica
non eccelsa, ma spettacolari quanto alla quantità di minuti particolari visibili.
Once secured the existence of said parameters, and following the suggestions
provided, can be obtained without major problems similar images or superior to
those that follow not exceptional as quality, but surely with an enormous
quantity of visible features.
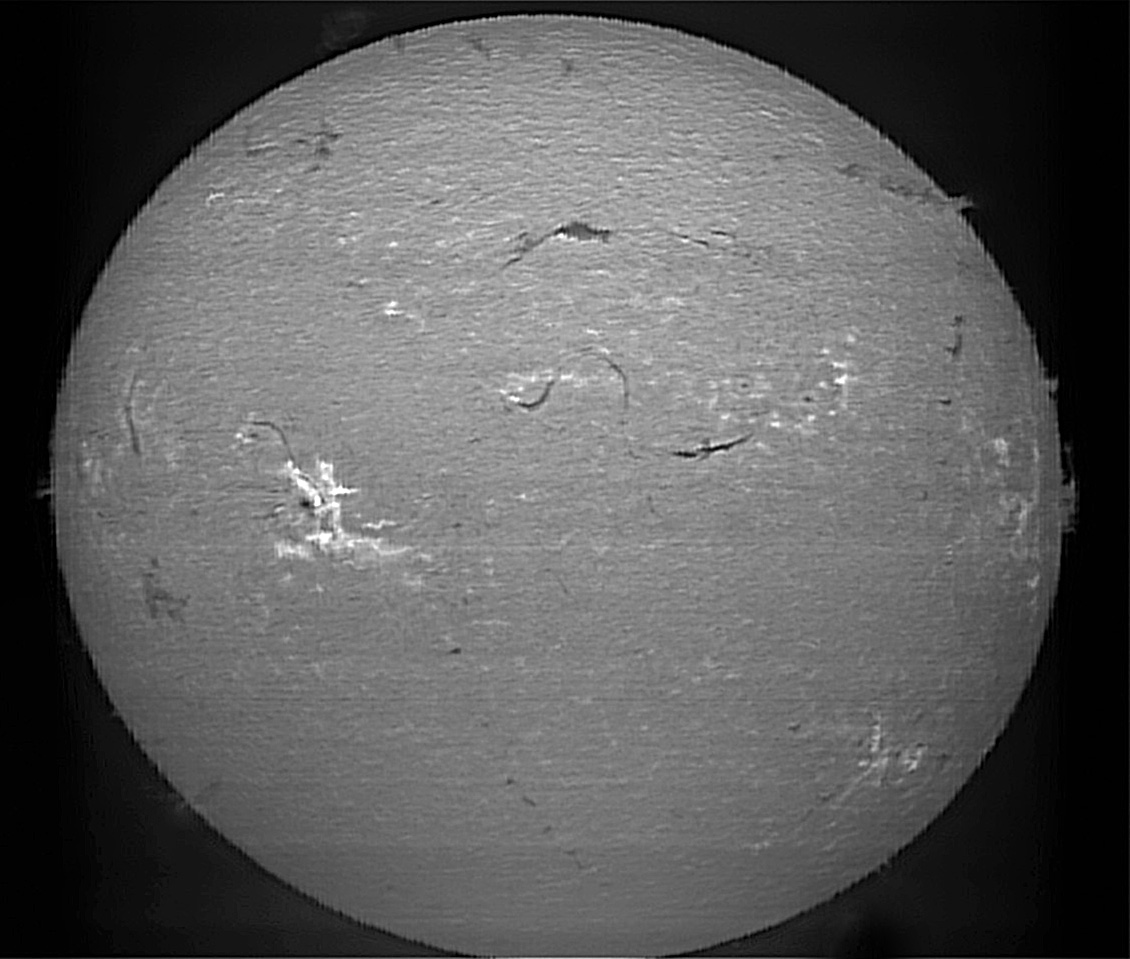
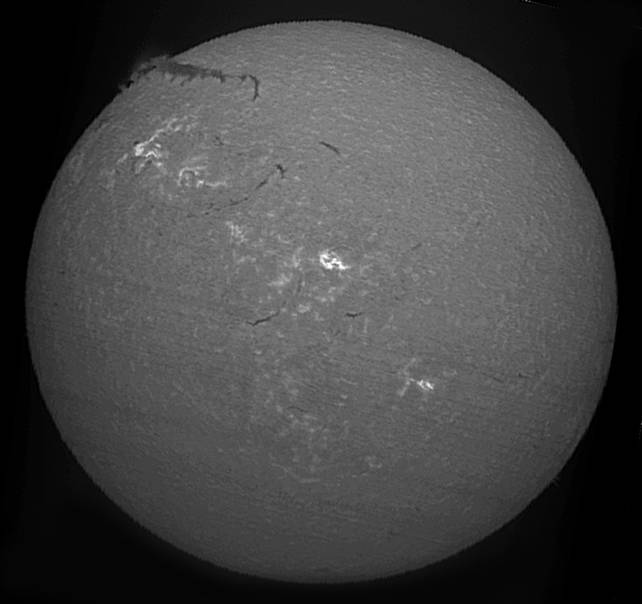
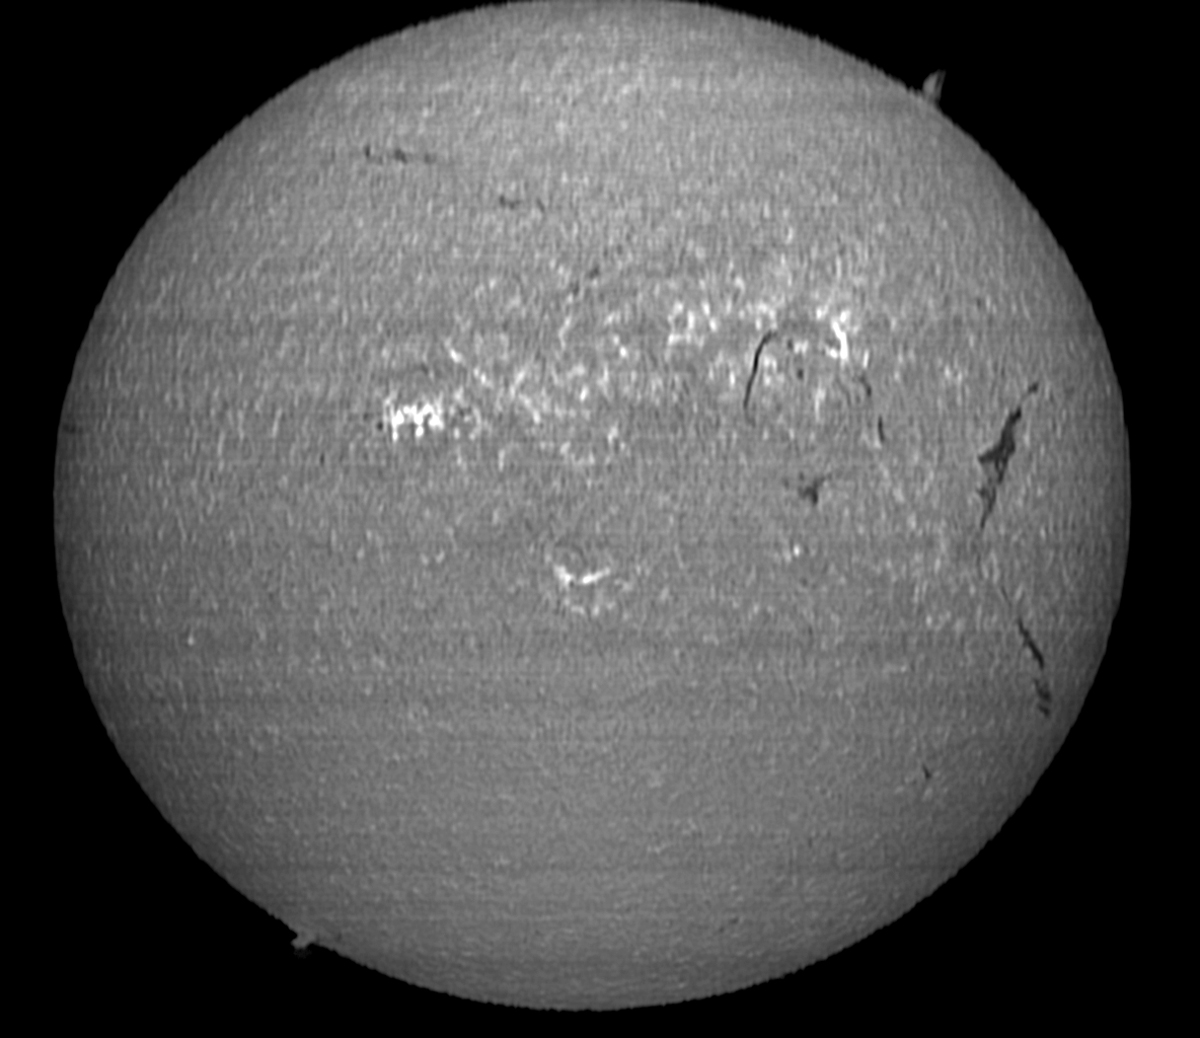

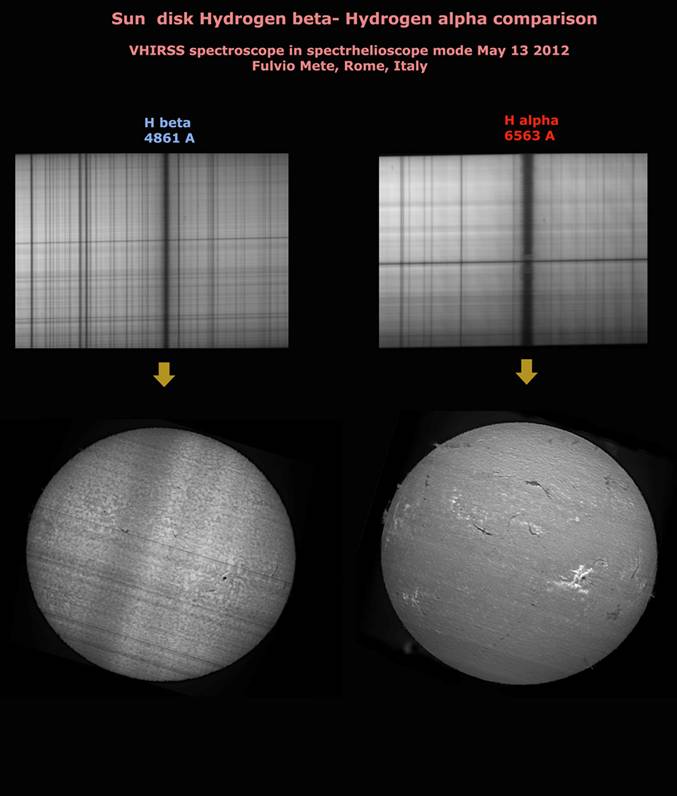
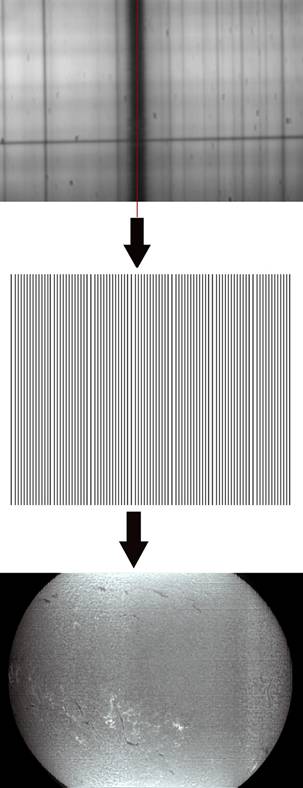
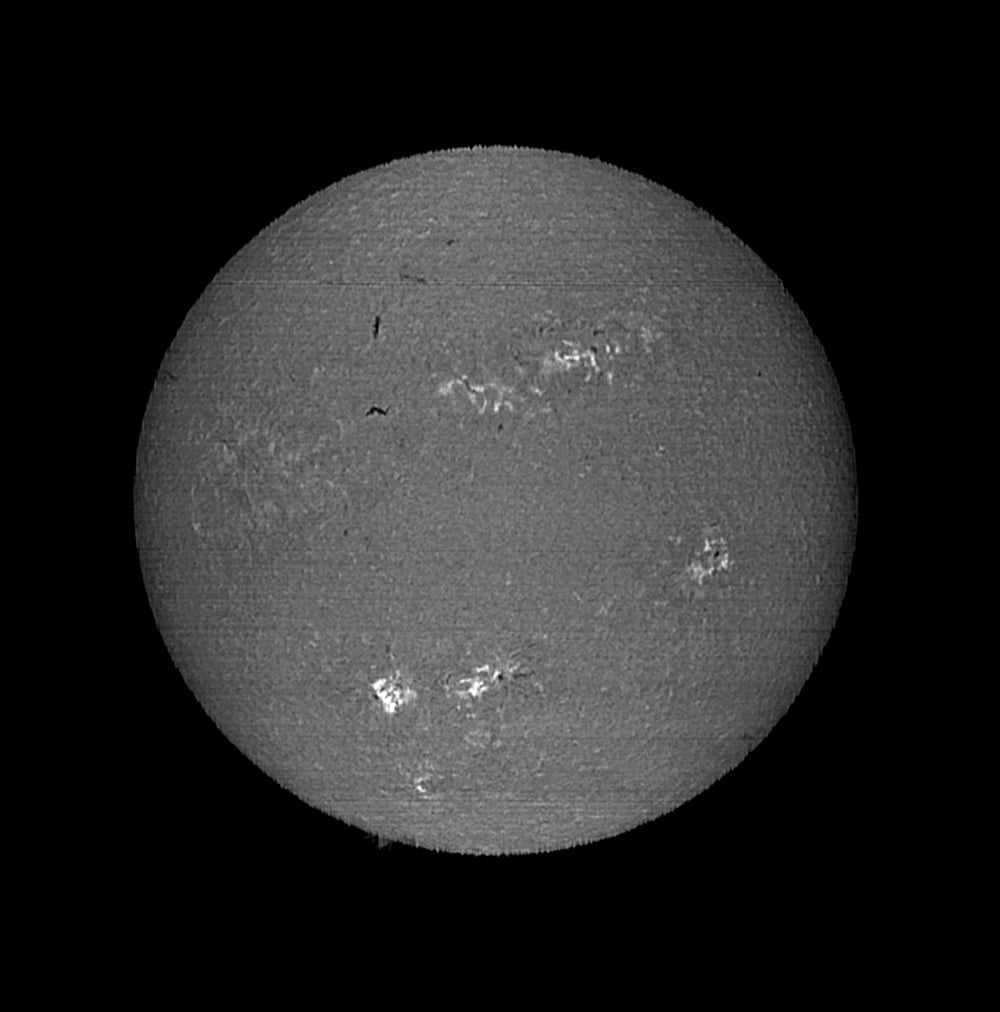
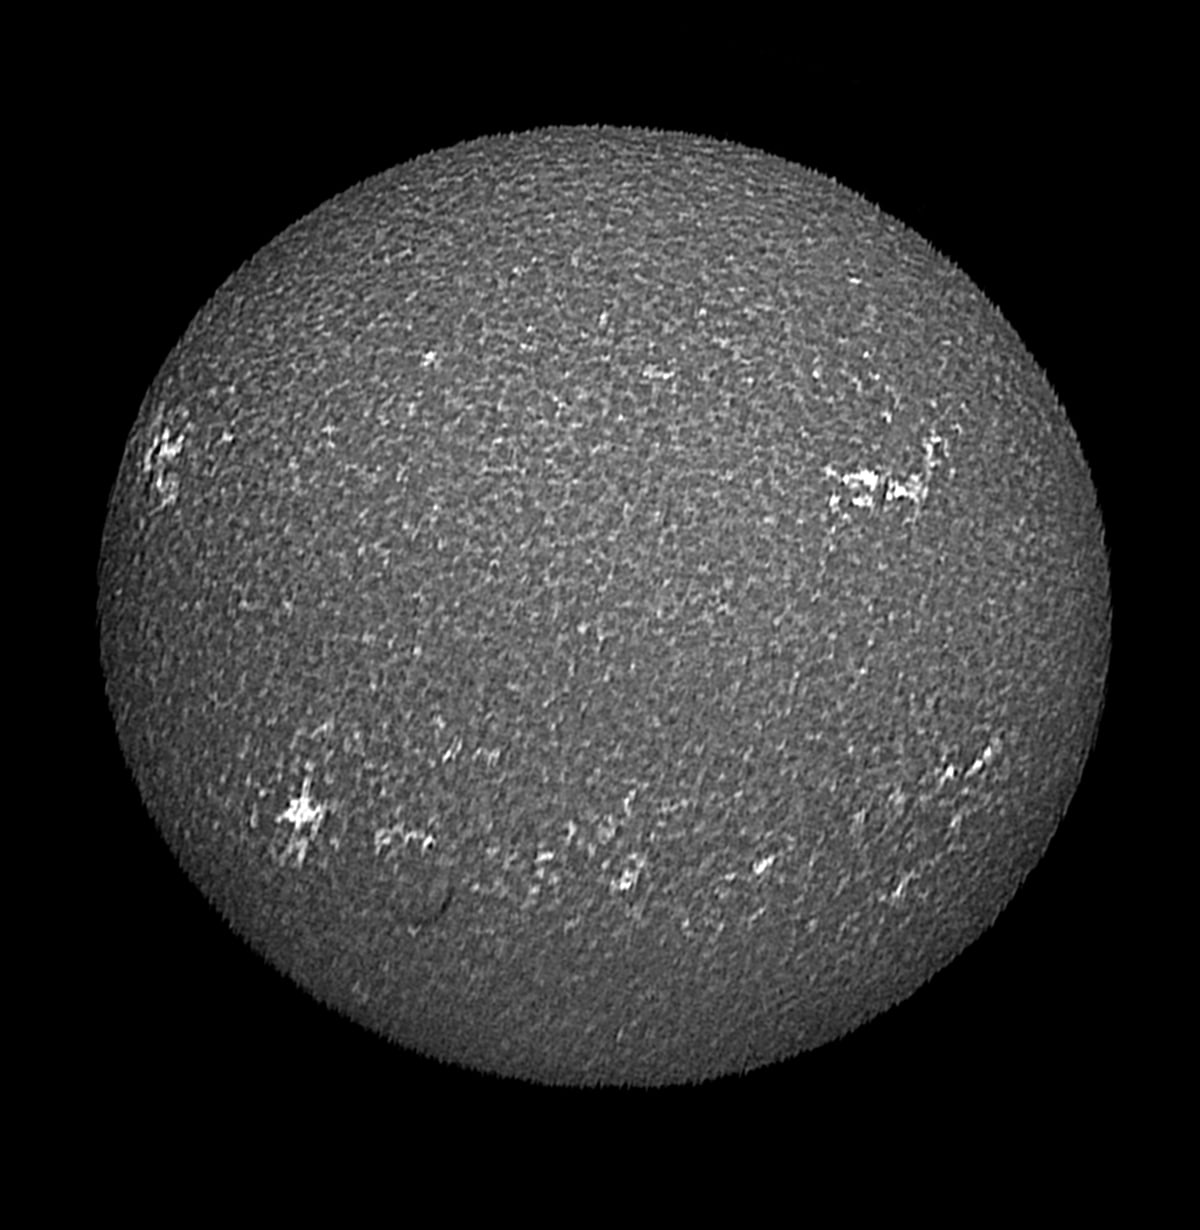
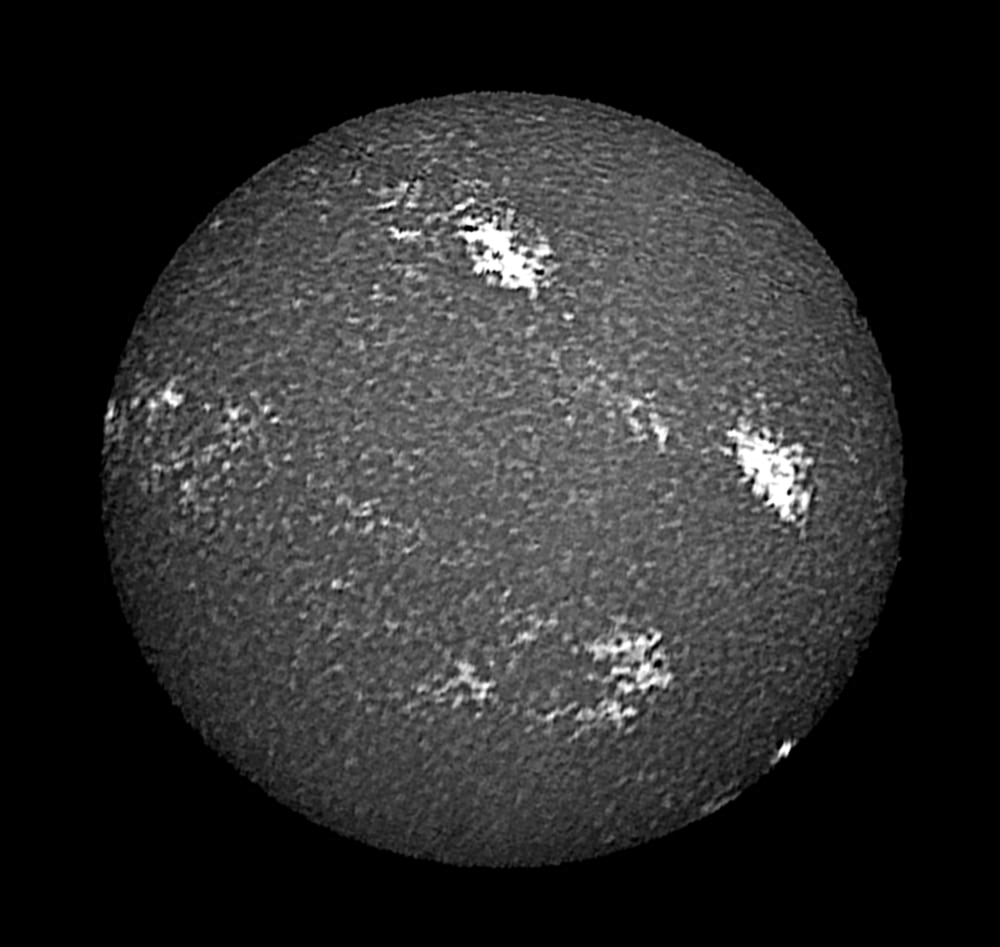
Immagine del sole in luce CaII K3 (centro riga CaII k di 0.15 A di bandpass) del
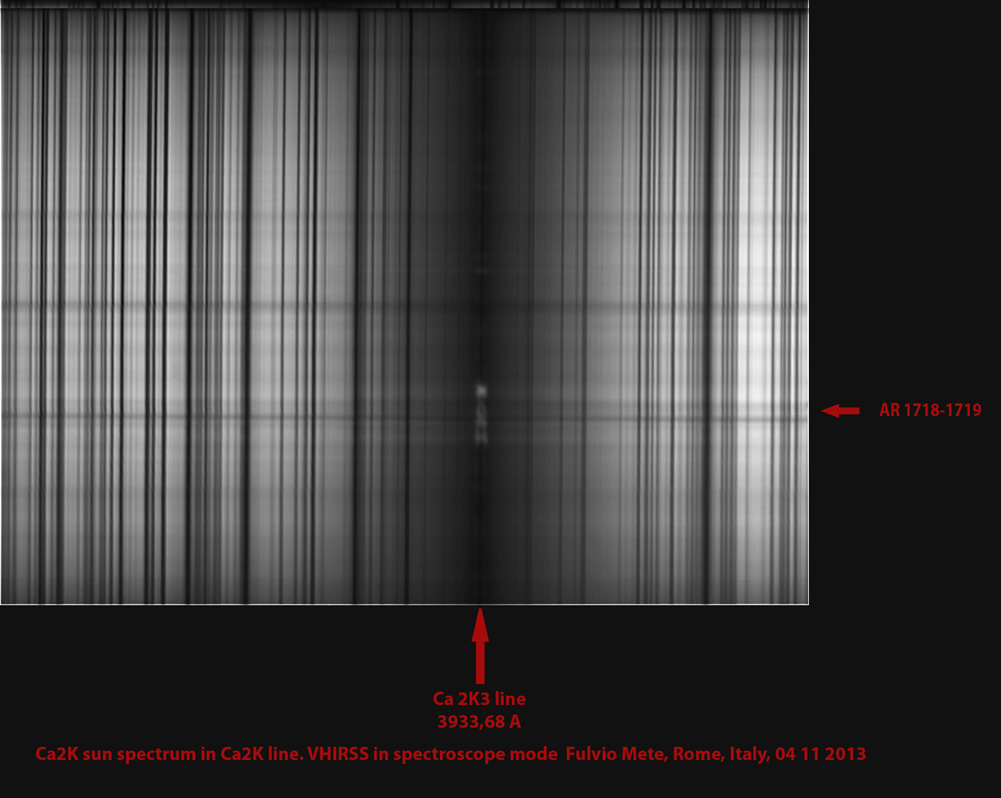
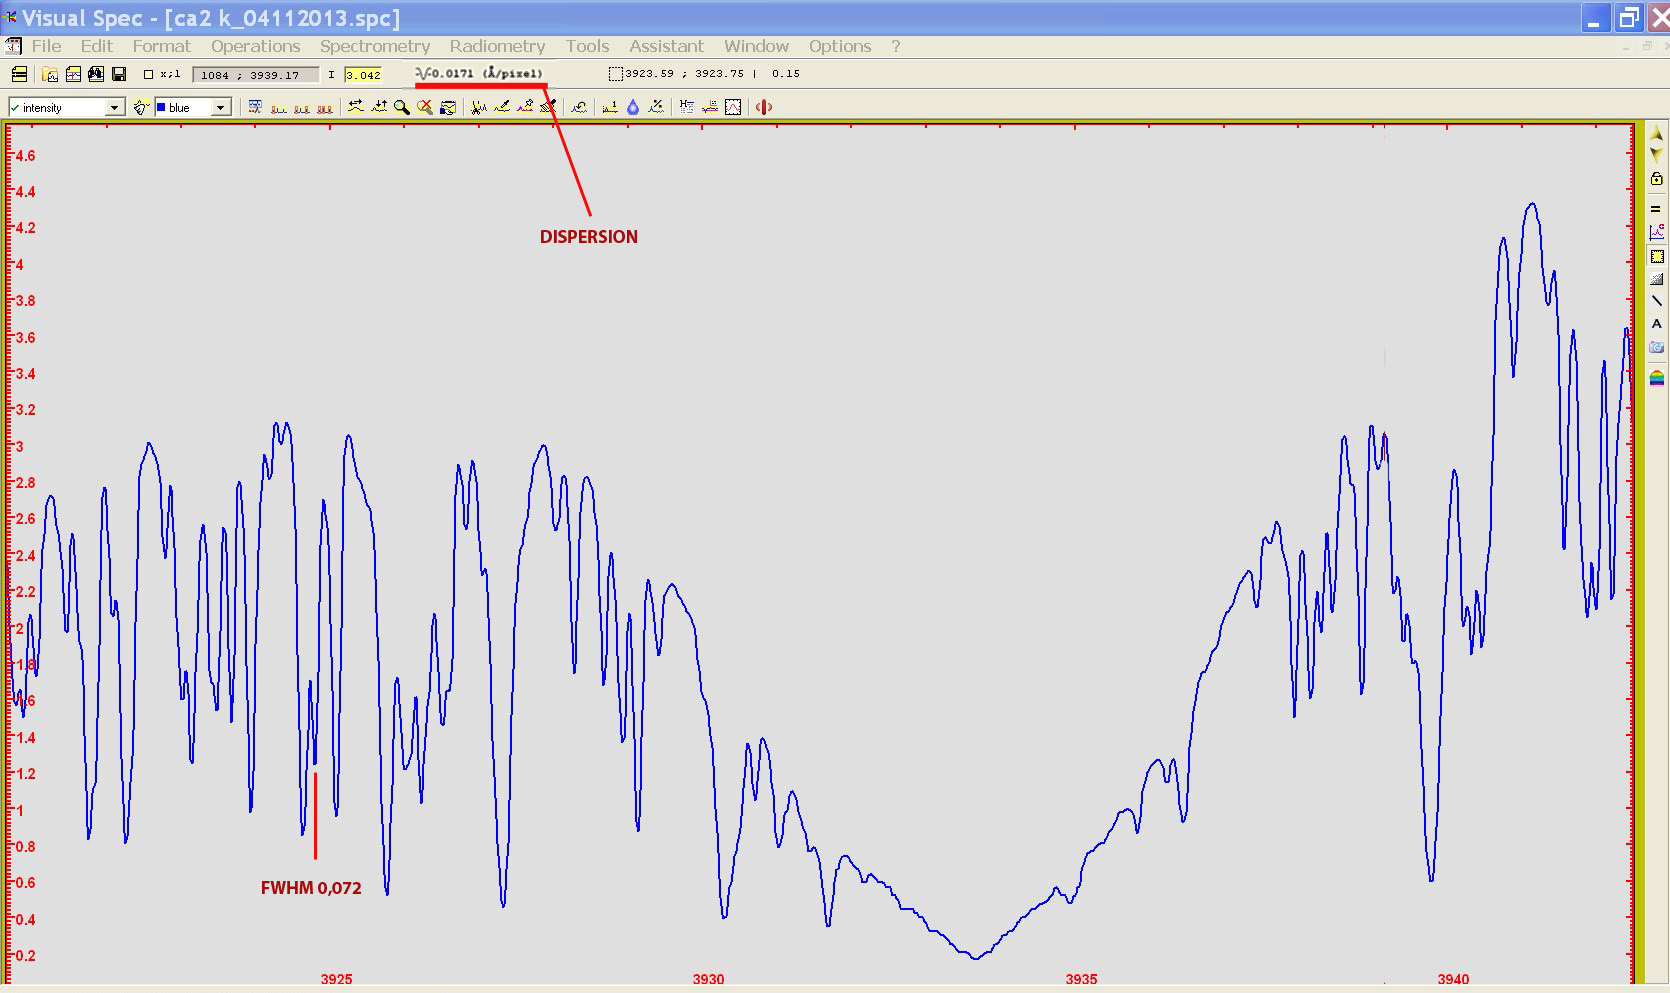
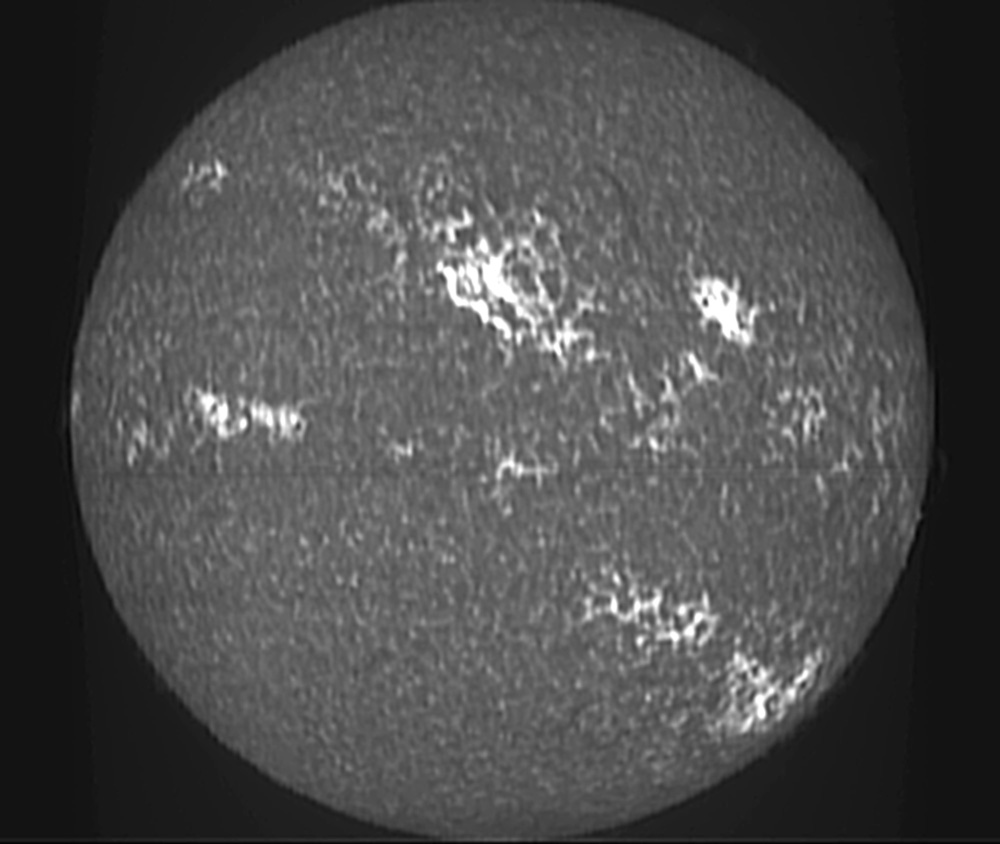
Nelle immagini precedenti una ripresa in luce CaII K3 (centro riga CaII K) a 3933.68 A effettuata il 4 novembre 2013 con VHIRSS, approfittando di una giornata di ottimo seeing: all'interno della riga, con una focheggiatura accurata si notavano molto bene le plages dell'AR 1718 in emissione (1^ foto); la dispersione , veramente eccezionale per lo strumento nel vicino UV , è stata di soli 0.017 A/pixel con R = 54000 a 3925 A (2^ foto), mentre l'immagine risultante appare nella 3^ foto.Inutile dire che la visibilità dei particolari sul disco è nettamente superiore a quella dei filtri commerciali CaIIK, che in genere hanno una banda passante di 2 A,mentre quella della foto è di 1/60 di A! si notano infatti i filamenti sul disco, normalmente non visibili in luce CA II K.
Up an image in light CaII K3 (center CaII K line) to 3933.68 A made on November 4 2013 with VHIRSS, taking advantage of a good seeing day: within the line, with an accurate focusing is well noticed the plages of AR 1718 (1 ^ photos); dispersion, truly exceptional for the instrument in the near UV, was only 0.017 A / pixel with R = 54000 at 3925 A (2nd photo), while the resulting spectroheliographic image appears in the 3rd photo : the visibility of details on disk is much higher than that of CaII K commercial filters, which typically have a bandwidth of 2 A, while the photo is 1/60 of A! we can in fact note the filaments on the disk, not normally visible in light CA II K.
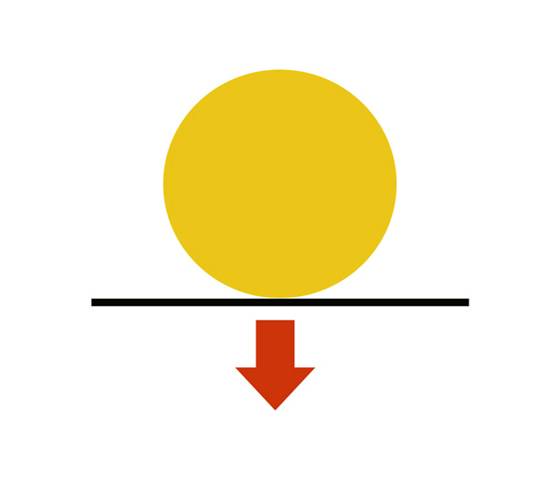
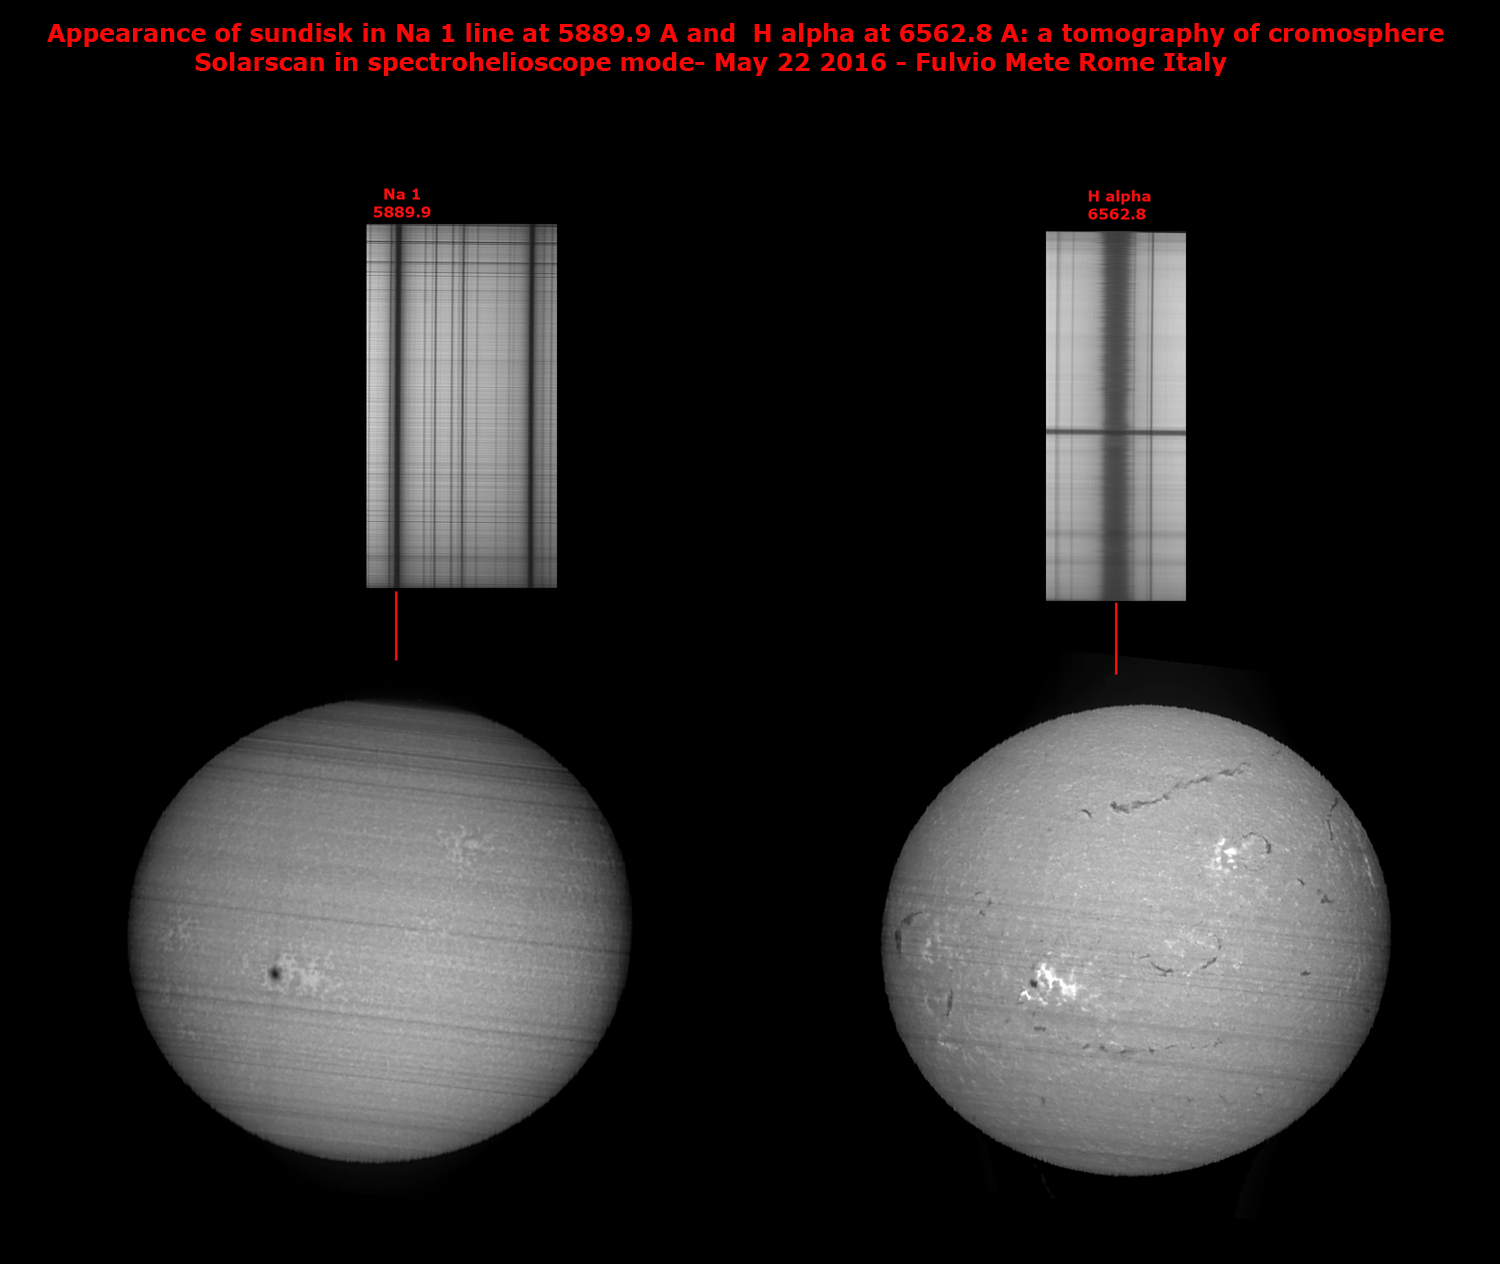
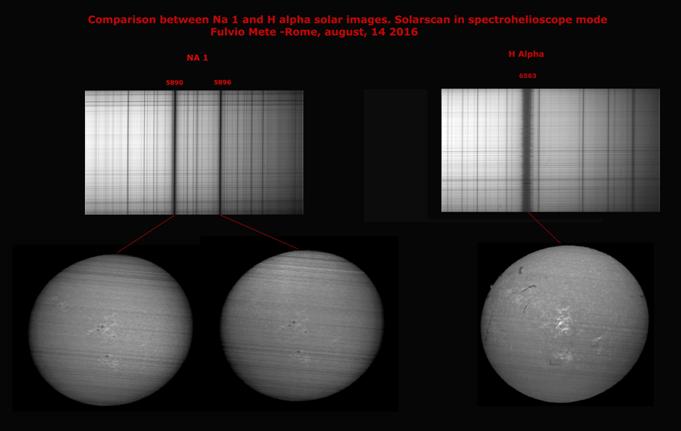
Il diverso aspetto della cromosfera in luce Na1 e H alpha: una tomografia della
cromosfera solare
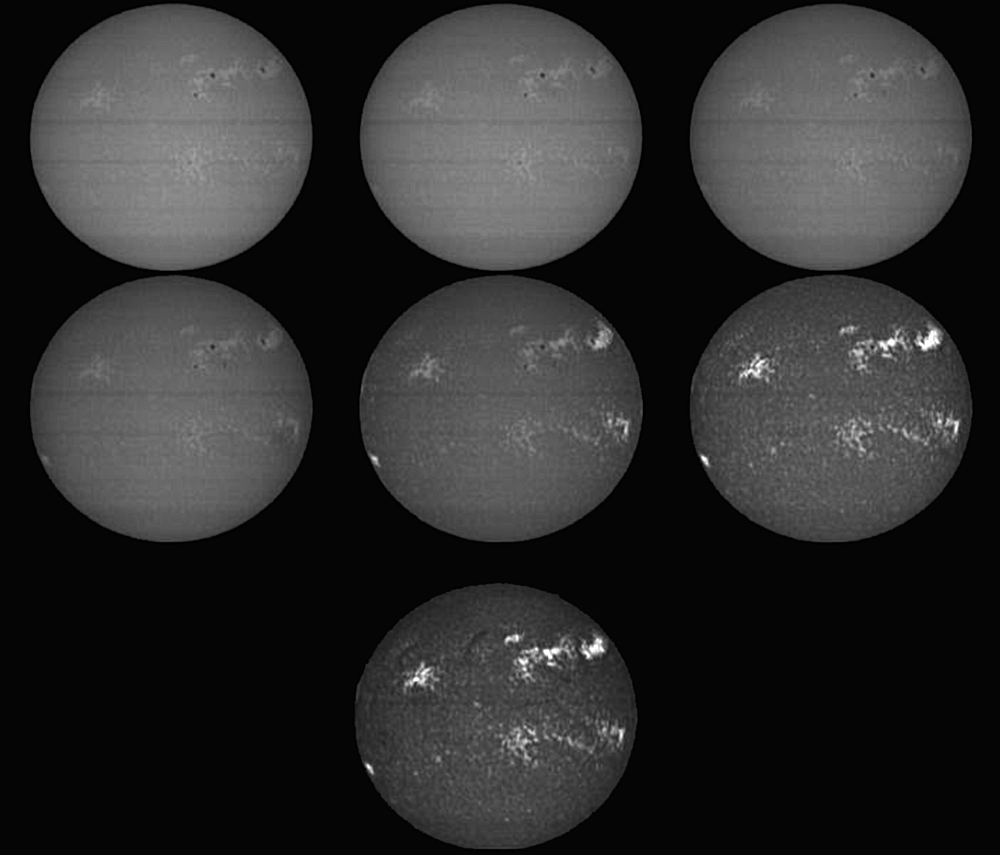
Nell’immagine seguente
un’altra interessante comparazione tra le varie transizioni dell’Idrogeno, le
tre righe principali della serie di Balmer in Cromosfera; la H alfa a 6563 A, H
beta a 4861 A e H gamma a 4341 A
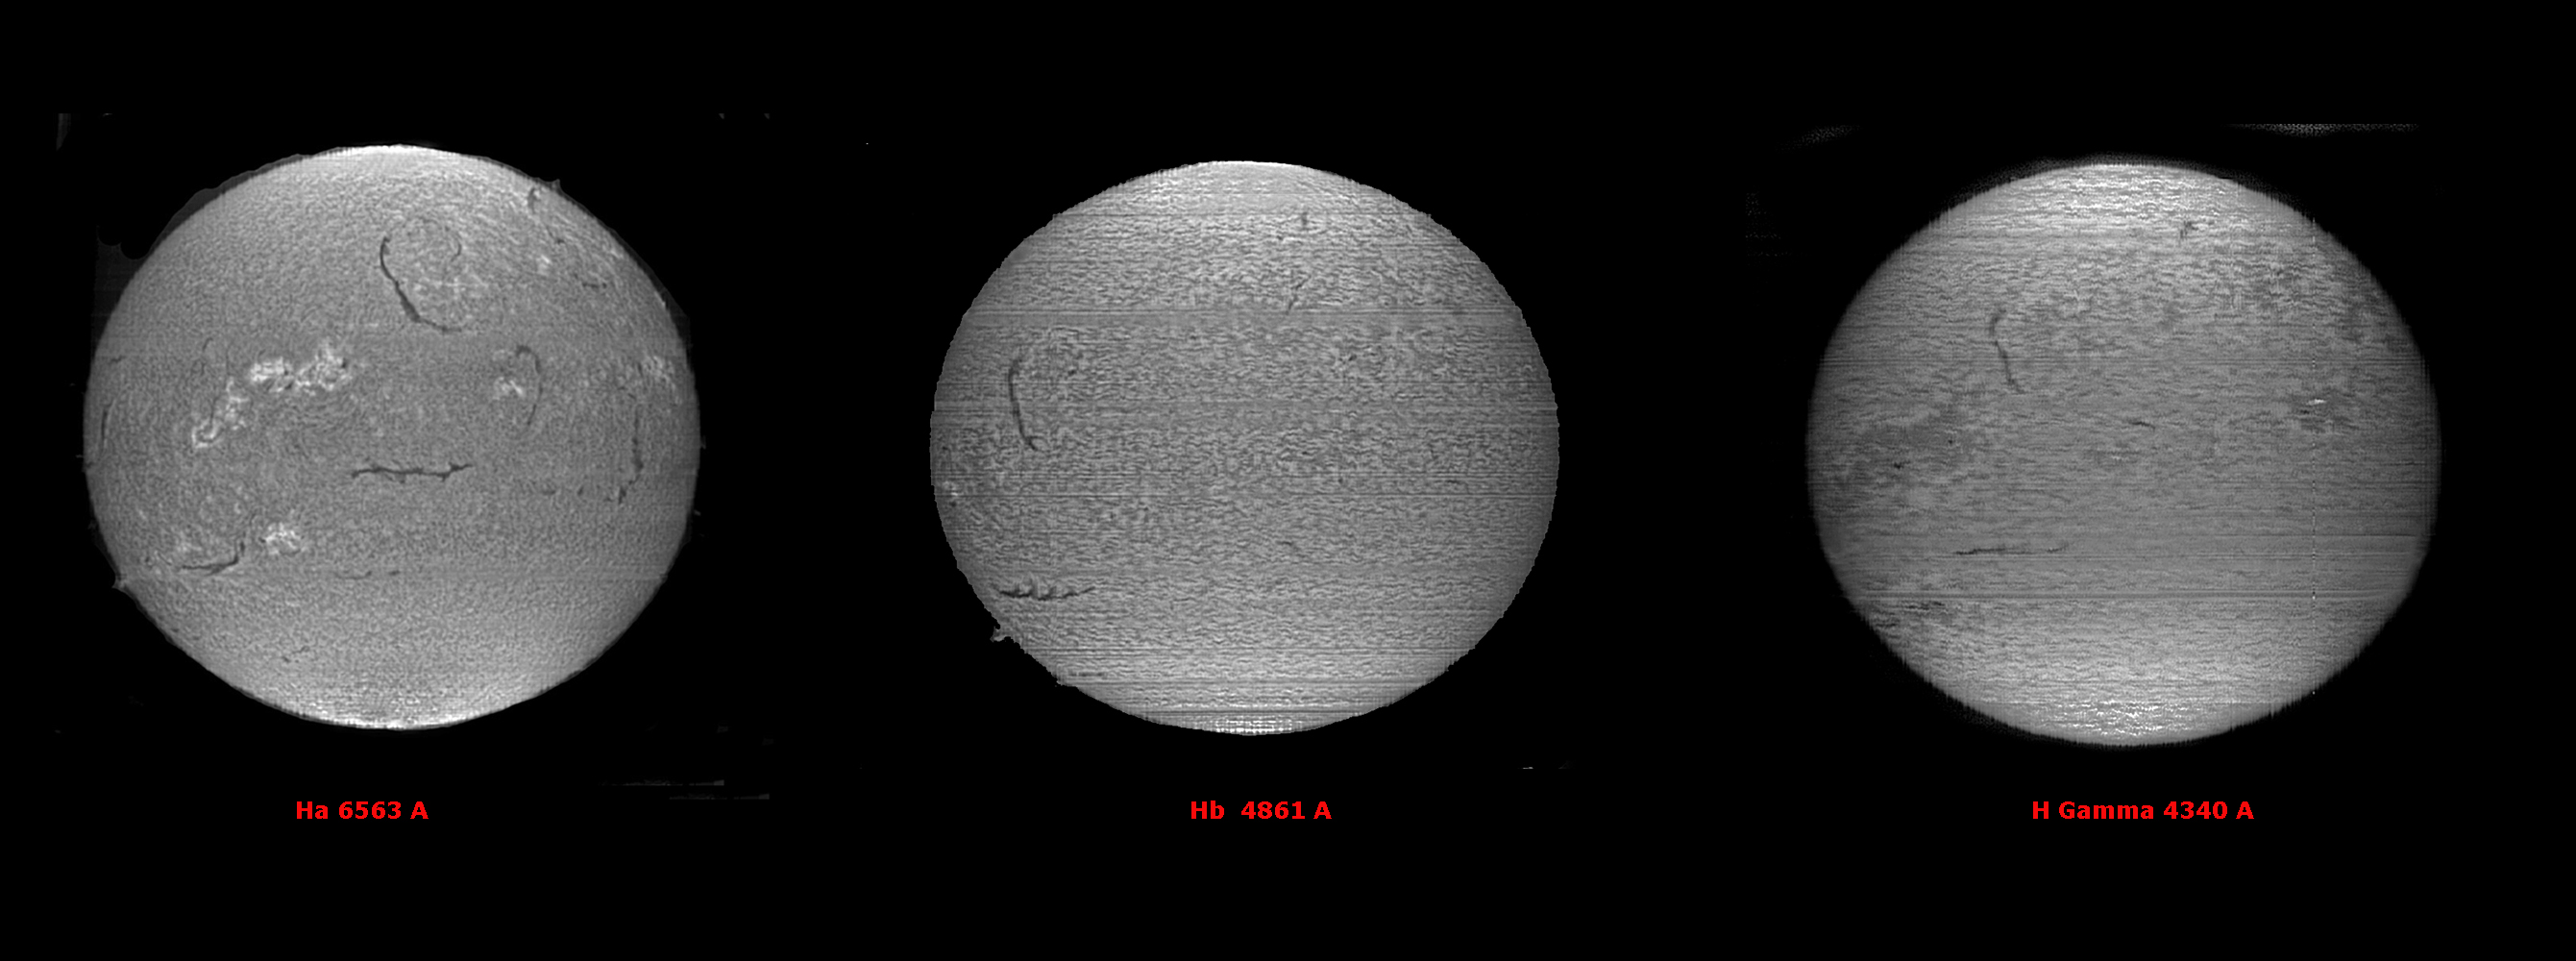
Si può facilmente
osservare come il passaggio verso transizioni relative a lunghezze d’onda minori
si traducano nella visibilità delle plages e delle regioni attive in generale da
emissione ad assorbimento (esse diventano più scure), mentre i filamenti
diventano meno visibili.
Un’ altra interessante
osservazione è stata quella del
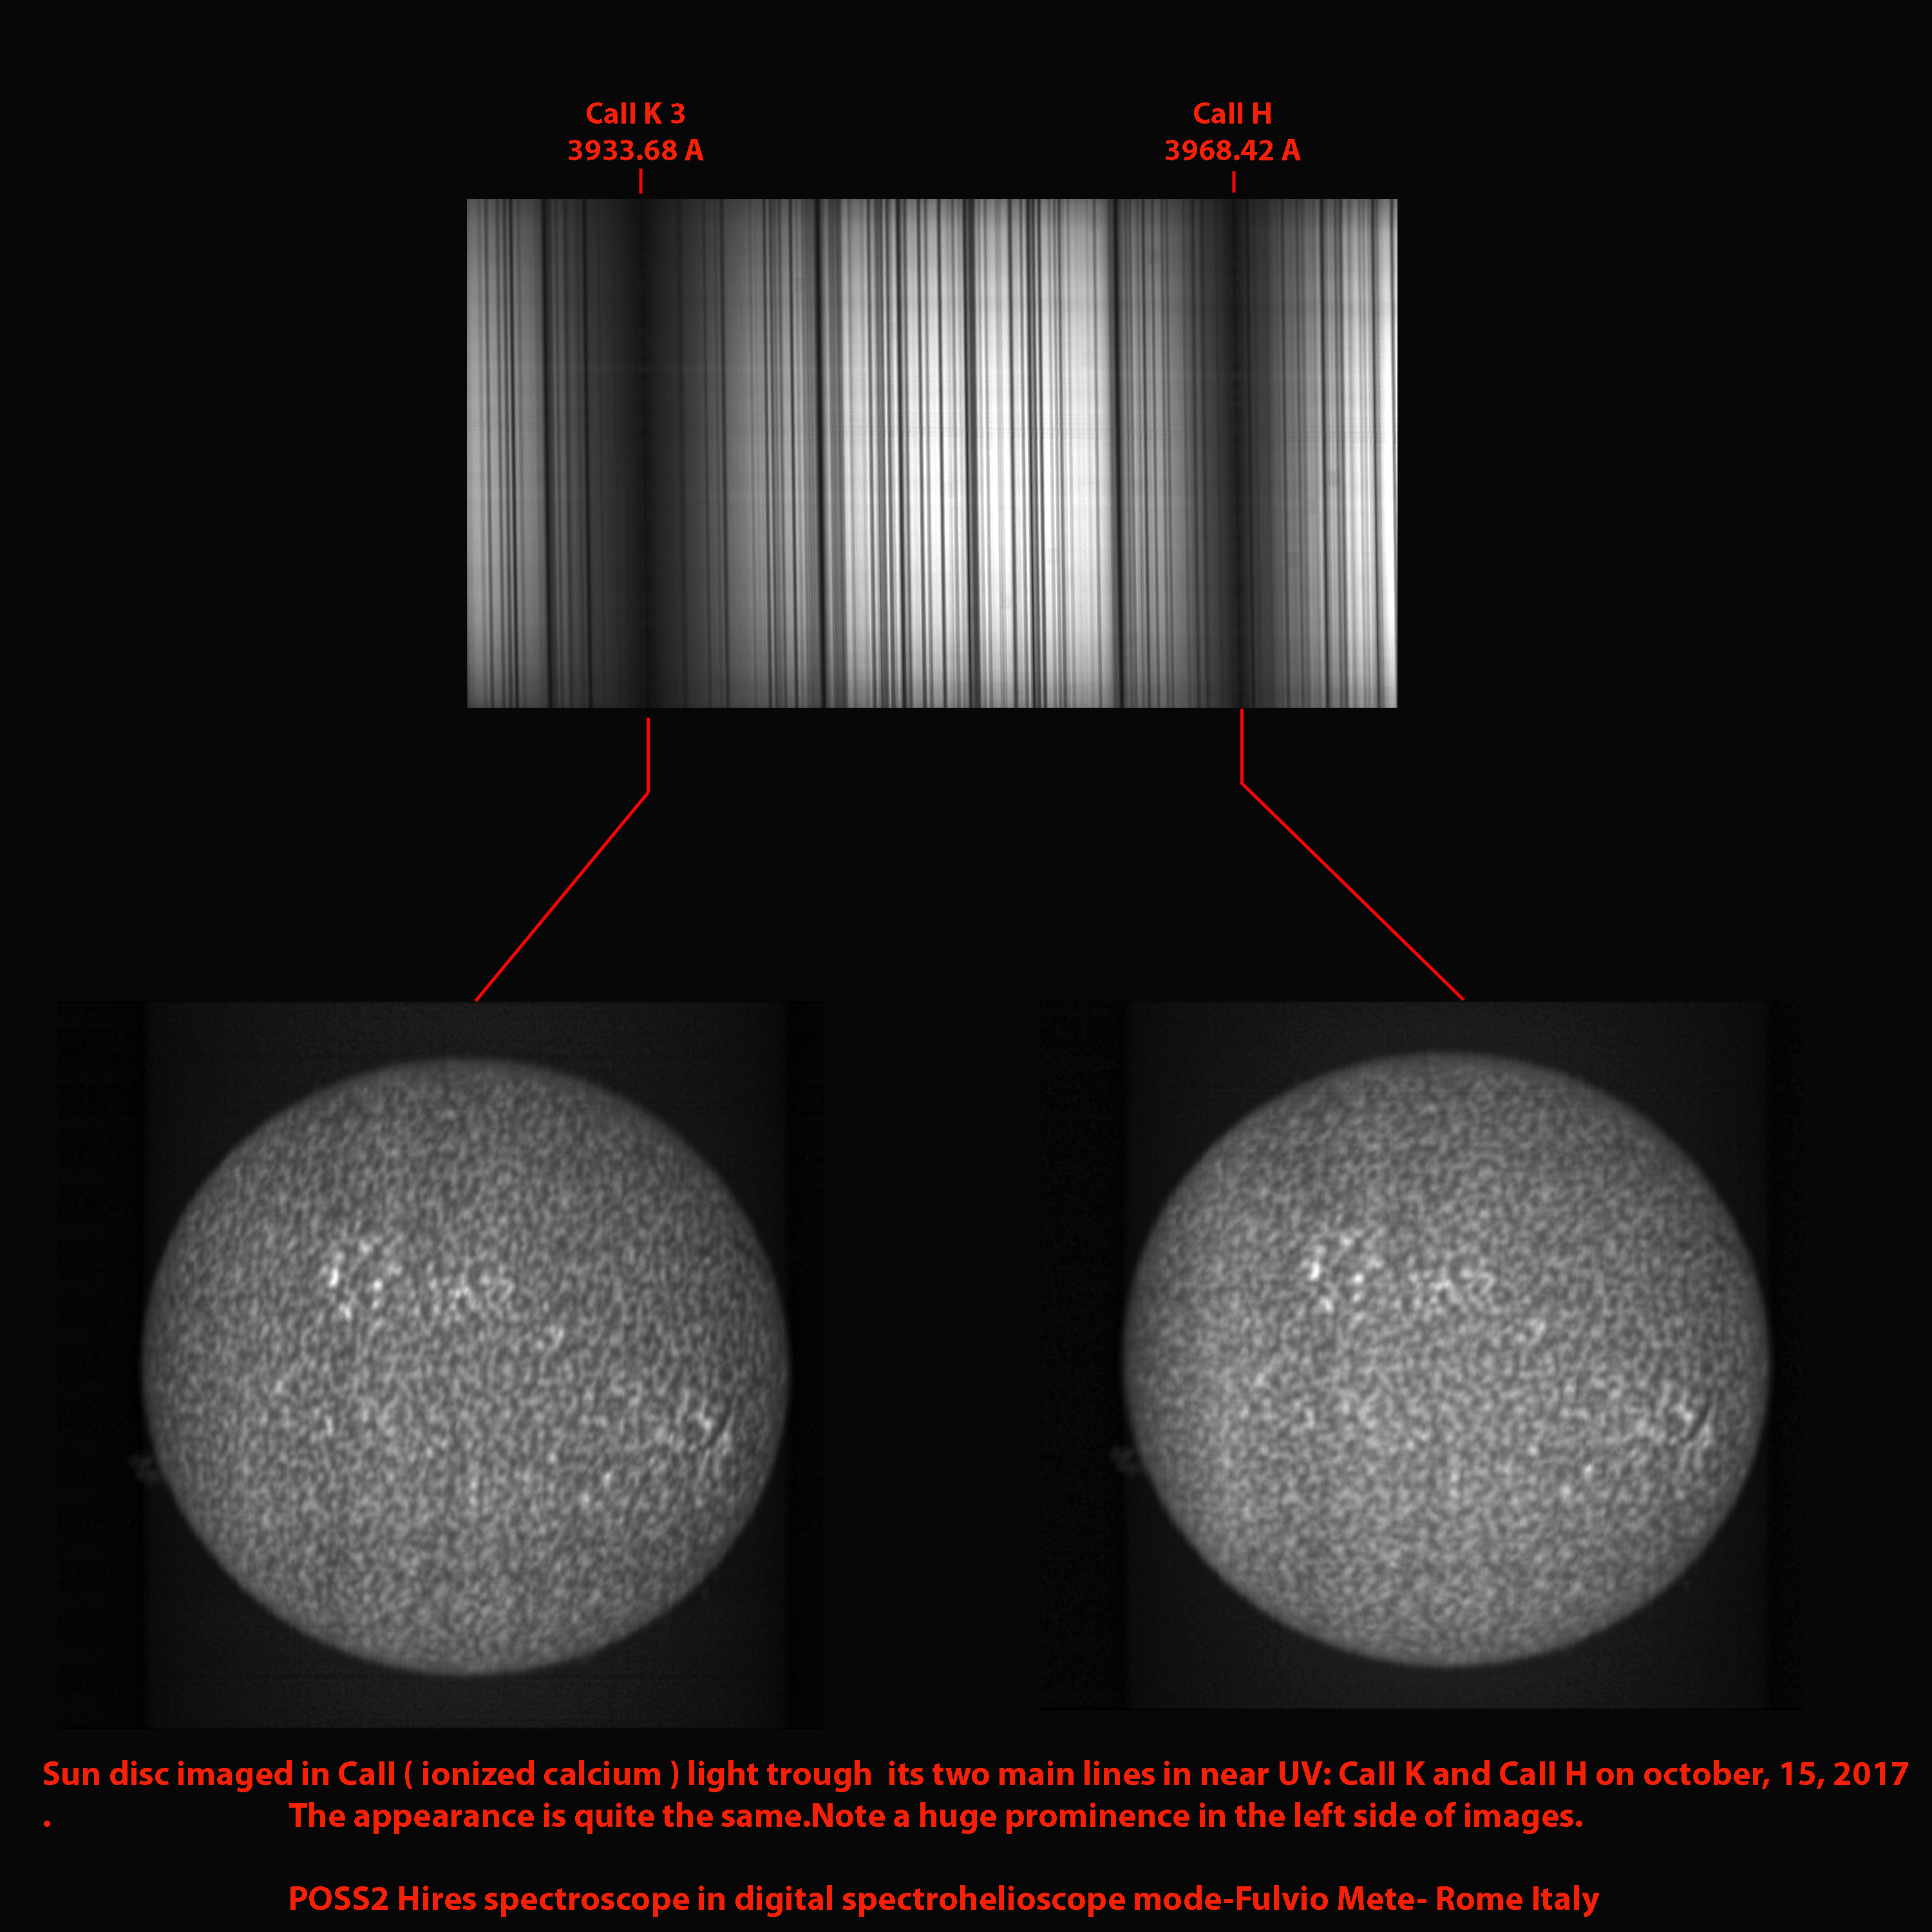
Le due immagini, ottenuta da una colonna di 1 pixel (0.037 A) sul centro di entrambe le righe, non mostrano sostanziali differenze.Diverso sarebbe il caso di una banda più larga, in cui la CaII H rischierebbe di essere in blend con la vicina riga del ferro a 3969.2 A e dell'Idrogeno Epsilon a 3970.0 A.Questo è il motivo per cui, anche in sede professionale, si preferisce utilizzare la riga CaII K (meglio la CaII K3, centro riga di 0.15 A) anzichè la CaII H.
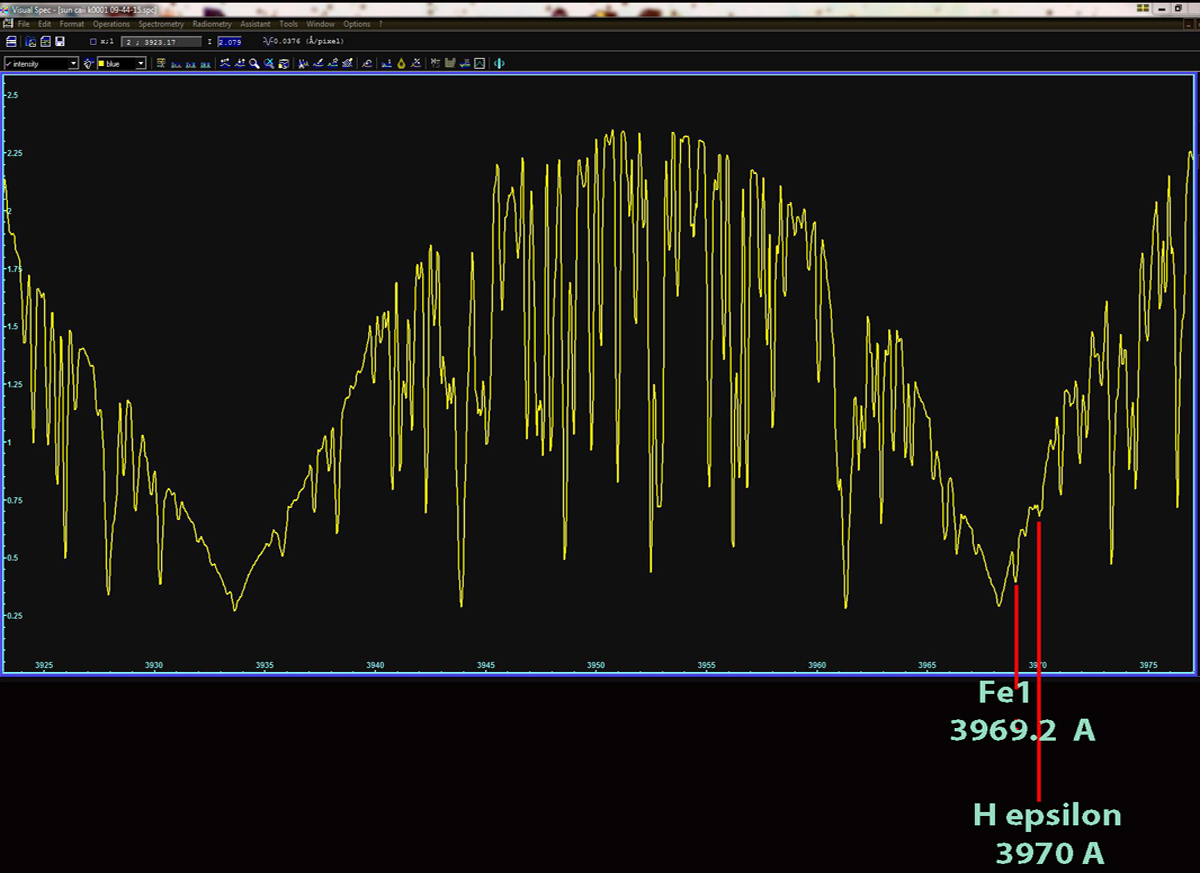
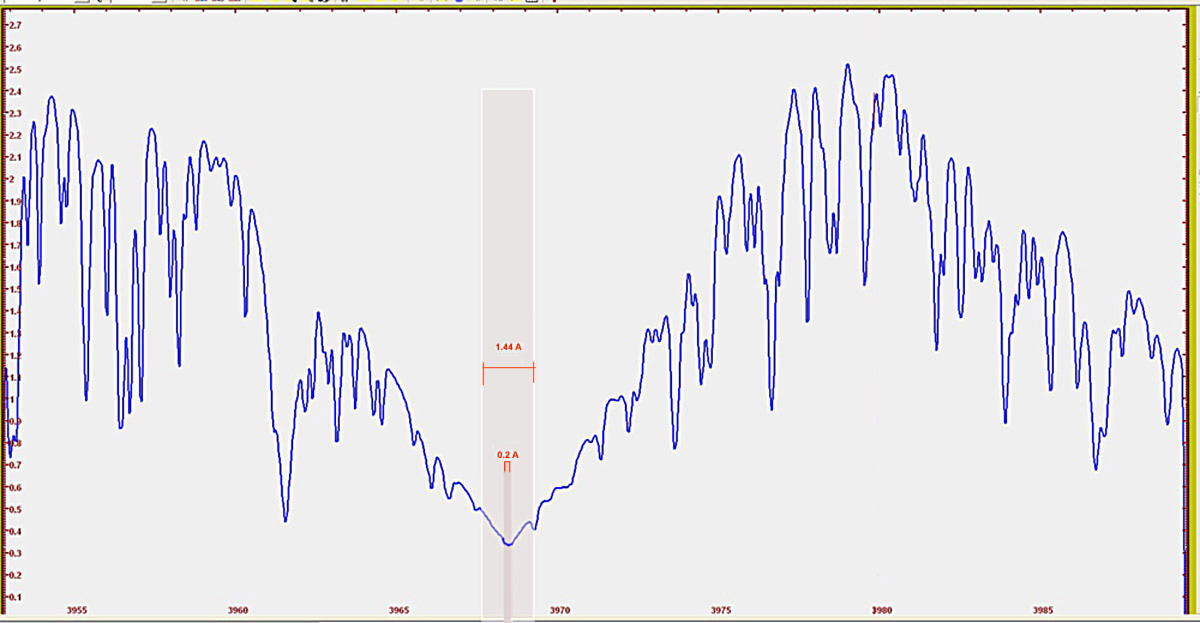
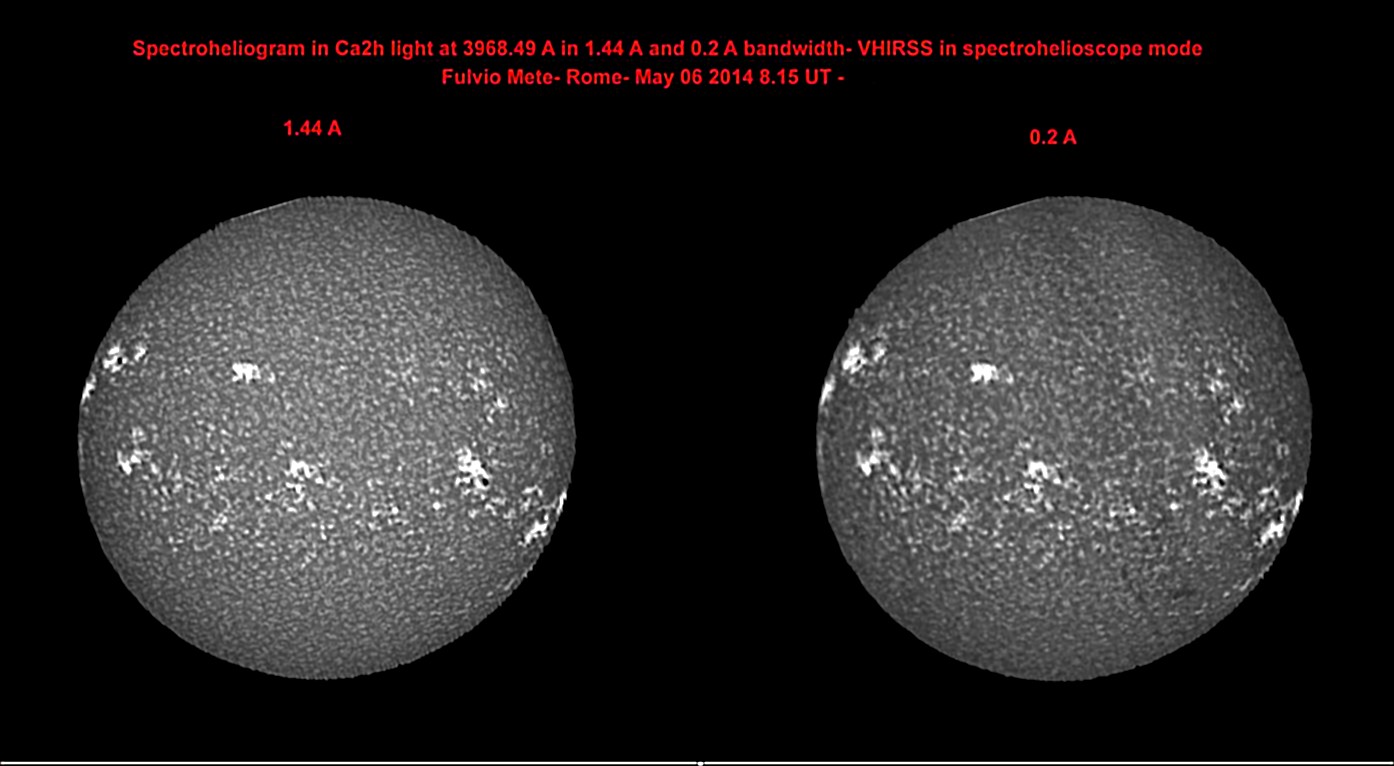
Nell’immagine che segue, del 2014, un raffronto tra un’immagine solare in luce CaII H a 3968 .49 A ottenuta dalla media di frames per 1.44 e 0.2 A di banda passante centrata sul centro riga: la differenza è visibile, anche per la presenza della riga Fe1 nella banda più larga.
In the following image a comparison between two solar image in the CaII H line at 3968.49 A with different bandpass: one, larger, of 1.44 A and another, smaller,of 0.2 A: the difference is visible, also for the blend of Fe1 line.
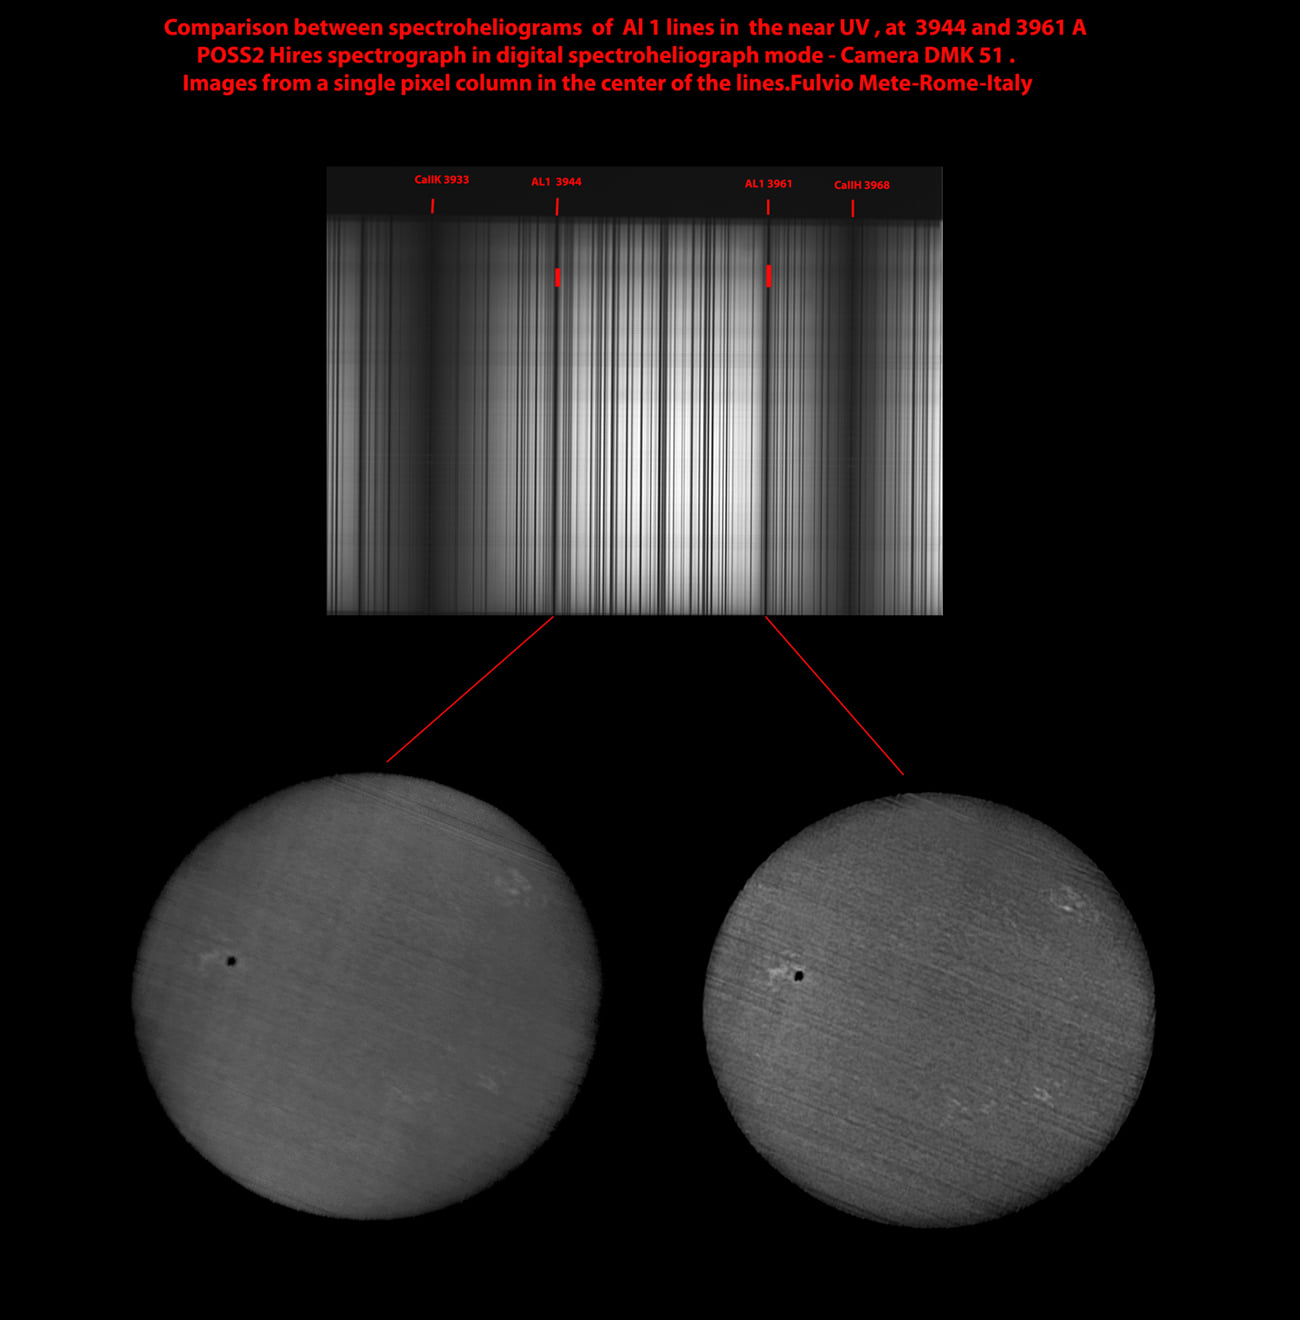
Alcuni recenti spettroeliogrammi dopo che VHIRSS è stato dedicato alle immagini H alpha e POSS2 a quelle nell'UV vicino: CaIIH, CaIIK , Al 1 Fe1, anni 2021-2022
Some recent spectroheliograms, using VHIRSS for Halpha and POSS2 for near UV , CaIIH, CaIIK, Al1, years 2021-2022
VHIRSS
POSS2
CaIIH
CaIIK
Al1

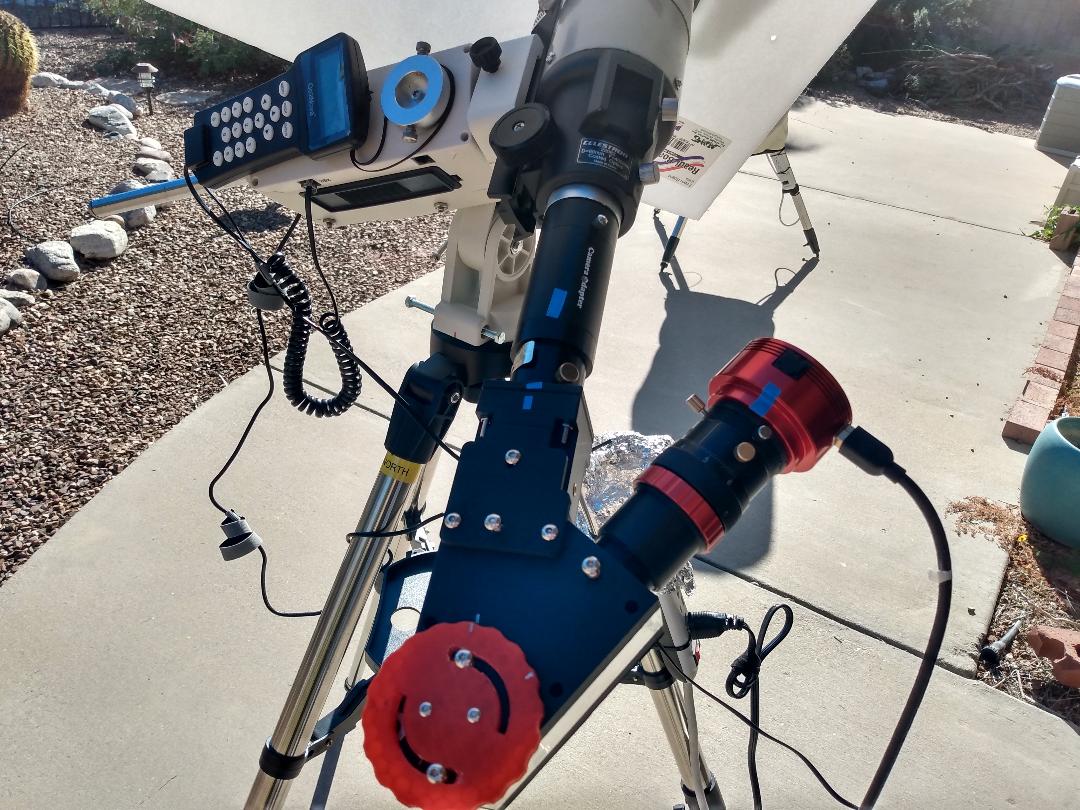
SOL'EX Spectrograph design realized by David.G.IADEVAIA
David G. Iadevaia
I found that Christian Buil had designed a printable SHG called the
Sol'Ex. Since the Sol’Ex would fit the build platform of my Monoprice lII P 3D
printer I decided to print it. Using a roll of black PLA I had available, the
print was straight forward and with the usually sanding, pieces fit. It was
light tight with a strip of aluminum tape applied along the seam between the
upper and lower case.
I purchased the lens from Thor Labs and the
grating from Optometrics using the specifications of Buil’s design. The slit
from my Alpy 600 was available when I replaced it with the guide module. Because
the slit is only 3 mm long and the Sol’Ex design uses a 4 mm long slit I am not
able to get a complete disk using the ASI 178MM camera. However a complete disk
is made from two scans, top and bottom of the solar disk that I stitch together
using GIMP or ICE.
When finances allow I will
purchase the Sol’Ex Shelyak slit.
The telescope used is an old Celestron Nexstar 80mm f5 refractor. While
trying to focus the system I found that by stopping the telescope down to 25mm I
was able to achieve good focus and contrast. A ND.9 filter is used as an ERF at
the aperture of the telescope thus reducing the 80 mm to 25 mm.
SharpCap is used to record the scans and INTI
(Valerie
Desnoux) is used to process
the scans and produce the final image. Typically a scan rate of 8X the sidereal
rate is used producing about 850 images at an exposure of 4.5ms.
Currently I am interested in the H alpha line at 6563 A for the
chromoshperic images and the sodium Na lines at 5895A and 5889A for the “white
light” photoshperic images that are taken in succession. This allows one to see
the placement of any sunspots to their corresponding chromosphere activity.
I would like to thank, Ken Harrison, Fulvio Mete,
Hamish Barker, Tony Rodda and Valerie
Desnoux
for their helpful comments and Christian Buil for the excellent design of the
Sol’Ex… truly international effort.
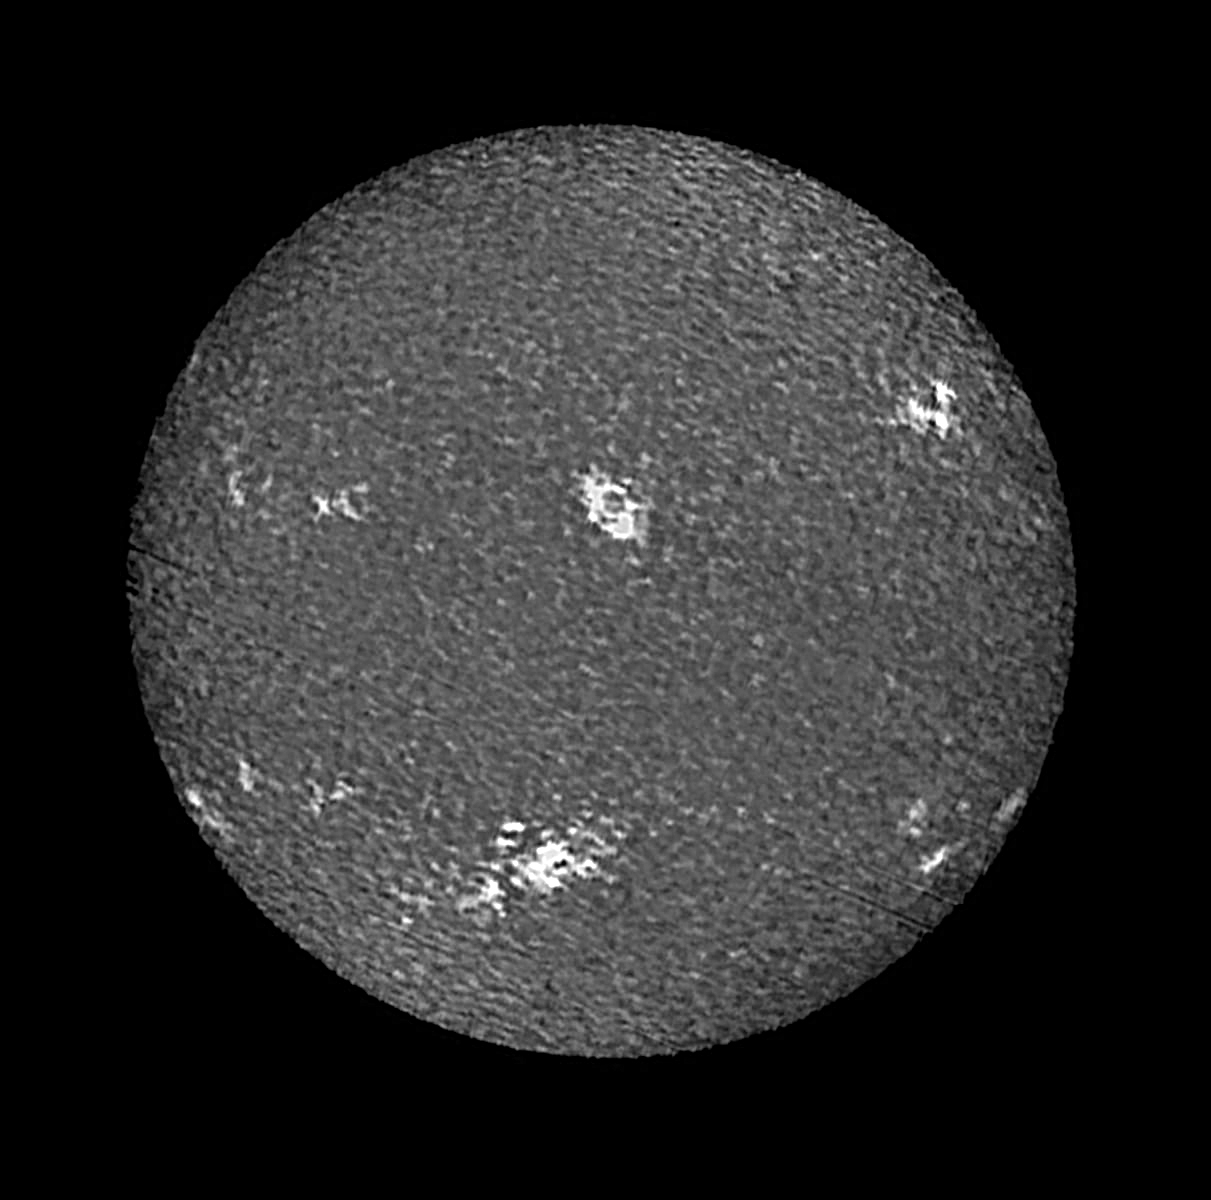
The Sol'EX Spectrograph
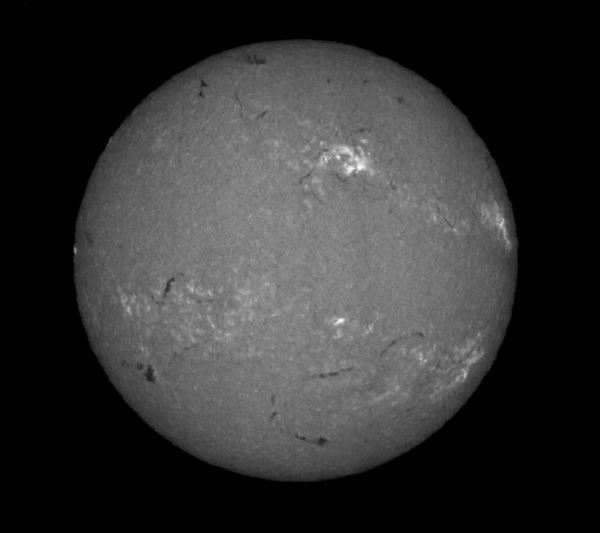
A Halpha 6563 A image obtained with the spectrograph on 10 Feb 2022
L