Strumentazione astronomica
Astronomy Instruments
Rupert Powell - York (UK)
01.04.2017
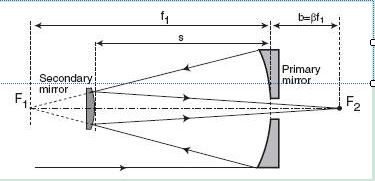
Costruzione di un Ritchey Cretien da 250 mm
Making a 250 mm Ritchey Cretien
First motivation for building a telescope was that there are some really
serious scopes from manufacturers such as Optical
Guidance Systems and RCOS,
as well as some unusual designs from small scale manufacturers, such as OfficinaStellare and Dream
Scopes.
The big stumbling block for all these scopes is PRICE! Not only the cost of the
basic OTA but also the cost of the mounts and all the accessories soon adds up
to the cost of a decent family car. Way out of my league!
My second motivation for building my own design was to have a scope that
could take accessories and be developed over a period of time to perform more
and different things, such as visual and photographic and maybe in the future
spectography and photometry. The BIG scopes are designed from the start to
take a host of instruments and I wanted a scope like that, but one that I could
afford and could fit in my shed such that my wife didn't say "....and where are
you going to keep that?"
I
soon realised that my design of choice was the Ritchey Chretien, which at the
time I knew little about. In fact the name was not very often heard until Meade
tried to hijack the name for their (then) newly released RCX400. At the launch I
was in the depths of researching about RC designs and even I knew then that they
were stretching it a bit with their RC claims...anyhow that's a different
conversation and one that the courts have resolved. Read
more at the link:
La mia
prima motivazione per la costruzione di un telescopio fu il fatto
dell’esistenza di telescopi di ottima qualità e di design avanzato prodotti da
ditte serie come OGS e RCOS, così come Officina Stellare and Dream Scopes.L’unico
fattore negativo di tali strumenti è il prezzo, che , tra il costo dell’OTA e di
una montatura adeguata supera quello di un’auto per la famiglia.
La mia seconda motivazione è stata quella di realizzare uno strumento con un
progetto personale che potesse in seguito essere modificato e sviluppato per usi
diversi, sia in campo visuale che fotografico ed eventualmente per future
applicazioni in fotometria e spettroscopia.Volevo inoltre un telescopio grande
come quelli citati, ma anche affidabile ed adeguato alle mie esigenze, anche di
collocazione fisica, senza che mia moglie dovesse dire: “dove pensi di mettere
quest’affare?”.
Presto compresi che il progetto adeguato alle mie esigenze era quello del
Ritchey Cretien, sul quale a quel tempo conoscevo poco , e che non era molto
comune sino a quando la Meade decise di usare tale nome per il loro (all’epoca)
nuovo strumento RCX 400.Fu allora che cominciai ad interessarmi
ai design di RC ed alla progettazione di tali
telescopi……per saperne di più sulla realizzazione del mio RC da sogno andare al
link:
Fulvio Mete - Rome, Italy
01.01.2018
Spec 600
UP e Spec 600 EVO : l’evoluzione della specie
Spec 600 UP and Spec 600 EVO: the evolution of the species
Come ho ampiamente approfondito nel mio libro “Cenni di
spettroscopia astronomica amatoriale” il modo più facile, per i novizi della
spettroscopia, di accostarsi a questa affascinante branca dell’Astrofisica nel
campo della spettroscopia stellare è quello dell’uso di un reticolo di
diffrazione
a basso potere (100-200 l/mm) da usare in fascio convergente, ad una certa
distanza dal sensore di ripresa.Tale approccio si rivela vincente anche per
coloro che osservano sotto cieli semi inquinati, per raggiungere magnitudini
elevate
(14-15) con telescopi amatoriali di dimensioni medio-alte (30-40 cm).Ma se
l’uso dei reticoli in fascio convergente dà risultati ottimali,
perché allora utilizzare pesanti ed ingombranti , oltre che costosi,spettroscopi
a fenditura? La risposta è semplice ed articolata allo stesso tempo:
1-
nei reticoli usati nel
percorso ottico, che in pratica usano le dimensioni del disco di airy per
ottenere lo spettro, la qualità di questo dipende dal seeing e non può in alcun
modo essere adattato alla strumentazione usata, se non variando la distanza del
reticolo dal sensore per ottenere una dispersione ottimale.
2-
La sottrazione del fondo
cielo risulta più difficile, ed in alcuni casi problematica per il gran numero
di stelle e dei loro spettri presenti nell’immagine, che possono dare artefatti.
3-
Lo spettro della stella
d’interesse può, specie nel caso di campi stellari affollati, essere inquinato
da immagini di stelle e/o dei loro spettri molto vicini o sovrapposti allo
spettro dell’oggetto.
4-
La risoluzione è per forza di
cose molto bassa e, come detto, dipende dal seeing.
5-
La costanza e la ripetibilità
delle osservazioni sullo stesso oggetto attraverso il tempo viene parzialmente a
mancare, nonostante la calibrazione per la risposta.
Uno spettroscopio a fenditura permette di evitare tali
inconvenienti e di rendere possibile osservazioni costanti e ripetibili,
calibrate sull’utilizzo di una fenditura dimensionata in relazione al seeing del
luogo ed alla focale del telescopio usato, e, quel che più conta , di
aumentare la risoluzione sulla base del potere del reticolo
utilizzato a parità di altri fattori.Il vero problema, tuttavia, specie per
coloro che non sono certi del futuro interesse per questa affascinante ma non
banale branca dell’astronomia è il costo degli spettroscopi amatoriali
commerciali a fenditura, che in genere va da 2000 € in su.L’unica possibilità
alternativa è l’autocostruzione cd “intelligente”, ovvero non costruendo tutto
lo strumento ex novo, ma assemblando sulla base di un progetto componenti già
esistenti modificati per l’occasione, cosa che fa scendere di molto i costi
mantenendo nel contempo una relativa facilità di realizzazione.
As I have extensively studied in my book "An outline of amateur astronomical
spectroscopy" the easiest way, for novices of spectroscopy, to approach this
fascinating branch of Astrophysics in the field of stellar spectroscopy is the
use of a diffraction grating at low power (100-200 l / mm) to be used in a
converging beam, at a certain distance from the camera sensor. This approach
proves successful even for those who observe under polluted skies, to reach high
magnitudes (14-15) with amateur telescopes of medium-high dimensions (30-40 cm).
But if the use of converging beam gratings gives optimal results, why then use
heavy and cumbersome, as well as expensive, slit spectroscopes? The answer is
simple and articulated at the same time:
1- in the grating used in the optical path, which in practice use the airy disk
size to obtain the spectrum, the quality of this depends on the seeing and can
in no way be adapted to the instrumentation used, if not by varying the distance
of the grating from the sensor to achieve optimal dispersion.
2- The subtraction of the sky background is more difficult, and in some cases
problematic for the large number of stars and their spectra present in the
image, which can give artifacts.
3- The spectrum of the star of interest can, especially in the case of crowded
stellar fields, be polluted by images of stars and / or their spectra very close
to or superimposed on the spectrum of the object.
4- Resolution is necessarily very low and, as mentioned, depends on seeing.
5- The constancy and repeatability of observations on the same object over time
is partially lost, despite the calibration for the response.
A slit spectroscope allows to avoid such inconveniences and to make possible
constant and repeatable observations, calibrated on the use of a slit
dimensioned in relation to the seeing of the place and the focal length of the
telescope used, and, more importantly, to increase the resolution on the basis
of the power of the grating used to equal other factors. The real problem,
however, especially for those who are not sure of the future interest for this
fascinating but not trivial branch of astronomy is the cost of commercial slit
amateur spectroscopes, which it usually goes from € 2,000 upwards. The only
alternative is the so-called "intelligent" self-construction, ie not building
the whole new instrument, but assembling it -on the basis of a project - already
existing components modified for the occasion, which it greatly reduces costs
while maintaining a relative ease of implementation.
L’origine: Spec 600
The origins:
Spec 600
Un esempio emblematico è stato, nel mio caso,la
realizzazione di un progetto pensato da lungo tempo: uno spettroscopio costruito
attorno ad un grism (reticolo + prisma) con ottiche di corta focale in modo da
contenere gli ingombri
ed un modulo di guida con fenditure riflettenti,dispositivo che
permette di osservare e posizionare la stella d’interesse sulla fenditura. Il
grism, come si sa, permette di deviare i raggi diffratti da un reticolo, in modo
che lo spettro si osservi in linea con la fenditura, semplificando molto la
costruzione meccanica.Il vincolo è stato il costo, che non avrebbe dovuto
superare i 500 €.
Tuttavia grism già predisposti non sono rinvenibili presso i
grandi produttori di componenti scientifici (Edmund, Thorlabs,Newport, etc) e
solo casualmente e molto raramente possono trovarsi in macchine di surplus .Si
poneva quindi il problema di trovare un grism a basso costo.
Essendo da tempo cliente della nota ditta di materiale
scientifico inglese “Paton Hawksley” avevo messo gli occhi su un loro prodotto,
che mi sembrava alquanto valido e con un ottimo rapporto qualità/prezzo: uno
spettroscopio didattico per uso generale, (fisica, chimica, gemmologia etc) non
certo pensato per usi astronomici.Tale strumento era appunto costruito intorno
ad un “grism” da 600 l/mm di 12 mm ca di diametro, con un collimatore ed una
fenditura .Traguardando attraverso quello che sembrava un oculare, ma in realtà
era il grism stesso, e rivolgendo la fenditura verso l’oggetto d’interesse, se
ne poteva osservare lo spettro.
An emblematic example was, in my case, the realization of a long-thought
project: a spectroscope built around a grism (grating + prism) with short focal
optics in order to contain the dimensions and a guide module with reflective
slits device that allows to observe and position the star of interest on the
slit itself. Grism, as we know, allows to deviate the rays diffracted by a
transmission grating, so that the spectrum is observed in line with the slit,
greatly simplifying the mechanical construction. The constraint was the cost,
which should not have exceeded 500 €.
However, grismes already prepared can not be found at large producers of
scientific components (Edmund, Thorlabs, Newport, etc) and only casually and
very rarely can they find themselves in surplus machines. So the problem was to
find a low-cost grism.
Having long been a client of the well-known English scientific firm "Paton
Hawksley" I had my eyes on one of their products, which seemed to me very valid
and with an excellent quality / price ratio: an educational spectroscope for
general use, (physics, chemistry, gemmology etc) certainly not designed for
astronomical uses.This instrument was precisely built around a "grism" of 600 l
/ mm of 12 mm diameter, with a collimator and a slit. Looking through what
looked like an eyepiece, but in reality was the grism itself, and turning the
slit toward the object of interest, the spectrum is observed.
Lo strumentino - il cui acquisto consiglio comunque a
tutti per scopi didattici - è un cilindro di acciaio di 1.5 mm di spessore
dimensioni 25 x 105 mm, peso di 115 g, e dal prezzo veramente popolare ed
attraente,solo 66 £ (inizialmente ca 100 €, attualmente ribassato ad 80
€) e sembrava il candidato ideale per trovare il grism che cercavo.
Fatto l’acquisto, e provato il piccolo spettroscopio
che sembrava funzionare in modo eccellente (le righe di una lampada a basso
consumo erano nette e luminose in rapporto alle modeste dimensioni del
reticolo), si poneva il problema di come estrarre il grism, incorporato in una
cella di plastica dura che a sua volta era stata incollata nel tubo.Dopo alcuni
tentativi di estrazione con metodi dolci andati a vuoto, dovetti passare a
quelli duri, ovvero bloccare il tubo in una morsa ed usare un pappagallo per
idraulica e tutta la forza per estrarre il grism.Inutile dire che la cella
rimase segnata nella parte esterna, ma alla fine il grism fu estratto
intatto.Provvidi poi ad inserirlo in un barilotto di alluminio 42 x 0.75 di
lunghezza tale da potervi inserire anche il collimatore.Questo consistette , nel
primo modello, di un doppietto acro da 20 mm di D e 50 di focale posto a circa
50 mm dal piano del reticolo (la fenditura risultava a fuoco a tale distanza)
acquistato da Surplushed ad un prezzo ridicolo, ca 7 €
https://www.surplusshed.com/pages/item/L3678.html
In seguito, nello scorso ottobre 2017 ho sostituito il
doppietto con un obiettivo russo Industar 50 mm f 3.5, che dà un
campo più piano e minore coma ai bordi e che è costato quanto il
primo sul mercato dell’usato.Tra l’altro SShed ha parecchi obiettivi per
fotocopia che a breve distanza possono sostituire validamente quelli fotografici
ed il cui costo non supera in genere i 10 €.
https://www.surplusshed.com/category/Camera_Lenses
.
https://www.surplusshed.com/category/Lenses
Uno di tali obiettivi, da 32 mm f 3.5 , costo 6 € circa fu
usato all’inizio, e lo è tuttora, come ottica della camera.
https://www.surplusshed.com/pages/item/L13698.html
The instrument – whose purchase I would recommend to everyone for educational
purposes - is a 1.5 mm thick steel cylinder, dimensions 25 x 105 mm, weight 115
g, and the really popular and attractive price, only £ 66 (initially approx. €,
currently reduced to € 80) and seemed the ideal candidate to find the grism I
was looking for.
After the purchase, and tried the small spectroscope that seemed to work
in an excellent way (the lines of a low-consumption lamp were clear and bright
in relation to the modest size of the lattice), there was the problem of how to
extract the grism, incorporated into a hard plastic cell which in turn had been
glued into the tube. After a few extraction attempts with soft methods, I had to
switch to hard ones, that is, clamp the tube in a vice and use a hydraulic
parrot and all the strength to extract the grism.Needless to say that the cell
remained marked on the outside, but in the end the grism was extracted intact.I
then placed it in an aluminum barrel 42 x 0.75 in length such that it can also
insert the collimator.This consisted, in the first model, a 20 mm D and 50 focal
doublet placed at about 50 mm from the grating plane (the slit was in focus at
that distance) purchased from Surplushed ad a ridiculous price, ca € 7
https://www.surplusshed.com/pages/item/L3678.html
Later, in October 2017, I replaced the doublet with a Russian lens Industar 50 f
3.5, which gives a more plane field and less coma at the edges and that cost as
much as the first on the used market. Among other things, SShed several lenses
for photocopies that at a short distance can effectively replace photographic
ones and whose cost does not generally exceed 10 €.
https://www.surplusshed.com/category/Camera_Lenses
https://www.surplusshed.com/category/Lenses
One of these objectives, a 32 mm f 3.5, cost about € 6 was used at the
beginning, and still is, as a camera lens.
https://www.surplusshed.com/pages/item/L13698.html
Il costo complessivo (grism + ottiche) è quindi sinora
valutabile, ai costi attuali, in 80 + 13= 93 € circa +ss, diciamo circa 100 €.
Ma il pezzo più importante era la scatola con la fenditura ed il sistema di
guida.Ritenni allora opportuno usare il sistema multifenditura a piastra rotante
di 2 mm con 9 fenditure di diversa apertura usato dall’amico australiano Ken
Harrison per il suo L 200, un clone dell’LHires III. Tale accessorio, visibile
nella foto che segue, mi fu proposto da JTW astronomy, che produceva l’L200, a
150 €, prezzo che poi fu aumentato a oltre 230 €
per il secondo da me acquistato, e tuttavia ancora vantaggioso data
la notevole utilità della piastrina
porta fenditure rotante, e l’accessorio stesso era ben fatto e
molto robusto.Ora JTW astronomy non produce più questo componente quindi occorre
rinvenirlo nel mercato dell’usato oppure ricorrere ad una soluzione autarchica
per costruire il supporto del disco multi fenditure, supporto che meccanicamente
presenta
problemi di realizzazione.
The total cost (grism + optics) is therefore evaluable, at current costs, in 80
+ 13 = € 93 approximately + ss, say about € 100. But the most important piece
was the box with the slit and the guide system. You should then use the 2 mm
rotating plate multi-plate system with 9 slits of different opening used by the
Australian amateur Ken Harrison for his L 200 spectroscope, a clone of the Lires
III. This accessory, visible in the picture that follows, was proposed to me by
JTW astronomy, which produced the L200, at € 150, price that was then increased
to over € 230 for the second purchased by me, yet still advantageous given the
considerable usefulness of the rotating slit holder plate, and the accessory
itself was well made and very robust. Now JTW astronomy no longer produces this
component so you have to find it in the used market or fall back to an autarchic
solution to build the multi-slit disc support, support which mechanically
presents problems of realization.
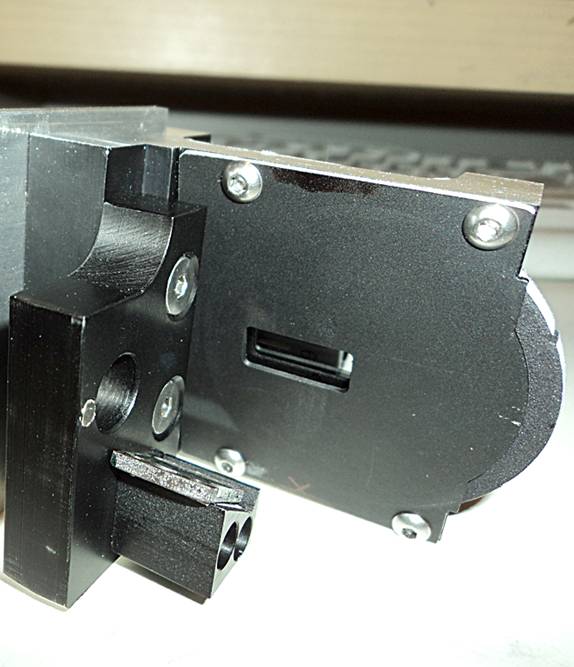
Nell’immagine che precede il modulo di guida multi fenditura
dell’L200 di Ken Harrison: la cella della piastrina multi fenditura, zigrinata,
può essere fatta ruotare con un dito, innestando fenditure di diversa ampiezza
in frazioni di secondo, adattando lo strumento ad eventuali cambiamenti di
seeing o di setup.L’accessorio è robusto , ma deve essere adattato ad un box
apposito.Nel primo modello dello strumento ho usato un quadratino di alluminio
da 6 cm di lato e 3 mm di spessore forato e filettato 42x0.75 su tre facce.Lo
stesso presentava due tappi di chiusura laterali sagomati per la piastrina
inclinata di ca 15°.Completava il box un portaoculari da 31.8.Il quadratino di
alluminio era già in mio possesso ed è stato fatto da me filettare, con un costo
di 30 €, mentre altri 70 € sono andati per il porta oculari, ed i tubi di
alluminio di raccordo 42 x 0.75, in tutto 100 € circa.
In the image that precedes the multi-slit guiding module of the L200 by Ken
Harrison: the cell of the multi-slit plate can be rotated with a finger,
inserting slits of different widths in fractions of a second, adapting the
instrument to any changes of seeing or setup.The accessory is sturdy, but must
be adapted to a special box.In the first model of the instrument I used a square
of aluminum 6 cm side and 3 mm thick drilled and threaded 42x 0.75 on three
faces. The same had two side-shaped closing plugs for the plate inclined to 15 °
C.The box was completed by a 31.8 eyepiece holder. The square of aluminum was
already in my possession and was made by me to thread, with a cost of € 30,
while another € 70 went for the eyepiece holder, and the aluminum connecting
tubes 42 x 0.75, around € 100 approximately.
Naturalmente tutto il modulo si presenta estremamente solido
ed in grado (come dev’essere) di sostenere pesi anche di un certo livello (la
restante parte dello spettroscopio,la camera di imaging e quella di guida.La
possibilità di flessioni con le camere CCD di modesto peso o DSLR è remota.
Alla base del porta oculari è stata inserita una lente di
rinvio, un doppietto acro da 20 mm di D e 50mm di focale, dal costo di 5 €.
Naturally, the whole module is extremely solid and able (as it must be) to
support weights of a certain level , as the remaining part of the spectroscope,
the imaging camera and the guide camera. The possibility of bending with the
light weight CCD cameras or DSLR is remote.
At the base of the eyepiece holder was a relay lens, a 20 mm D and 50mm focal
acro doublet, costing € 5.
La piastrina multi fenditure riflettenti è contenuta nel
modulo di guida, ma può comunque essere acquistata a parte dalla OVIO, ditta
francese del settore e costa 46 € : essa porta 9 fenditure da 100 a 20 micron
selezionabili con una semplice rotazione , anche durante le riprese CCD, ed
adatte in pratica a tutte le focali ed i sistemi di guida
https://www.ovio-optics.com/produits/composants/jetons-et-objets-de-diffraction.html.
La Ovio è stata tuttavia recentemente incorporata nella
francese Jeulin, per cui occorrerà rivolgersi a tale ultima ditta per acquisire
la piastrina multi fenditura di che trattasi, che al momento, con la nuova
gestione, viene venduta insieme ad altri tre pezzi, che non
interessano.Occorrerà quindi richiedere alla ditta la vendita della sola
piastrina.
https://en.jeulin.fr/en-products/physics-chemistry/optics/optical-components-common-equipment.html
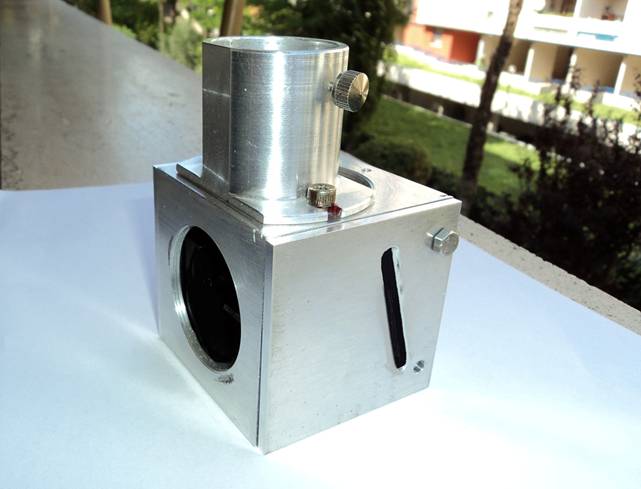
Nell’immagine sottostante Spec 600 nella sua veste
finale,(ottobre 2017) con un collimatore Industar 50 f 3.5 , la camera di
imaging ATIK 16 HR (peso 500 g) e quella di guida SX Lodestar (100g)
The reflective multi-slit plate is contained in the guide module, but can still
be purchased separately from OVIO, the French company in the sector and costs €
46: it carries 9 slits of 100 to 20 micron selectable with a simple rotation,
even during taking CCD images, and suitable in practice at all telescope focal
lengths and driving systems
https://www.ovio-optics.com/produits/composants/jetons-et-objets-de-diffraction.html.
However, the Ovio has recently been incorporated into the French firm Jeulin, so
it will be necessary to contact this last company to acquire the multi-slit
plate, that actually is sold in bundle with three others plates, that don’t have
interest for our purposes.It will be necessary to ask the Company to sell the
multi slit plate only.
https://en.jeulin.fr/en-products/physics-chemistry/optics/optical-components-common-equipment.html
In the image below Spec 600 upgraded in its final appearance, (October 2017)
with an Industar 50 f 3.5 collimator, the ATIK 16 HR (weight 500 g) and the SX
Lodestar guide camera (100g)
Facendo i conti finali, lo spettroscopio mi è costato:
ca 100 € il corpo, (ottiche + grism) + 150 € il modulo
di guida,100 € il box di alluminio, porta oculari e raccordi, 5 € per l’ottica
di rinvio nel modulo di guida,30 € l’elicoide non rotante necessario per
focheggiare la camera; in tutto 435 € circa.Un prezzo più che accettabile per
uno strumento capace di sfoderare ottime prestazioni e di struttura
sufficientemente robusta (l’unico neo è stato il componente finale, l’ elicoide
non rotante che unisce lo spettroscopio alla camera ed al cui interno è stato
inserito l’obiettivo della camera da 32 mm di focale, che
presenta una lievissima flessione, comunque ancora ininfluente
sulla resa finale a patto di non usare camere di peso superiore a 900 g circa).
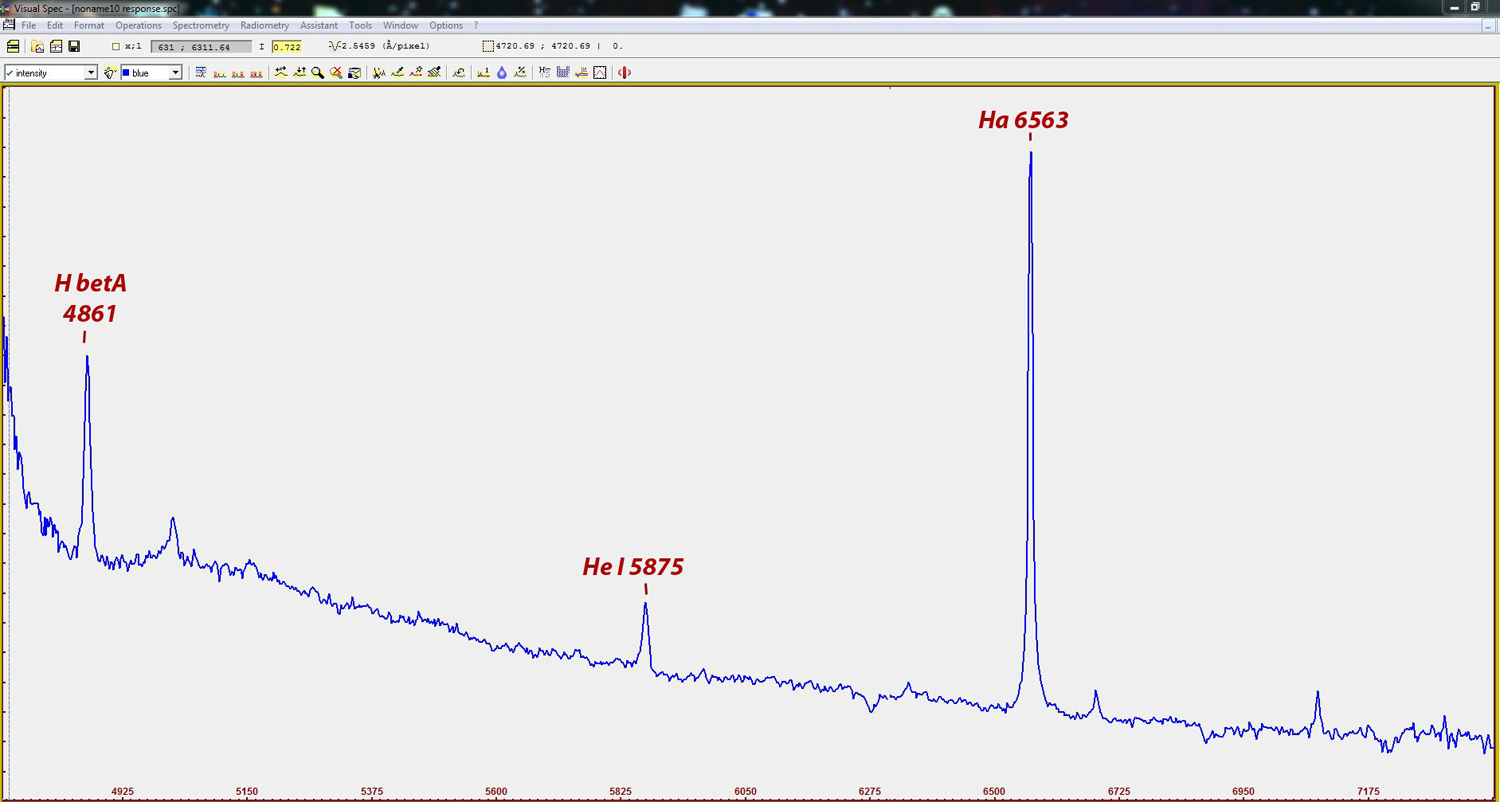
Testando lo strumento indoor su una lampada a basso
consumo (con ingresso formato da un foro stenopeico da 1 mm per simulare
grossolanamente l’immagine stellare)
si ottiene il profilo spettrale che segue dal quale è possibile
ricavare i dati fondamentali dello strumento stesso, utilizzando una camera (Atik
16 HR) con sensore Sony ICX 285 AL
con pixel da 6.4 micron.La dispersione è stata di 2.4 A/pixel e la
risoluzione max ottenuta sulla riga a 5789 A è stata di ben 1564 con una
fenditura da 25 micron, anche se la risoluzione media (misurata sulla Fwhm di
tutte le righe dal
blu al rosso) è stata di 735.Naturalmente si tratta di una risoluzione in
condizioni di laboratorio, che non tiene conto degli effetti del seeing e della
air mass,ma comunque ottima per il reticolo usato, merito anche delle ottiche
impiegate.
In the final accounts, the spectroscope costed me:
100 € the body, (optics + grism) + 150 € the driving module, 100 € the aluminum
box, eyepieces and fittings, € 5 for the optics of reference in the driving
module,30 € the not rotating helical focuser that assures the focusing of the
camera, altogether € 435 approx. A price that is more than acceptable for an
instrument capable of striking excellent performance and a sufficiently robust
structure (the only flaw was the final component, a non-rotating helicoid that
joins the spectroscope to the camera and inside which the objective of the 32 mm
focal length camera, which presents a very slight bending, however still
irrelevant to the final yield using cameras of weight less than 1 kg).
By testing the indoor instrument on a low-consumption lamp (with an input from a
1 mm pinhole to simulate the stellar image), the following spectral profile is
obtained from which it is possible to obtain the fundamental data of the
instrument itself, using a camera (Atik 16 HR) with Sony ICX 285 AL sensor with
6.4 micron pixel. The dispersion was 2.4 A / pixel and the maximum resolution
obtained on the line at 5789 A was well 1564 with a 25 micron slit, although the
average resolution (measured on the Fwhm of all lines) was 735. Of course it is
a resolution in laboratory conditions, which does not take into account the
effects of seeing and air mass, but still excellent for the used grating, thanks
also to the optics used.
Lo spettro di PCygni , ottenuto con lo strumento in
questione, una fenditura da 40 micron, e 240 sec di integrazione su un Celestron
8 ridotto a f 6.3.
The spectrum of PCygni, obtained with the instrument, a 40 micron slit and 240
secs of integration with a Celestron 8 at f 6.3.
Tra l’altro lo strumento è completamente modulare, nel senso
che può essere completamente smontato nei suoi componenti: grism, ottiche, e
modulo di guida, in una manciata di secondi.
Allo stesso, che del resto ho già usato sul campo da
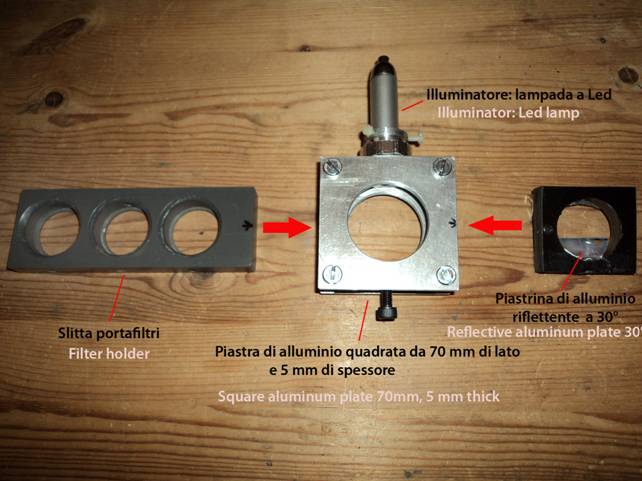
tempo, ho aggiunto anche un accessorio utile, che , pur non essendo
obbligatoriamente utilizzabile, ne estende il campo di applicazione: un porta
slitta di alluminio formato da due piastre di alluminio da ben 5 mm di spessore,
al cui interno può essere alloggiato un illuminatore del campo inquadrato, utile
sia per
individuare l’immagine della fenditura attraverso la camera di guida sotto
cieli molto bui, sia per la flat (con diverso illuminatore).Dentro il porta
slitte può anche essere alloggiata una slitta a tre componenti per l’uso di
filtri da 31.8 mm.
Il sistema , anch’esso modulare, consiste, come si è
accennato, di un porta slitta di alluminio da 70 mm di lato e 5 mm di spessore,
capace di sostenere senza alcuna flessione pesi di oltre 6-7 kg che reca su
entrambi i lati un foro
filettato femmina 42 mm x 0.75 (per essere quindi applicato al
modulo di guida occorre un anello maschio-maschio 42x 0.75).Nel vano del porta
slitta può essere inserito sia una slitta porta filtri da 31.8 di PVC con
capacità di 3 filtri, sia un modulo di illuminazione del campo inquadrato,
formato da un foglietto di alluminio riflettente da 0.5 mm posto angolato a 30°
circa, di dimensioni tali da non occultare il fascio di luce proveniente dal
telescopio, ma comunque atto a diffondere in direzione della fenditura la luce
proveniente da una piccola lampada a led posta perpendicolarmente allo
stesso.Quest’ultimo permette una visione completa della
fenditura anche con cieli molto bui e con pose di 1 sec o meno, facilitando di
molto la
precisa collocazione su di essa della stella o dell’oggetto del quale si
vuole riprendere lo spettro.Il sistema porta filtri in ingresso (tra il
telescopio e lo spettroscopio) si renderebbe necessario in quanto nella
configurazione meccanica descritta la camera è unita allo spettrografo
direttamente col suo attacco femmina 42 x0.75, e non mediante un attacco maschio
da 31.8 o 50.8 al quale poter applicare i filtri eventualmente necessari.Il
costo aggiuntivo di tale accessorio, comunque, ripeto, non
indispensabile, si
aggira sui 70 € compresa la piccola lampada portatile a led made in China (2
€).
Among other things, the instrument is completely modular, in the sense that it
can be completely disassembled into its components: grism, optics, and driving
module, in a matter of seconds.
At the same time, , I have also added to it (I have already used in the
field for some time) a useful accessory, which, although not necessarily usable,
extends its field of application:a filter holder consisting of two aluminum
plates of 5 mm thick, inside which
it can be housed a
framed field illuminator, useful both to identify the image of the slit through
the driving camera under very dark skies, and for the flat (with different
illuminator) and also a three-component sliding PVC
filter holder for
the use of 31.8 mm filters.
The system, which is also modular, consists, as has been mentioned, of two
aluminum plates of 70 mm on the side and 5 mm thick, able to support without any
bending weight over 6-7 kg with on both sides a female threaded hole 42 mm x
0.75 (to be applied to the guide module, a male-male ring 42x 0.75 is required).
In this can be housed the PVC filter holder with capacity of 3 31.8 filters, or
a module of illumination of the framed field, formed by a 0.5 mm reflective
aluminum foil placed angled at about 30 °, of dimensions such as not to
interfere with the beam of light coming from the telescope, but still able to
spread in the direction of the slit the light coming from a small led lamp
placed perpendicular to the same. The latter allows a complete view of the slit
even with very dark skies and with poses of 1 sec or less, greatly facilitating
the precise positioning of the slit itself of the star or object of which you
want to image the spectrum.The input filter holder system (between the telescope
and the spectroscope) would be necessary because in the mechanical configuration
described the camera is joined to the spectrograph directly with its female
attack 42 x0.75, and not through a 31.8 or 50.8 male connection to which you can
apply the necessary filters.The additional cost of this accessory, however,
again, not essential, is around 70 € including the small portable LED lamp made
in China (€ 2) .
Lo strumento è ottimizzato per un fascio in ingresso
dal telescopio di rapporto F/D tra f 4 e f 7, e quindi, nel caso di utilizzo con
strumenti Schmidt Cassegrain, si impone l’uso di un riduttore di focale; il suo
peso è di 1.5 Kg comprese
le camere CCD , di ripresa e di guida (ca 900 g senza le camere).
The instrument is optimized for an input beam from the telescope of F / D ratio
between f 4 and f 7, and therefore, in case of use with Schmidt Cassegrain
instruments, the use of a 6.3 or less focal reducer is required; its weight is
1.5 kg including the CCD cameras, shooting and driving (about 900 g without
cameras).
L’evoluzione: Spec 600 EVO
The evolution:
Spec 600 EVO
Tuttavia, come succede spesso nella vita, un’iniziativa di
successo tende ad essere ripetuta nella speranza di ulteriori miglioramenti.Nel
mio caso il progetto Spec 600 era già sufficientemente evoluto ed i punti deboli
pochi; ciònonostante ho cercato di individuarli ed eliminarli.
1-
La camera usata era l’Atik 16
HR (sorella anziana della recente Atik 314 L), che presenta il suo vantaggio
maggiore nel peso di soli 500 g: mettere al suo posto camere CCD di 1.5 Kg come
le Sbig serie ST, ad esempio, era da escludersi.
2-
l’ottica della camera,
seppur di buona qualità, non era eccezionale e quindi poteva
essere sostituita da altra di migliore qualità ottica.
L’idea era quindi quella di una struttura estremamente rigida
e priva di flessioni: un tank spettroscopico, ovviamente di maggior peso del
precedente ma capace di poter essere utilizzato anche con camere CCD di maggior
peso e dimensioni.
L’unico punto debole della struttura di Spec 600 era il
focheggiatore ad elicoide non rotante posto nel punto di attacco alla camera:
questo , pur essendo sufficientemente robusto per pesi sino a 900 g circa,
rischiava di flettersi per pesi maggiori.Occorreva quindi un sistema di
focheggiatura più solido.Sarebbe stato inoltre opportuno un sistema di
focheggiatura del collimatore sulla fenditura, nel modello precedente settato e
bloccato.Necessitava, infine un sistema di irrigidimento di tutta la struttura.
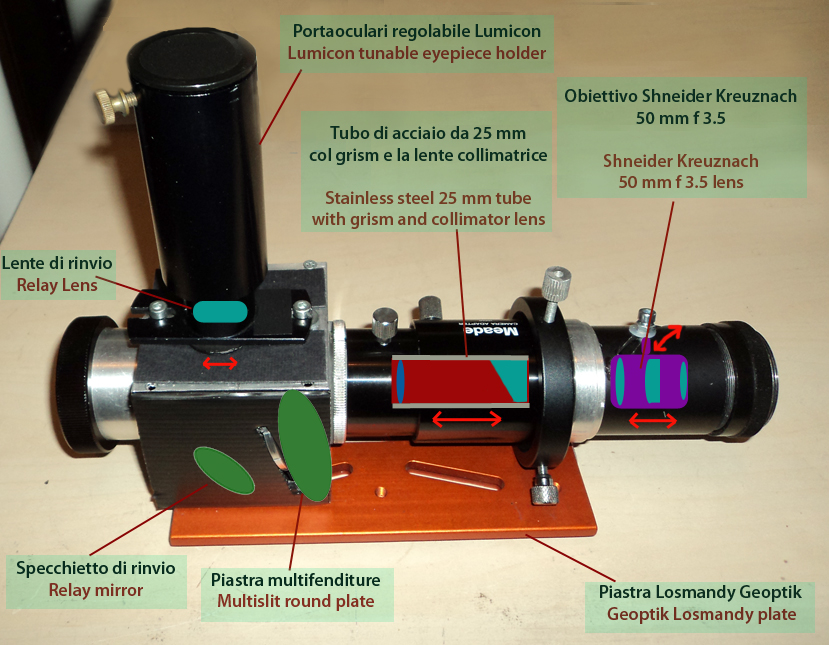
Una novità sostanziale del nuovo modello rispetto al
precedente è stata quella del
diverso utilizzo dello spettroscopio educativo di Paton Hawksley: se
in precedenza mi ero limitato ad estrarre dal tubo il grism,lasciando tubo,
fenditura e collimatore, stavolta ho fatto il contrario: ho estratto e lasciato
da parte la fenditura, utilizzando il tubo in acciaio da 25 mm di diametro x 1.5
mm di spessore col grism ed il collimatore.Per facilitare la messa a fuoco di
quest’ultimo sulla piastra con la fenditura il tubo in acciaio è stato inserito
in un sistema per ripresa planetaria in proiezione di oculare Meade acquistato a
suo tempo
in una svendita del nuovo all’incredibile prezzo di 15 € (ne acquistai
infatti 2): Questo consta infatti di tue tubi da 5 mm circa di spessore e
permette lo scorrimento l’uno nell’altro con viti di fissaggio.Una volta
ottenuta la focheggiatura sulla fenditura e bloccate le viti, il tutto è di una
rigidità assoluta.
Circa il
sistema di focheggiatura dell’ottica della camera ho adottato
quello più semplice e robusto esistente: un tubo di alluminio di ben 6 mm di
spessore con una fresatura inclinata longitudinale, nella quale era inserito un
pomello con una vite da 4 mm con dado di blocco a sua volta collegata ad un tubo
interno di 31.8 mm di diametro interno, in cui era stato inserito e fissato
l’obiettivo della camera, un eccellente obiettivo fotografico di surplus
Shneider Kreuznach da 50 mm f 3.5 (Shneider, come
si sa, faceva ottiche per Zeiss e Leica).Lo scorrimento del pomello
avanti ed indietro muove l’obiettivo in un senso o l’altro rispetto alla camera.
However, as often happens in life, a successful initiative tends to be repeated
in the hope of further improvements. In my case the Spec 600 project was already
sufficiently evolved and with few weak points; nonetheless I tried to identify
them and eliminate them.
1- The used camera was the Atik 16 HR (older sister of the recent Atik 314 L),
which has its biggest advantage in the weight of only 500 g: putting in its
place CCD cameras of 1.5 kg as the Sbig ST series for example, it was to be
excluded.
2- the optics of the camera, albeit of good quality, was not exceptional and
therefore could be replaced by another of better optical quality.
The idea was therefore that of an extremely rigid structure without bending: a
spectroscopic tank, obviously of greater weight than the previous one but
capable of being used also with CCD cameras of greater weight and size.
The only real weak point of the Spec 600 structure was the non-rotating helical
focuser placed at the point of attachment to the camera: this, although
sufficiently robust for weights of up to 900 g, risked flexing for greater
weights.A more solid focusing system on the camera should be preferable. It
would also have been appropriate to have a focusing system of the collimator on
the slit, in the previous model set and locked. Finally, a system of stiffening
of the whole structure was required.
A substantial novelty of the new model compared to the previous one was the
different use of the educational spectroscope by Paton Hawksley: if I had
previously limited myself to extracting the grism from the tube, leaving the
tube, slit and collimator, this time I did the opposite: I extracted and left
the slit aside, using the steel tube 25 mm diameter x 1.5 mm thick with grism
and collimator.To facilitate the focusing of the latter on the plate with the
slit the steel tube was inserted in a Meade system for planetary imaging in
projection of eyepiece purchased at the time in a sell-off of the new incredible
price of 15 € (I bought 2): This consists of two tubes of about 5 mm thick and
allows scrolling one with the other with fixing screws. Once the focus on the
slit is obtained and the screws are locked, the whole device is of absolute
rigidity.
About the focusing system of the camera optics I have adopted the simplest
and most robust existing one: a 6 mm thick aluminum tube with an inclined
longitudinal milling, in which was inserted a knob with a 4 mm screw with nut
block in turn connected to an inner tube of 31.8 mm of internal diameter, in
which had been inserted and fixed the camera lens, an excellent surplus
photographic lens Shneider Kreuznach
50 mm f 3.5 (Shneider,
as we know, did optics for Zeiss and Leica) .The sliding of the knob back and
forth moves the lens in one direction or the other with respect to the camera.

Il layout dello strumento è quindi il seguente: la
piastra Losmandy inferiore aggiunta con fissaggio alla scatola di guida ed ad un
anello con viti regolabili a finale in teflon (per evitare flessioni non volute)
e l’attacco al telescopio (SC
da 50 mm corto e spesso) dà al tutto una solidità
estrema.Lostrumento ora può reggere senza alcun problema di flessione camere di
1.5-2.5 Kg tipo Sbig ST o STL.
The layout of the instrument is therefore the following: the lower Losmandy
plate added with fixing to the guide box and to a ring with adjustable teflon-ending
screws (to avoid unwanted
bending) and the attachment to the telescope (short 50 mm SC and often) gives to
the whole instrument an extreme solidity. The structure can now hold without any
problem of bending cameras of 1.5-2.5 Kg of weight as Sbig ST or STL series.
Il costo complessivo si è mantenuto praticamente lo stesso
del precedente, essendo stato usato materiale di usato o di surplus.
Il test di messa a fuoco della camera Sbig ST 8300 ,
sensore Kodak KAF 8300 con pixel da 5.4 micron sulla solita lampada a basso
consumo, con un apertura delle fenditura da 25 micron ha dato il risultato
mostrato nel profilo dell’immagine seguente, ottenuto con VSpec. La dispersione
è stata di 1.38 A/pixel
e la risoluzione R, sulla riga a 5789 A, ha raggiunto il notevole
valore, per uno spettrografo a bassa risoluzione, di 1630.
The total cost remained practically the same as the previous one, since used or
surplus material was used.
The focusing test of the Sbig ST 8300 camera,with a Kodak KAF 8300 sensor with
5.4 micron pixels on the usual low-consumption lamp, with a 25 micron aperture
slit gave the result shown in the following image profile, obtained with Visual
Spec software.Dispersion was 1.38 A/pixel and resolution, measured on the line
at 5879 A,was of 1630.
L’unico punto problematico, per chi volesse auto costruirsi
lo strumento, è il modulo di guida che, data l’indisponibilità attuale di quello
a piastra con fenditure rotanti dell’L 200, va sostituito con altri
componenti.Il supporto in alluminio delle ottiche, in particolare, risulta
difficile da realizzare.
Allora le possibilità sono le seguenti:
1-
Acquistare la piastrina
OVIO a fenditure multiple, far fare una cella di PVC alla stessa ed
inserire il tutto in una controcella inclinata di 15° che permetta la rotazione
frizionata della piastrina e delle fenditure.Tale controcella deve avere un foro
rettangolare centrale , in modo da fare arrivare la luce al collimatore :il foro
deve ovviamente essere centrato rispetto all’apertura del box di supporto e
della lente del collimatore.Questo comporta che la piastrina con la sua cella va
montata fuori asse, in modo da far corrispondere le fenditure al foro
centrale.In tal caso lo specchietto di rinvio deve avere un’inclinazione di 30°
(30+15 = 45).
2-
Acquistare una fenditura
fissa a diversa apertura per l’Alpy di Shelyak (costo € 160), oppure un modulo
quadrato di 4 fenditure riflettenti per LISA e LHiresIII che seleziona le
fenditure per rotazione (costo 175 €) e fare un supporto inclinato piegando un
listello di alluminio da 1.5 mm.
3-
Per inciso,il listello
di alluminio potrebbe avere una doppia piegatura, (10 e 35° nel caso di Shelyak,
o 15-30°
nel caso dell’L200) in modo da alloggiare sia la fenditura riflettente che
lo specchietto di rinvio.
The only problematic point, for those who want to self build the instrument, is
the driving module that, given the current unavailability of the plate with
rotating slits of the L 200, must be replaced with other components.The aluminum
support of the optics in particular, it is difficult to achieve.
Then the possibilities are the following:
1- Acquire the OVIO plate with multiple slots, make a PVC cell to the same and
insert the whole into a counterclock inclined 15 ° that allows the frictioned
rotation of the plate and slits.Tale counter-cell must have a rectangular
central hole, to let lighting of collimator: the hole must obviously be centered
with respect to the opening of the support box and the lens of the collimator.
This means that the plate with its cell must be mounted off-axis, so as to match
the slits to the central hole. In this case the relay mirror must have an
inclination of 30 ° (30 + 15 = 45).
2- Purchase a fixed slit with different opening for the Shelyak Alpy (cost €
160)or a 4 reflective slits module of LISA or LHiresIII mounted on a square
support and selectable by rotation (cost 175 €) and mount them on a 1.5 mm
inclined aluminium strip.
3- Incidentally, the aluminum strip may have a double fold, (10 and 35 ° in the
case of Shelyak, or 15-30 ° in the case of the L200) so as to house both the
reflective slit and the return mirror.
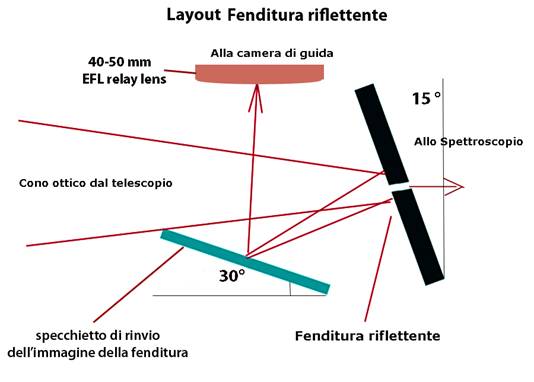
Il layout del modulo di guida (configurazione L200) sarebbe
quello indicato nella figura che segue:
The layout of the guiding module (L200 configuration) should be that of the
following image:
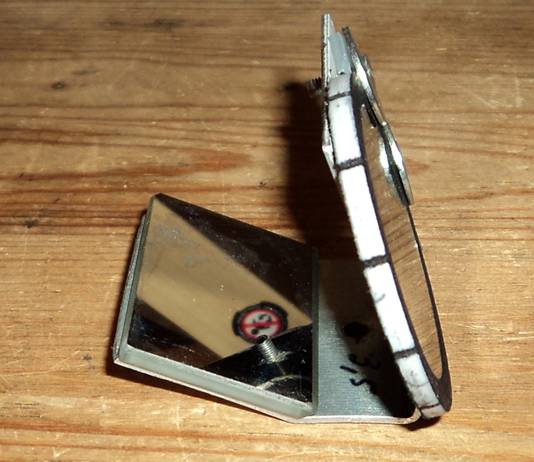
La soluzione con la piastrina riflettente ed il listello di
alluminio da 1.5 mm piegato: appare assolutamente provvisoria, ma funziona.
The solution with a folded 1.5 mm aluminum strip : it may appear absolutely
temporary, but it works.
E’intervenuta, nel frattempo, la soluzione proposta
dall’astrofilo Paul Gerlach, il quale tra l’altro ha anche messo on line un
interessante progetto di spettroscopio realizzato con la stampa 3D e con un
supporto plastico (PLA o altro) chiamato Low Spec.
https://www.thingiverse.com/thing:2455390
La soluzione di Gerlach riguarda il supporto della piastrina
multi fenditure dell’L 200
Realizzato sempre in stampa 3D di un supporto plastico.
In the meantime, the solution proposed by the amateur astronomer Paul Gerlach
intervened, who also put online an interesting spectroscopy project realized
with 3D printing and with a plastic support (PLA or other) called Low Spec .
https://www.thingiverse.com/thing:2455390
Gerlach's solution concerns the support of the L 200 multi-slit plate
Made always in 3D printing of a plastic support.
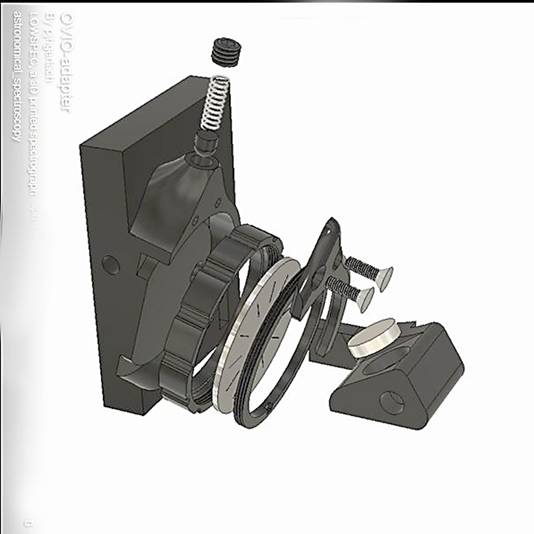
Proprio in questi giorni Gerlach sta aggiornando i files STL
del suo progetto in modo da rendere disponibile anche la stampa del supporto in
plastica della piastrina multi fenditure.Trattandosi di due o tre pezzi ,
dovrebbe essere possibile senza problemi farla stampare in un centro
specializzato , anche per coloro che non possiedono o non intendono acquistare
una stampante 3D, ed in tal modo sarebbe risolto il problema del supporto della
piastrina multifenditure .
In these days, Gerlach is updating the STL files of his project in order to make
the plastic support of the multi-slit plate also available.This , being of 2-3
pieces only, can be printed at a specialized 3D center, without buying a 3D
printer, and in this case the problem of the multi slit plate holder will be
fixed.
I componenti del modulo di guida, comunque assemblati,
andranno poi alloggiati nel box di alluminio quadrato da almeno 3 mm di
spessore, da 60 o 70 mm di lato esterno a seconda del layout scelto (quello per
la piastrina rotonda dovrebbe essere da 70 mm per lasciare un minimo di gioco),
mostrato in una figura precedente .Quadratini di alluminio di tale spessore si
trovano con una certa facilità e possono essere tagliati alla misura prevista.
L’elemento andrà poi forato e filettato femmina 42 x 0.75 su 3 lati ed un tappo
laterale di chiusura andrà poi fresato in modo da far passare la cella della
piastrina multi fenditure inclinata.In ogni caso consiglio di acquisire e
lavorare il box solo dopo aver lavorato i componenti da alloggiare in esso ed
aver determinato le misure relative, per essere sicuri delle dimensioni del box
stesso
Finisce qui questo lavoro, con il quale ho inteso prospettare
un’interessante possibilità di ottenere uno spettroscopio amatoriale a fenditura
a bassa-media risoluzione compatto, di peso contenuto ed estremamente robusto
con una spesa contenuta.
The components of the guide module, however assembled, will then be housed in
the square aluminum box of at least 3 mm of thickness, from 60 or 70 mm of
external side ,depending on the layout chosen, shown in a previous figure.
Aluminum square are found with some ease and can be cut to the expected size.
The element will then be drilled and threaded female 42 x 0.75 on 3 sides and a
lateral closing cap will then be milled so as to pass the cell of the sloping
multi-slit plate.
In any case, I advise you to acquire and work the box only after having worked
the components to be housed in it and have determined the relative measures, to
be sure of the dimensions required to the box itself.
Here ends this work, with which I intend to present an interesting possibility
of obtaining a compact low-medium resolution slit amateur spectroscope, of
contained weight and extremely robust with a limited cost.
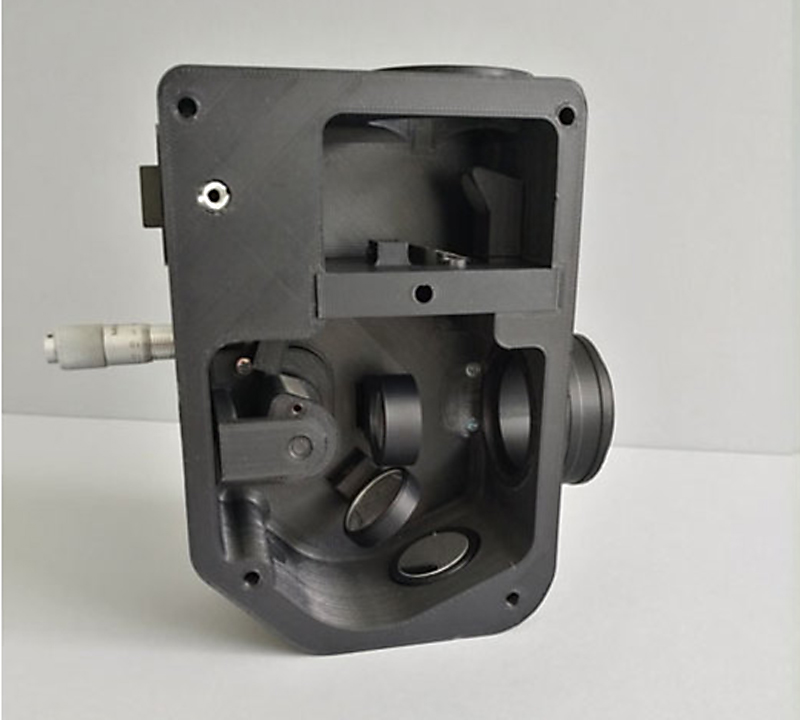
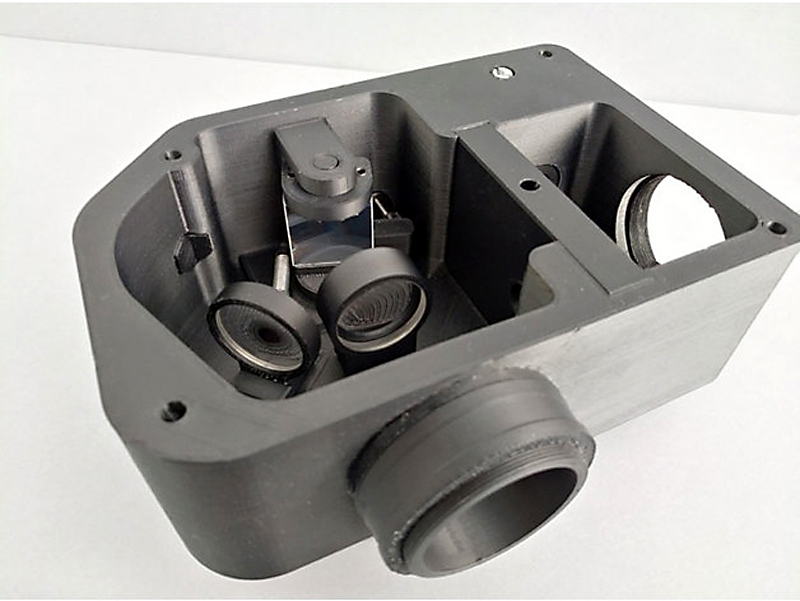
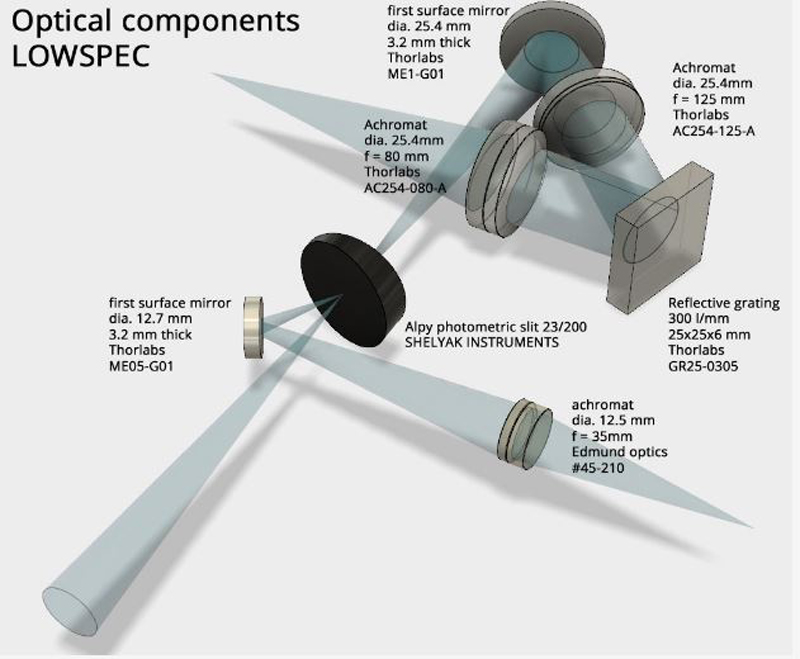
As you can see, the collimator's optical beam is "folded" to contain the dimensions, which are reduced.The collimator lens is an acro doublet 25.4 mm of aperture and 125 mm of focal lenght, while the camera optic is a 25.4 mm diameter doublet with a focal lenght of 80 mm. The guide module was designed for the use of the Shelyak Alpy's 23/200 micron slit, but, as it was seen in the previous topic in this same page, the author has also designed a guide module in which we can adapt the multislit plate OVIO.The instrument, taking into account the focal length of the collimator, appears optimized for a telescope with F / D focal ratio of 5-7.
At the following link, one can find the list of all the components of the structure, the STL files for printing,and the list of the hardware and optical components of the spectroscope.
.